
Enabling Inventory Tracking
Before you can manage inventory for a product, you must enable inventory tracking.
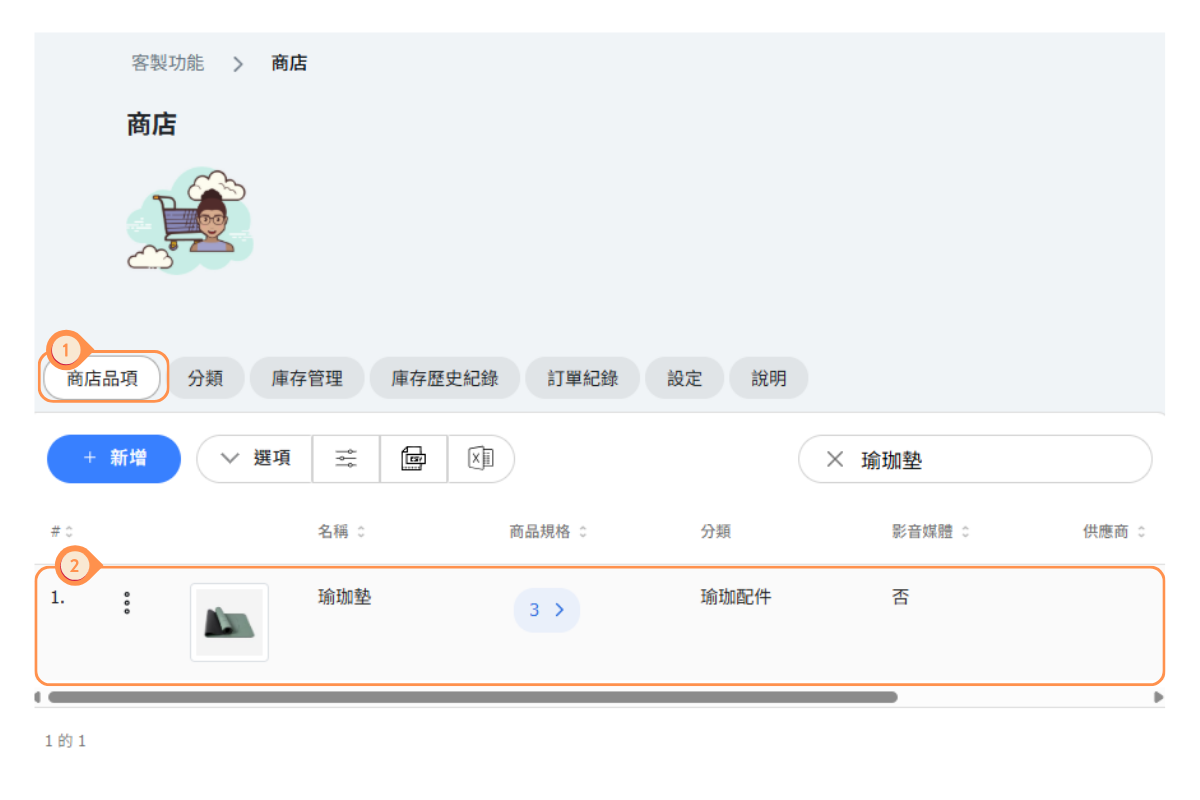
- Go to Store → the "Store Items" tab.
- Click on the product you want to track.
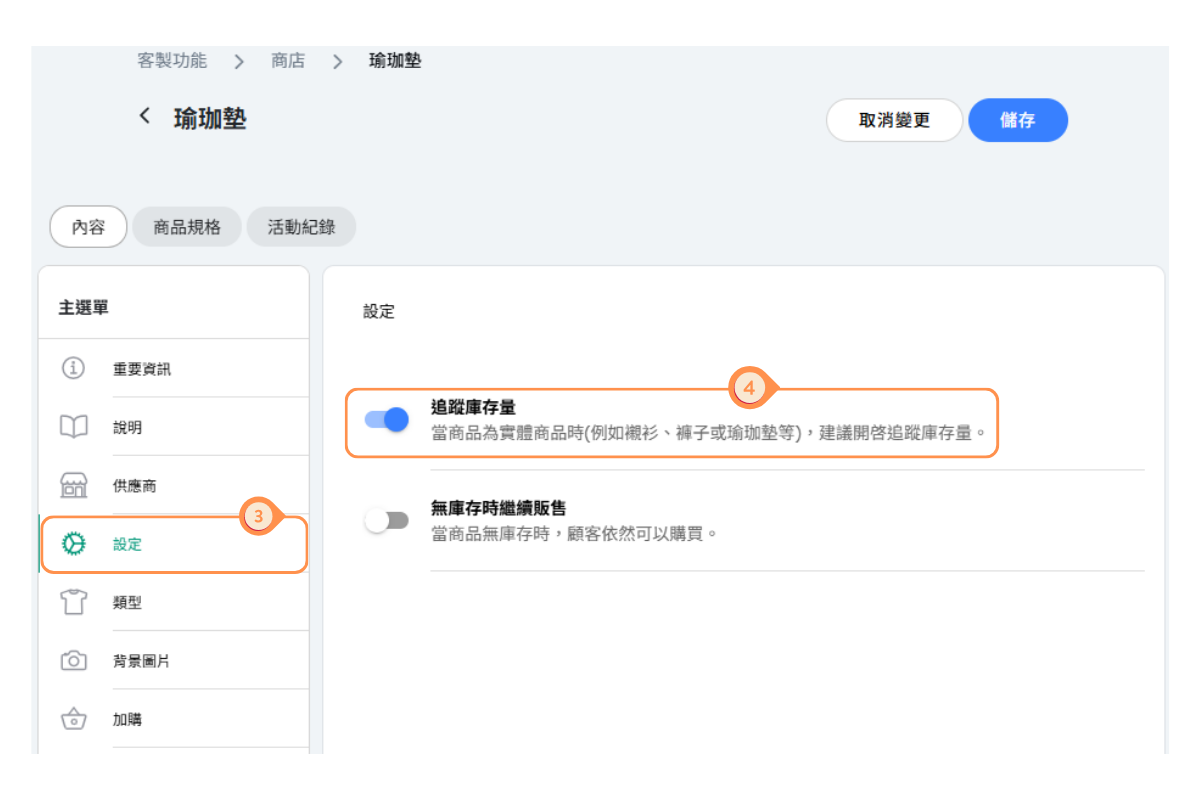
- Locate the Inventory Tracking toggle.
- Turn on the toggle to enable inventory tracking.
When to Enable Tracking:
- Physical Products – Must be enabled for items with limited stock.
- Digital Products – Usually not necessary, as digital products are unlimited.
- Services/Rentals – Enable if your equipment or capacity is limited.
- Note: Products without inventory tracking enabled will not appear in the inventory tab and will always be shown as available for customers.
Viewing and Adjusting Inventory
The Inventory tab shows all products with tracking enabled and their current stock levels.
To view inventory:
- Go to Shop → Inventory tab
- You'll see a list with columns: Product name, variant, current quantity available
- Use the Search box to find specific products
To adjust inventory:
For each product row, you'll see a quantity input field with two buttons:
- ADD - Adds the entered quantity to current stock (e.g., when receiving new shipment)
- SET - Sets the stock to exactly the entered quantity (e.g., after physical count)
Example:
| Current Stock | Action | Input | Result |
|---|---|---|---|
| 10 | ADD | 5 | 15 |
| 10 | SET | 5 | 5 |
A product that has no stock recorded yet shows - as its available quantity. It is treated as zero on hand, so using SET on it stores exactly the quantity you enter. If what you type is not a number, no change is worked out — clear the field and enter a whole number.
Instructions:
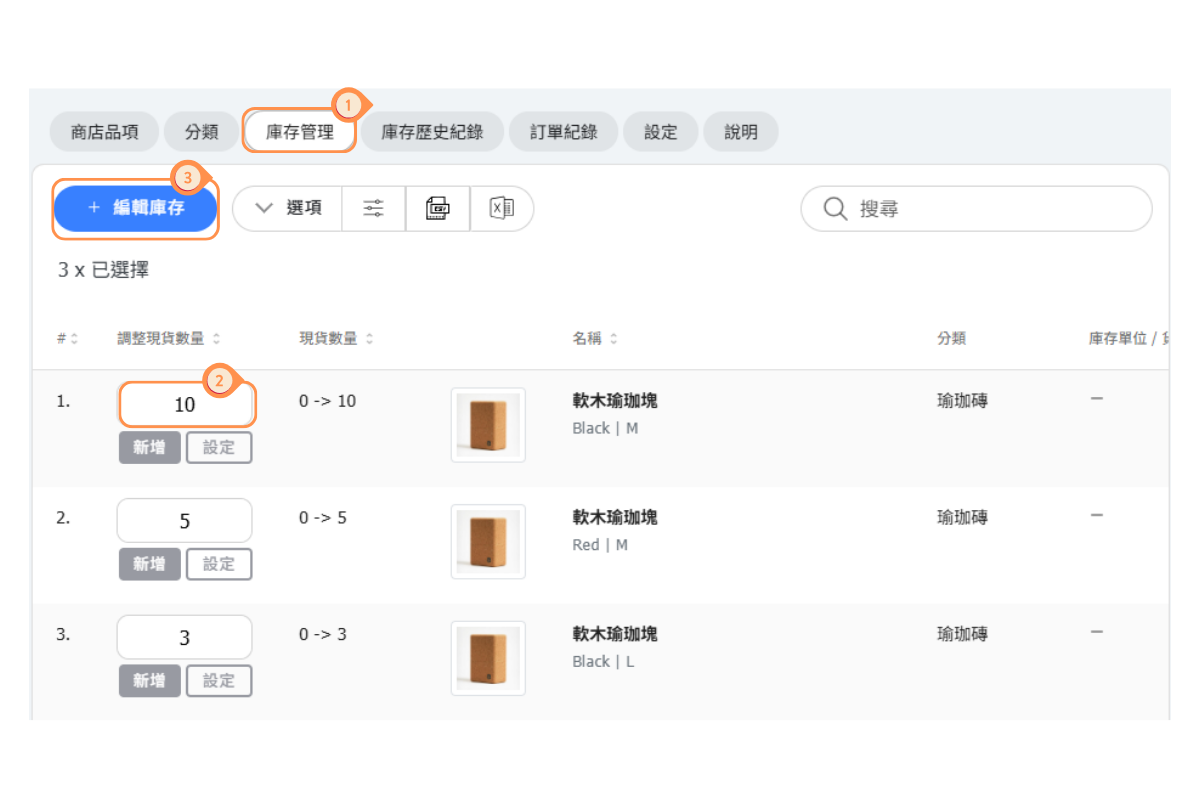
- Click on the "Inventory Management" tab.
- Enter the quantity you wish to adjust for the product.
- Click "+ Edit Inventory."
- Check the Location. It is pre-filled with the location you currently have selected, and it cannot be changed while a specific location is selected. To adjust stock at another location, switch to that location first. If you are not working in one particular location, you can still choose the location yourself.
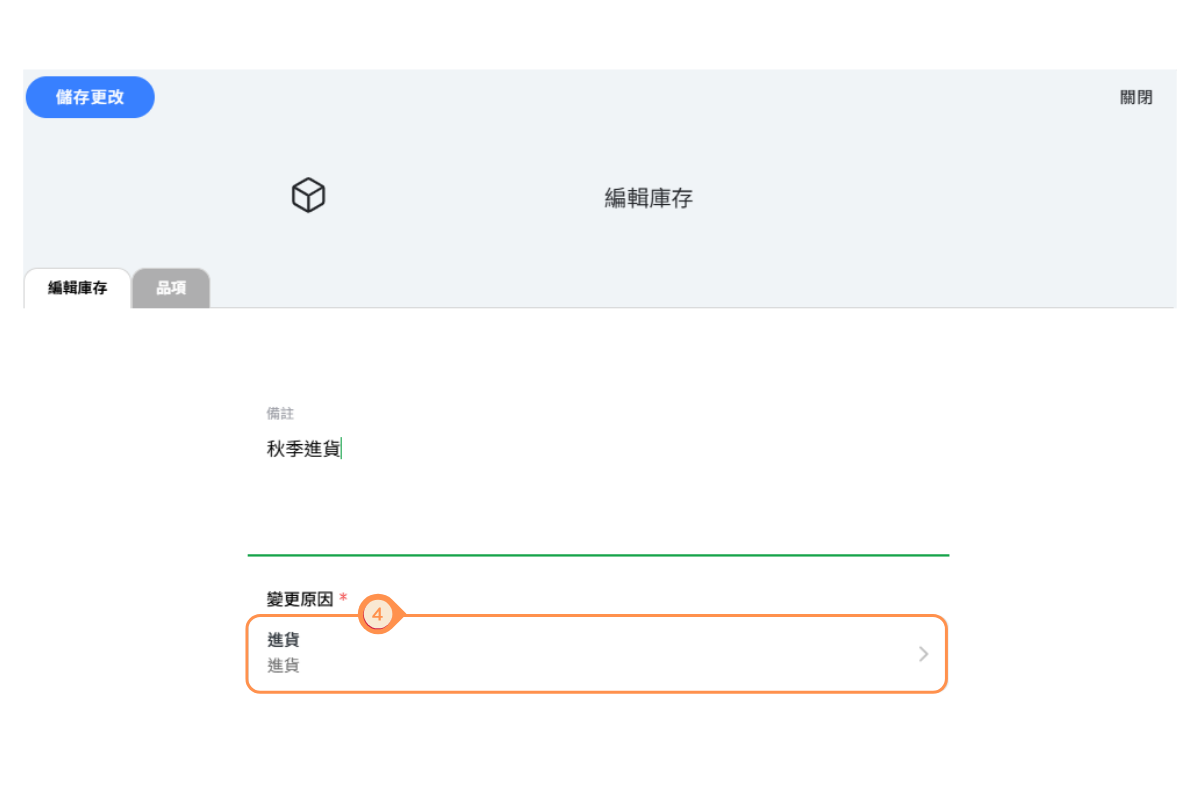
- Select the reason for the change.
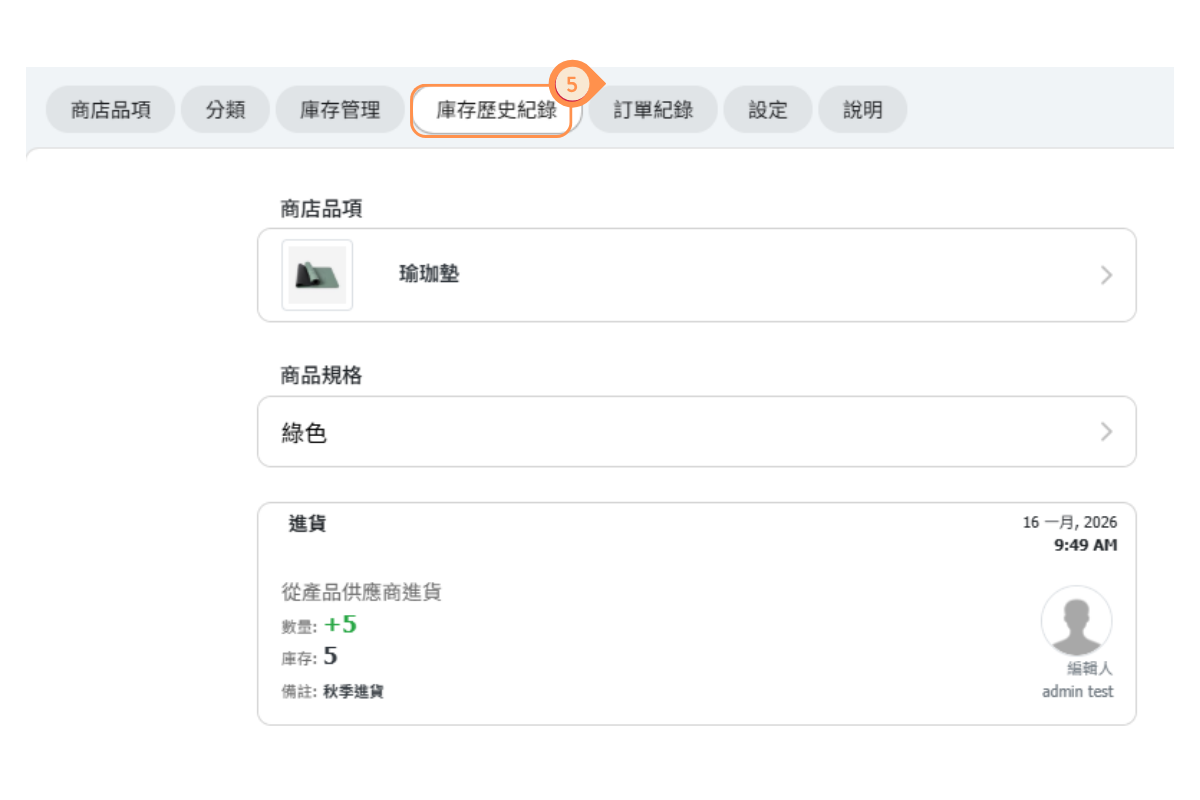
- You can view the product's inventory history in the "Inventory History" section.
Bulk Inventory Editing
For managing multiple products at once, use the Edit Inventory feature:
- Go to Shop → Inventory tab
- Click + EDIT INVENTORY button
- Select multiple products using checkboxes ("0 x selected" shows count)
- Enter quantities for all selected products
- Choose ADD or SET action
- Optionally add a reason for the change and notes
- Click Save to apply changes
When to Use Bulk Editing:
- Receiving a large shipment with multiple products
- After completing a physical inventory count
- Seasonal stock adjustments
- Correcting errors across multiple items
Multi-Location Inventory
If your business has multiple locations, you can track inventory separately for each one.
Enabling Multi-Location Inventory:
- Go to Shop → Settings tab
- Enable Quantity by Location? toggle
- Click Save
How It Works:
- Each location maintains its own stock levels
- The Inventory tab shows "Showing results for - All locations" header
- You can filter by location using the location selector
- When customers shop, they first select a location and see that location's stock
Managing Location-Specific Stock:
- Use the location filter in the Inventory tab to view/edit stock for a specific location
- A new stock adjustment is pre-filled with the location you currently have selected
- While a specific location is selected, the location cannot be changed on the adjustment. To adjust stock at another location, switch to that location first
- If no specific location is selected, you can choose the location on the adjustment yourself
- Transfer stock between locations by reducing one and adding to another - switch to each location in turn to record its side of the transfer
- Each location's sales only affect that location's inventory
Using the Inventory Log
The Inventory Log tracks all changes to your stock levels for audit and reference purposes.
Accessing the Log:
- Go to Shop → Inventory Log tab
- Select a product from the "Shop Item" dropdown
- View the complete history of inventory changes
Information Tracked:
- Date/Time - When the change occurred
- Previous Quantity - Stock level before change
- New Quantity - Stock level after change
- Change Amount - Difference (positive for additions, negative for reductions)
- Reason - Why the change was made (sale, restock, adjustment, etc.)
- Notes - Additional details entered during the change
- User - Who made the change
Common Reasons for Changes:
- Customer purchase
- Stock received/restocked
- Manual adjustment
- Inventory count correction
- Damaged/returned items
Out of Stock Settings
Configure how your shop handles products that are out of stock:
Out of Stock Display Setting:
- Go to Shop → Settings tab
- Find Out of Stock toggle
- Configure based on your preference:
- Enabled - Out of stock products remain visible but show as unavailable. Customers can see the product but cannot purchase.
- Disabled - Out of stock products are hidden from the shop until restocked.
Recommendation:
- Enable if you want customers to know a product exists (creates demand awareness)
- Disable if you don't want to show unavailable items
Automatic Inventory Adjustment on Purchase
Configure when inventory is reduced after a customer purchase:
Verify Bank Transfer Setting:
- Go to Shop → Settings tab
- Find Verify Bank Transfer toggle
Options:
- Enabled (Recommended) - Inventory is only reduced after you verify the payment. This prevents stock from being reserved for unconfirmed orders.
- Disabled - Inventory is reduced immediately when a customer completes checkout, before payment verification.
When to Use Each:
- Enable if you accept bank transfers and want to verify payment before committing stock
- Disable if you only accept instant payment methods (credit cards, online payment) where payment is confirmed immediately