
Adding Passes to Customer
[Instructions]
-
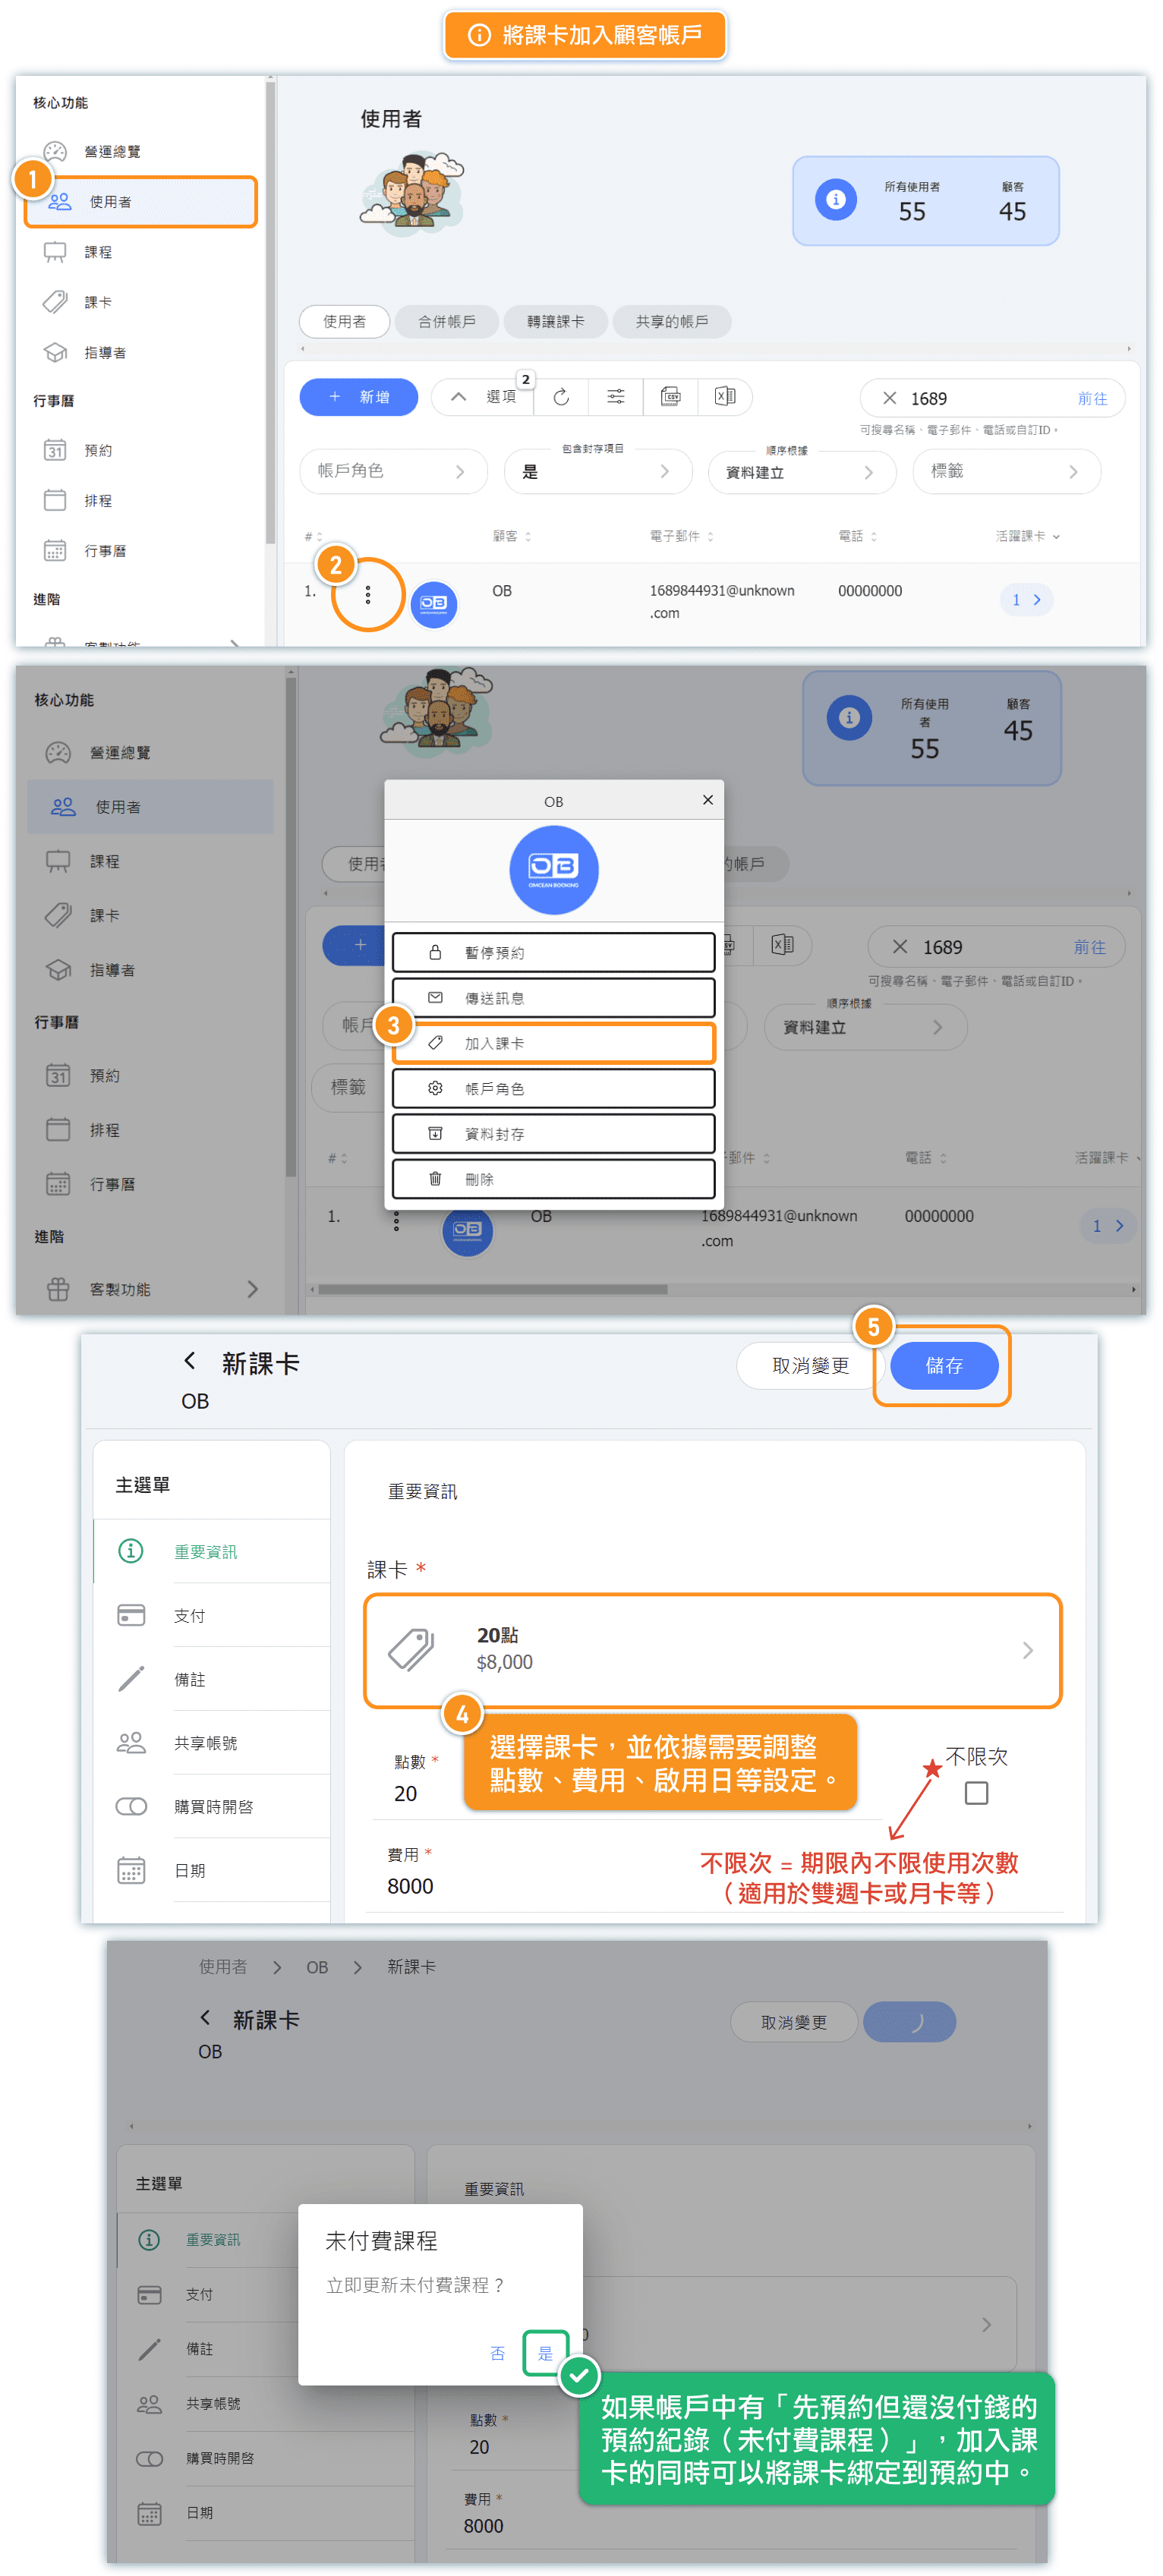
Click Users in the left menu.
-
Click the button (three dots) to the left of a user.
-
Select Add Course Card.
-
Choose a course card.
-
Click Save.
Class package passes: Only book upcoming sessions
When the pass you select is a class package pass, an extra toggle appears: Only book upcoming sessions (Past package sessions will be skipped for this assignment.).
- Turn it on to book only the sessions that have not started yet. Sessions bound to the package that have already taken place are skipped for this assignment, so the pass is not used up on classes the customer could not attend.
- The toggle is off by default. If you leave it off, the package books every session bound to the pass, including past ones — this is the original behaviour.
- It appears only when you are adding a new pass, and only for class package passes. You will not see it when editing an existing pass, or when the selected pass is any other type.
This is useful when a customer joins a package part-way through the course.
Example: For the introduction of a new business into the system with course passes, suppose a member previously purchased 20 points for 7,600 dollars, and now only has 12 points remaining to be imported into the system.
Select the corresponding course pass "20 points".
Adjust the points to 12 points.
Set the fee to the corresponding amount of the remaining points = 4,560 dollars.
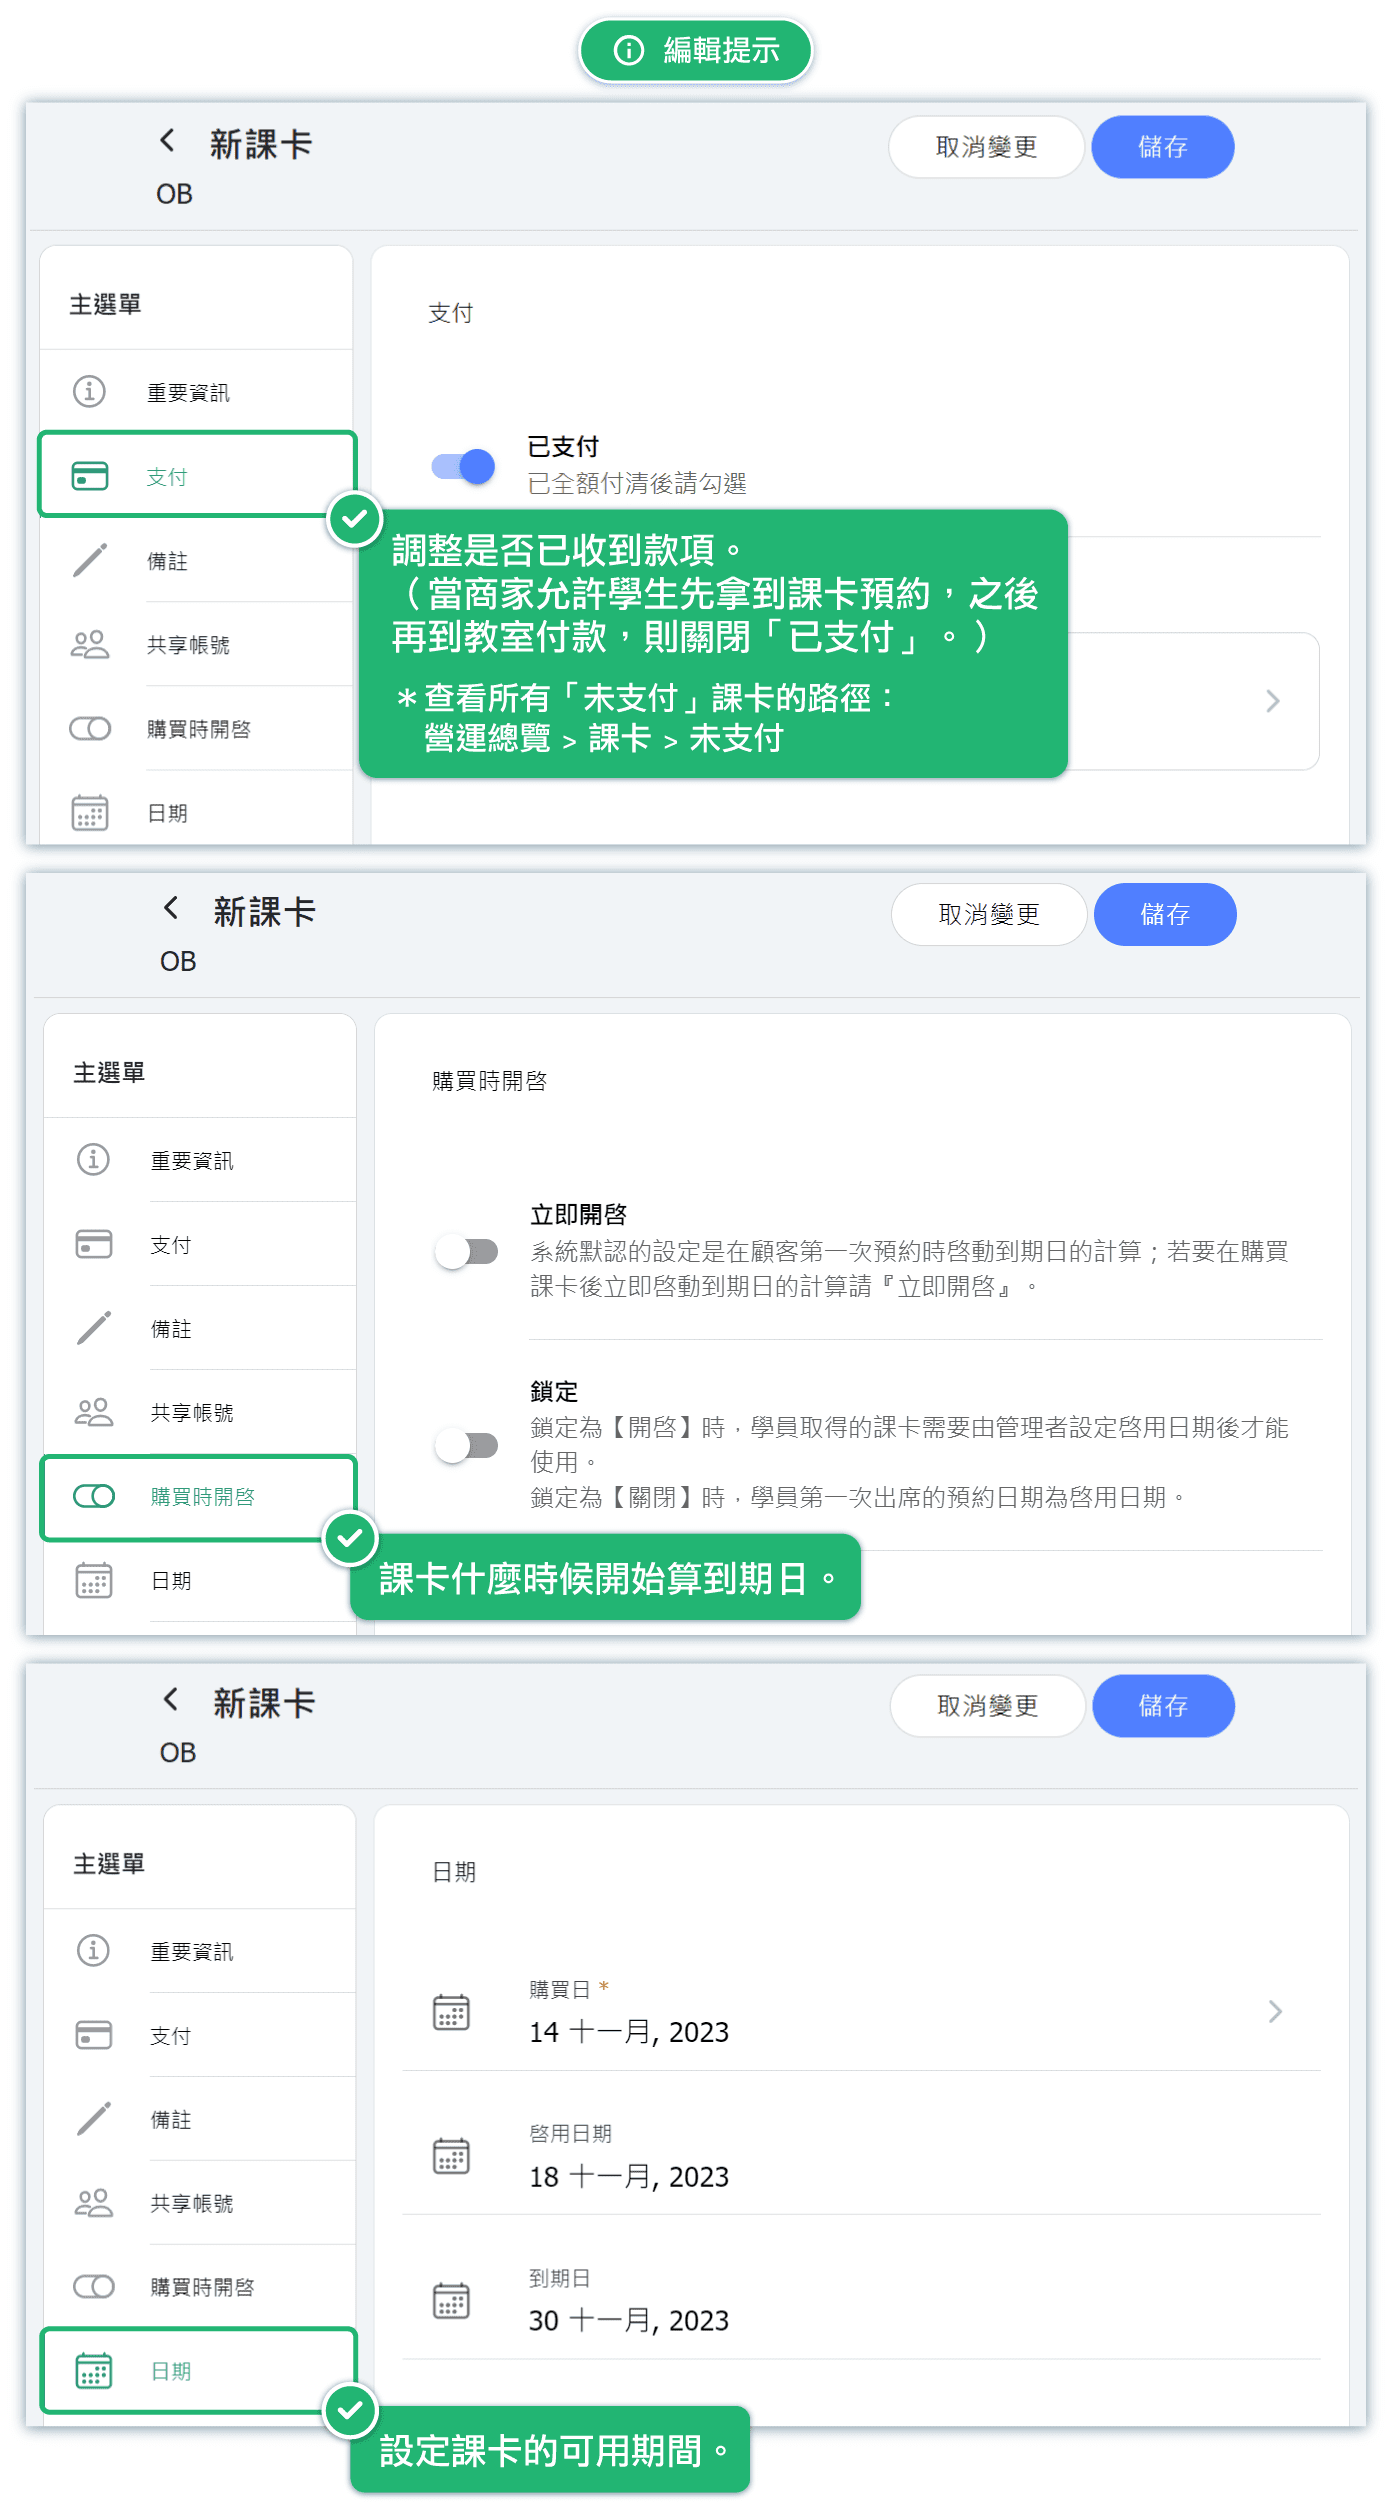
Activate on Purchase: ON Locked: OFF The status of the purchased pass after activation: Active | The timer starts immediately after the customer's purchase.* Activation Date = Purchase Date |
Activate on Purchase: OFF Locked: OFF The status of the purchased pass after activation::Inactive | After purchase, the card will show as "Inactive" until the customer makes their first reservation. Once the customer reserves a course, the card will be marked as "Active." * Activation Date = Date of the most recent reservation. |
Activate on Purchase:ON Locked:ON The status of the purchased pass after activation: Active | After obtaining the course card, the merchant sets the activation and expiration dates for the card * Activation Date = Activation date set by the merchant |
Tips: Unpaid pass / Pass activation date
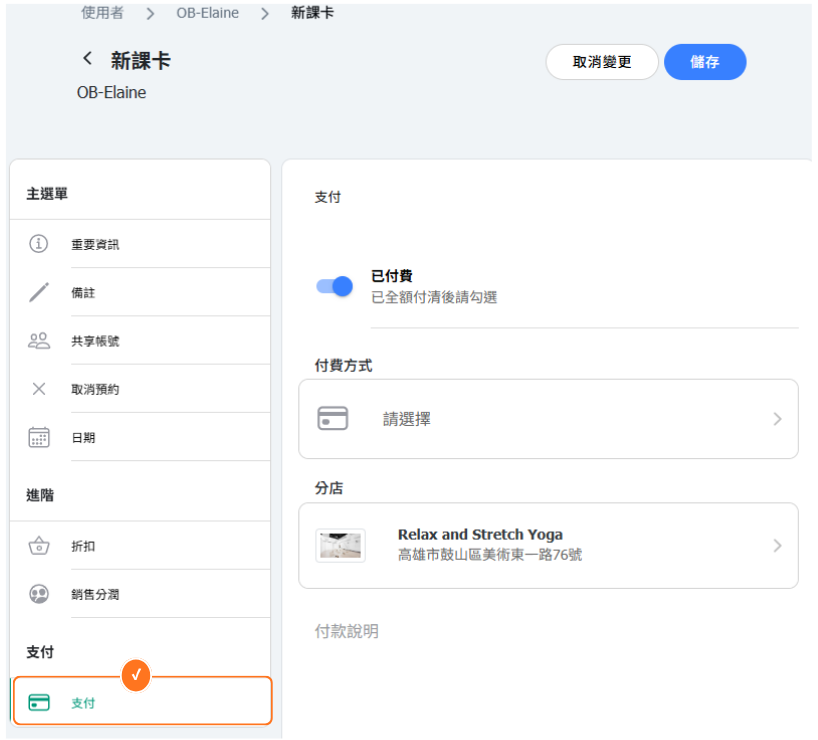
- 【Payment】: Adjust whether the payment has been received. (When the business allows customers to obtain a pass and make bookings before paying in person at the studio, please turn off "Paid".) *To view all "Unpaid" class passes: Dashboard > Passes > Unpaid
- 【Date】: Set the valid date range for the pass.
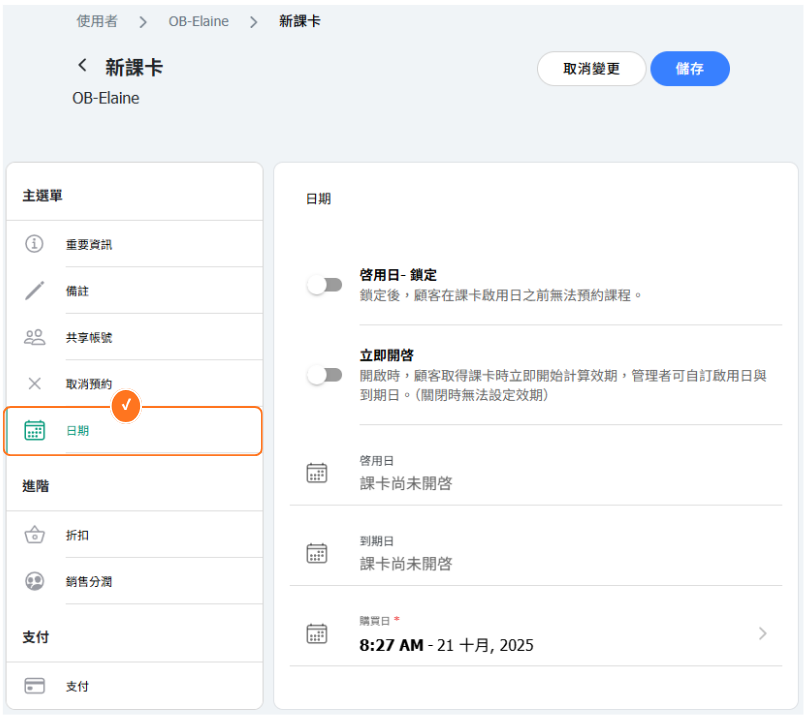
The range of class dates available for booking by the customer purchased pass is from the activation date to the expiration date.
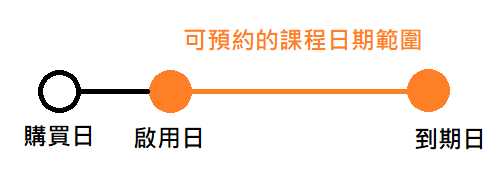
| Toggle | Pass Activation Date |
| Activate now: ON | Pass Status After Purchase: Activated Activation Date = Purchase Date Pass date starts counting immediately after purchase. |
| Activate now: OFF | Pass Status After Purchase: Non Activated Activation Date = Date of the most recent upcoming reservation After the customer purchases, it will display "Not Activated" until the first reservation is made. After the customer reserves a class, the pass will be displayed as "Activated". |
| Activation date - Locked: ON | The range of class dates that can be booked with the pass = from the activation date to the expiration date. |
| Activation date - Locked: OFF | Once an activation date is set, there is no restriction on how early classes can be booked — bookings can be made for any date up to the expiration date. Example: A class pass is purchased on Oct 10. The first booked class is on Oct 30 (activation date). Classes scheduled between Oct 10 and Oct 29 can still be booked. |
Example of importing passes for existing members
Suppose a member previously purchased a 20-point pass for $ 7,600, and now there are only 12 points left to import into the system.
- Add pass to customer, select the corresponding pass "20 points".
- Adjust the points to 12.
- Set the sales price to the corresponding amount: $ 4,560 for the remaining points .
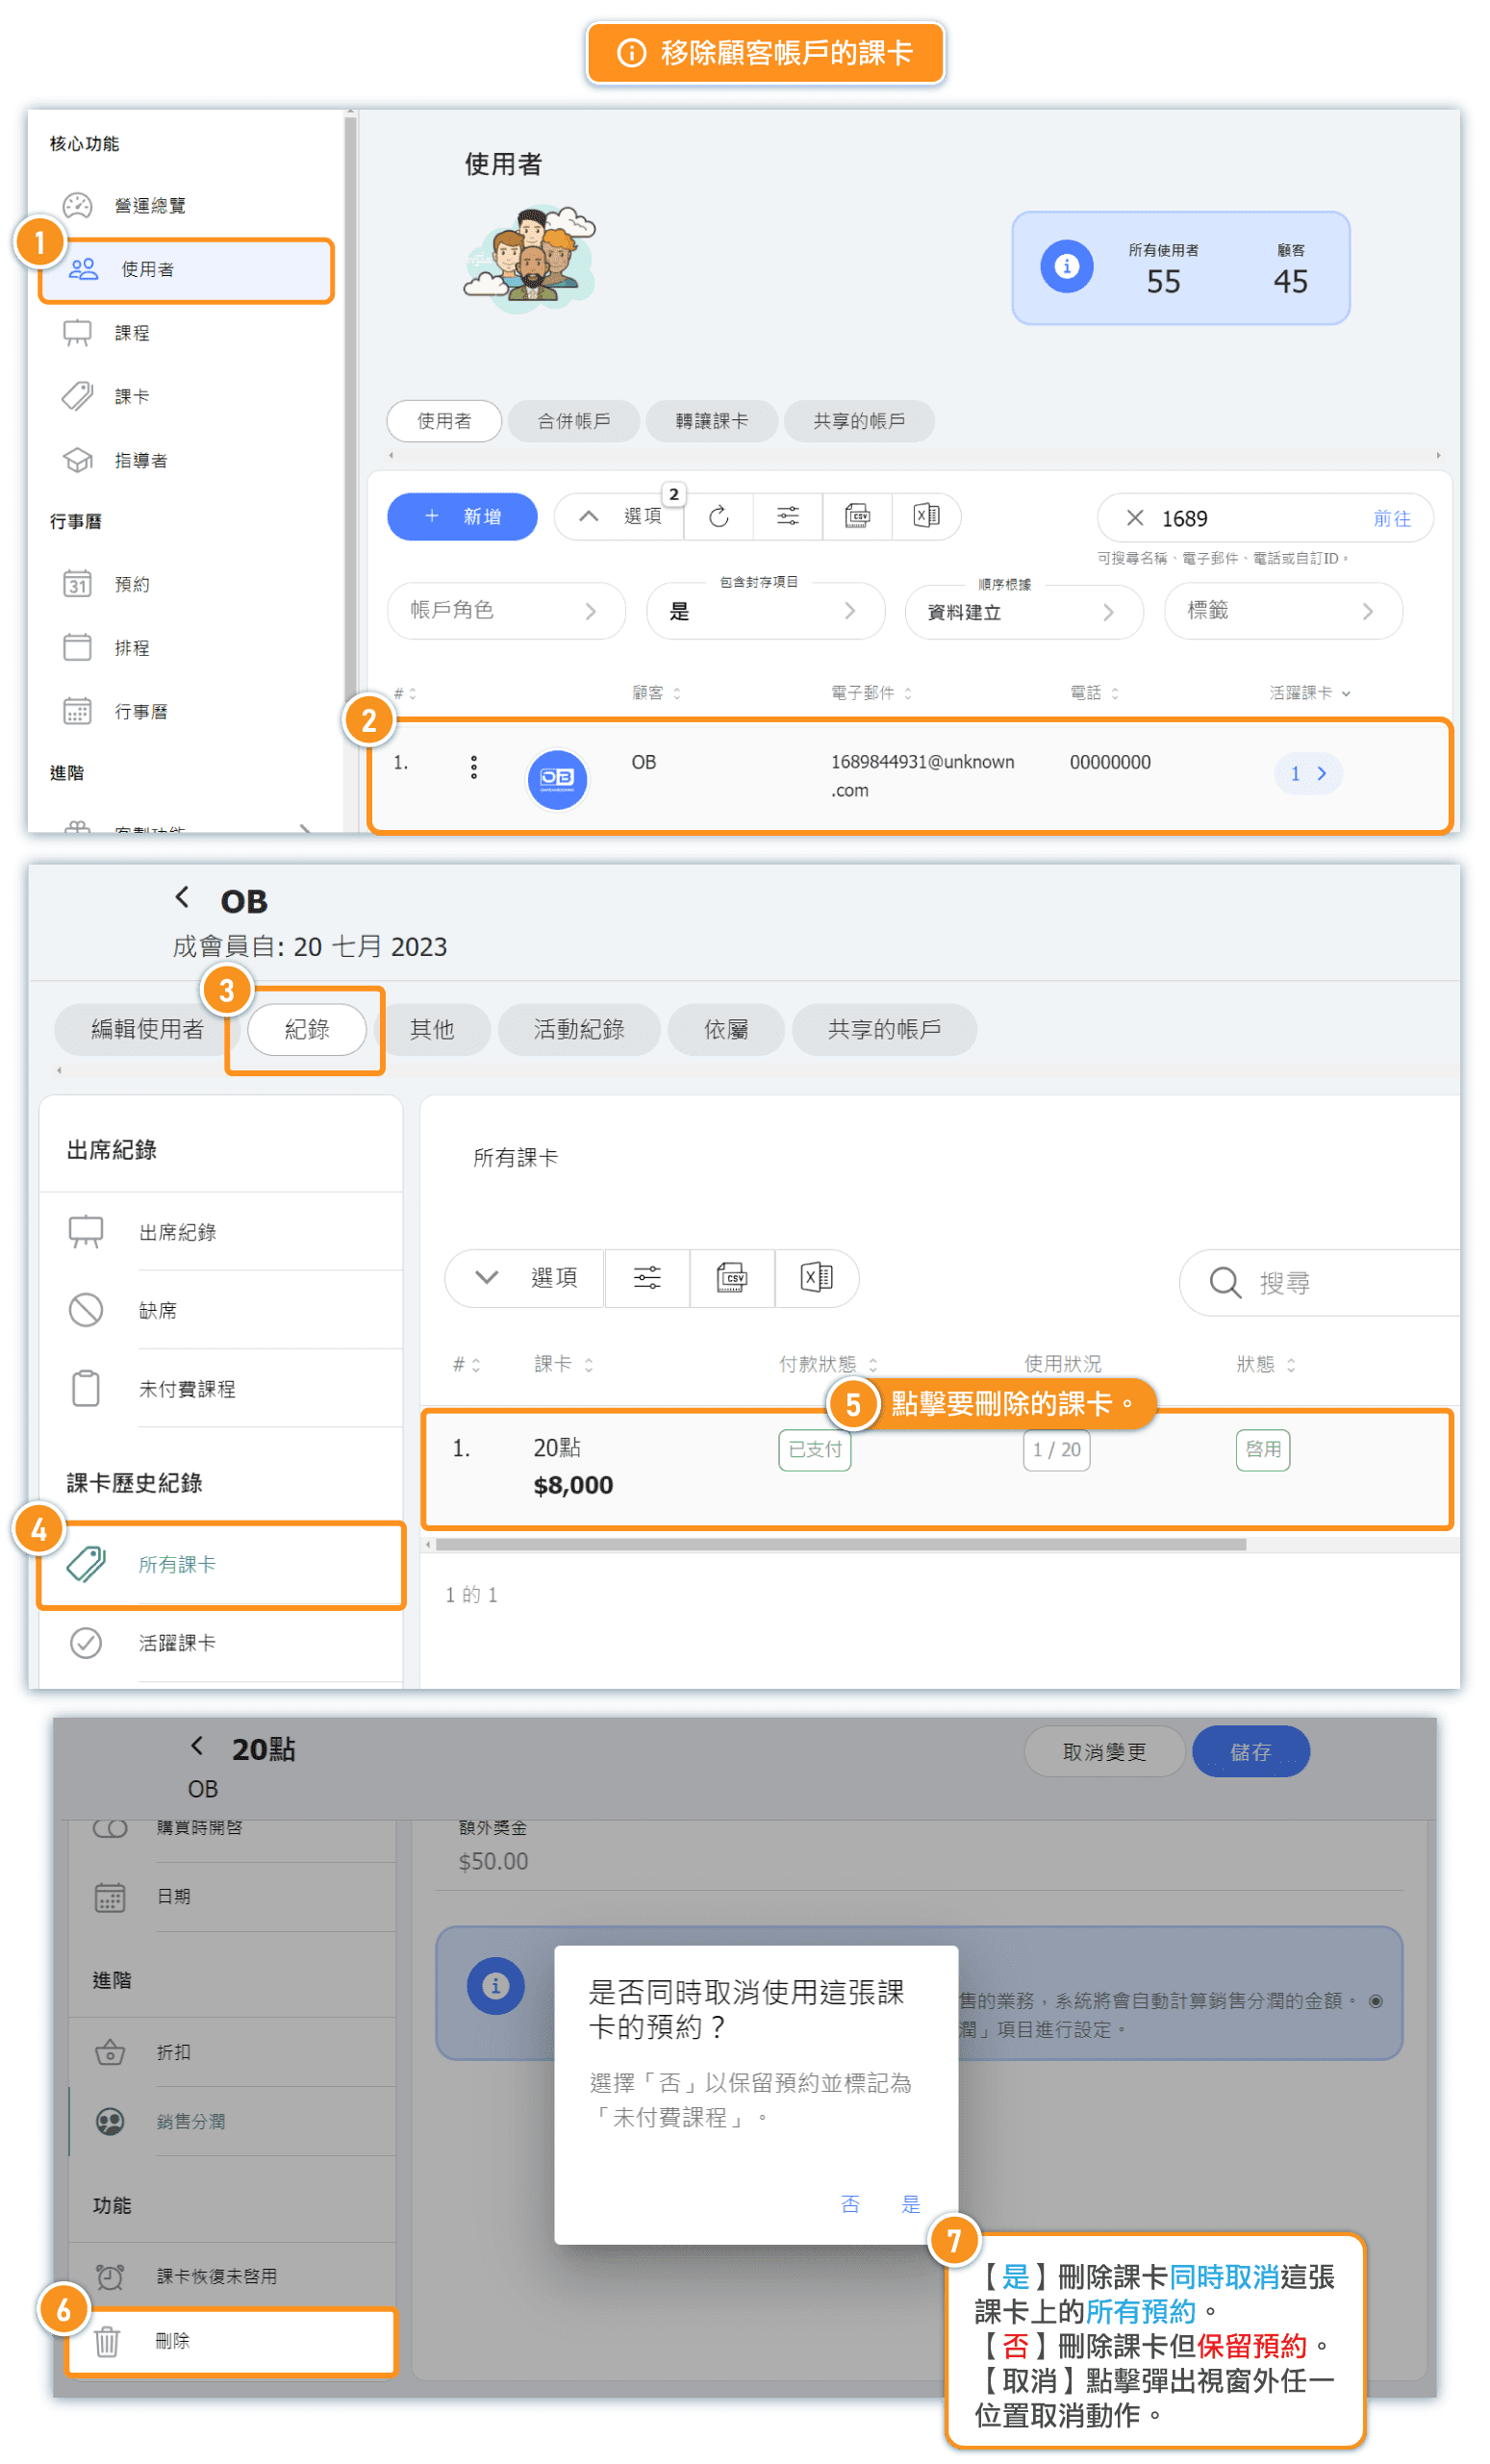
Removing Passes from Customer Accounts
[Instructions]
- Click Users in the left menu.
- Click the button (three dots) to the left of a user.
- Select the Records tab.
- Select All Course Cards.
- Click on a course card.
- Click Delete.
Bulk Adding a Pass to Multiple Customers
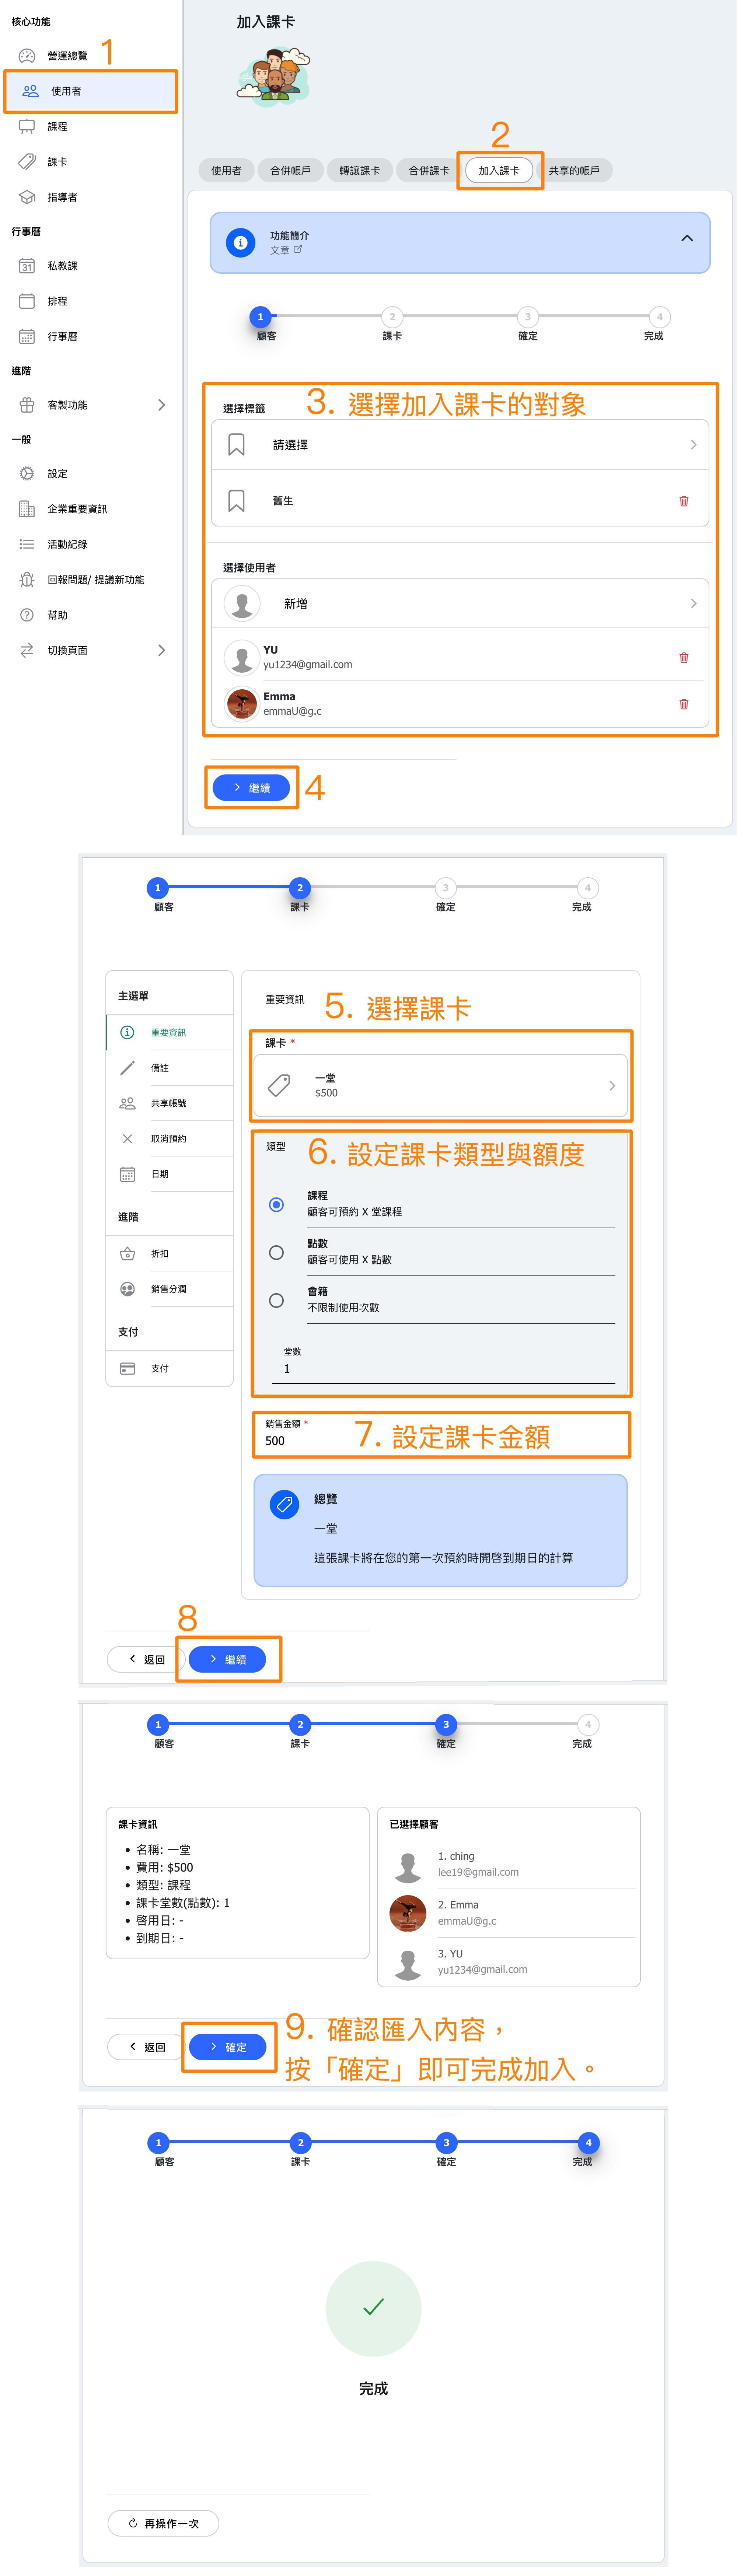
You can go to "Users" → "Add Pass" to assign the same pass to multiple accounts at once.
Typical use cases include:
1. Corporate or group course purchases
Companies, organizations, or schools buying a batch of courses for employees or students.
➜ Bulk assignment avoids manual one-by-one operations and improves efficiency.
2. Marketing campaigns or promotions
Distributing free passes or discounts to a targeted group of customers (e.g., Member's Day, Anniversary Campaign).
➜ Bulk operations enable large-scale giveaways quickly, saving time and effort.
3. Compensation or customer care
Providing compensation to multiple customers affected by system errors, class cancellations, or other service issues.
➜ Bulk pass assignment ensures all affected customers receive the same compensation.
4. Internal staff or instructor testing
Distributing test passes or internal-use courses to multiple accounts.
➜ Useful for quickly creating test data or offering staff benefit classes.
[Instructions]
-
Click Users in the left menu.
-
Select the Add Course Card tab.
-
Choose the target user to add the course card to.
-
Click Continue.
-
Select a course card.
-
Set the course card type and quota.
-
Set the course card amount.
-
Click Continue.
-
Review the details and click Confirm to complete adding the course card.
If the pass you choose is a class package pass, the Only book upcoming sessions toggle is available here too. It is off by default; turning it on applies to every customer in the batch, so each of them is booked only into the sessions that have not started yet.
Merge an accidentally duplicated pass
Use Merge only when two pass records represent the same entitlement and one record should not exist. A common example is an admin adding an 8-class pass so the customer can attend immediately, followed by the customer completing the real purchase online.
Merge keeps one primary pass, moves the duplicate's reservations to it, and deletes the duplicate. It does not add totals: two duplicate 8-class passes leave one 8-class pass, not 16 classes.
Merge, Rollover, or Transfer?
- Merge: same customer, duplicate entitlement, delete the mistaken record.
- Rollover: same customer, two legitimate purchases, move unused balance while keeping both records.
- Transfer: different customers, move all or part of a balance to another person.
- Open Users and select the customer.
- Open History → All Passes.
- Select exactly two duplicate passes and click the merge icon.
- Choose Merge Duplicate Passes.
- Select the Primary pass to keep and the Duplicate pass to delete.
- Review and confirm.
The primary payment, expiration, and allowance stay authoritative. Existing reservations and wait-list entries move from the duplicate. Memberships, subscriptions, different pass templates, and passes with prior transfer/rollover history cannot be merged. If the duplicate has a real payment that needs refunding or voiding, handle that payment separately before merging.
Who can change the values copied from a pass
When you add a pass to a customer, the form is pre-filled from the pass you chose. Changing those pre-filled values requires the Override pass defaults permission, found under Users → Pass management in the role editor.
- Choosing the pass does not require it. Anyone with Pass management can still give a customer a pass. Without Override pass defaults they simply keep the settings that come from the pass.
- Fields it covers: Type, the number of classes or points, Price, Discount, Activation date - Locked, Activate now, Activation date, Expiration date, Limit customer cancellations, and the sale Location.
- Locked, not hidden. If you do not have the permission, those fields still appear on the pass form with a small lock icon and cannot be changed.
The permission offers Edit only, and it is listed in the role editor only while Pass management is set to Edit. Setting Pass management below Edit clears Override pass defaults automatically, so grant Pass management - Edit first and then Override pass defaults. See Role Permissions Management for the full setup.