
What is Kiosk Customer Check-In?
Kiosk Customer Check-In is a self-service feature that allows your students to check in for their classes using a dedicated tablet or device at your studio. Instead of staff manually marking attendance, students can:
- Log in with email and password to view their reservations
- Scan their personal QR code for quick check-in
- View their upcoming classes and mark themselves as attended
- Create a new account if they're a new customer
Benefits:
- Reduces front desk workload
- Speeds up the check-in process during busy times
- Provides accurate attendance records automatically
- Allows students to confirm their own attendance
How Do I Set Up Kiosk Customer Check-In?
Follow these steps to set up the kiosk check-in system:
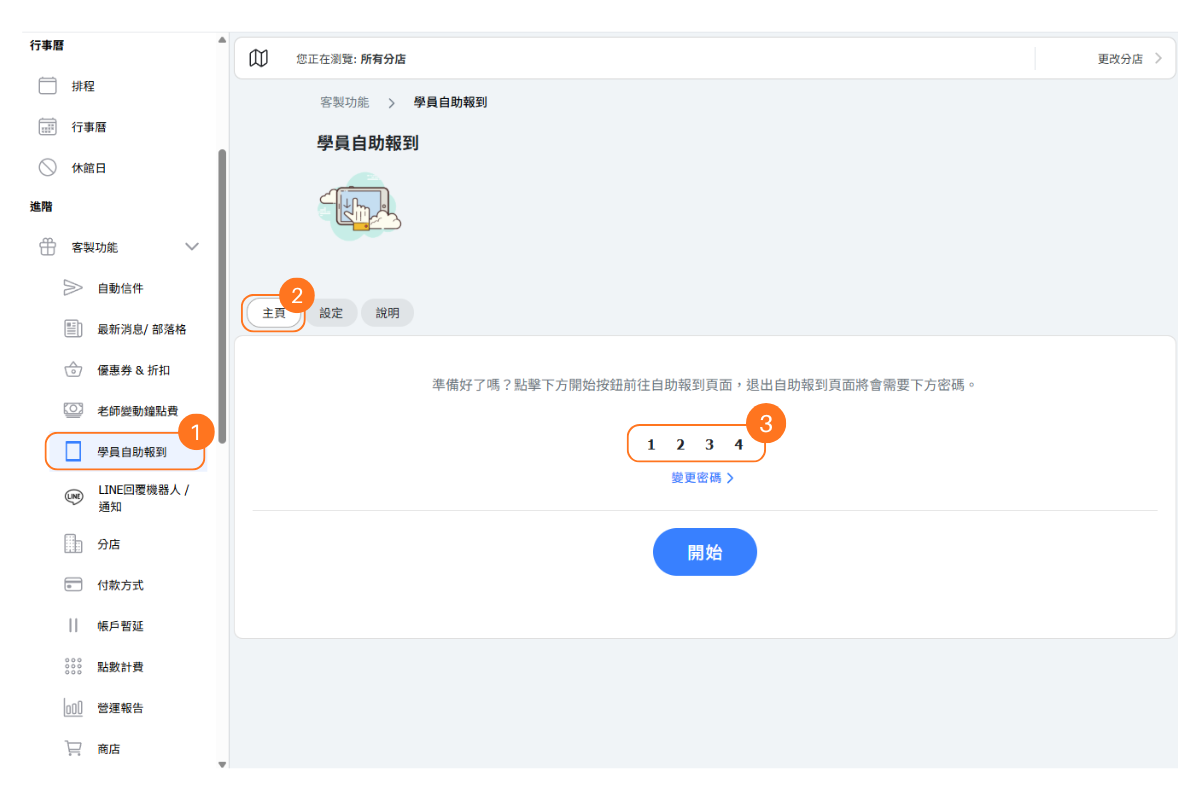
- Go to Custom Features > Kiosk Customer Check In in the left sidebar
- Set a 4-digit passcode - this prevents unauthorized exit from kiosk mode
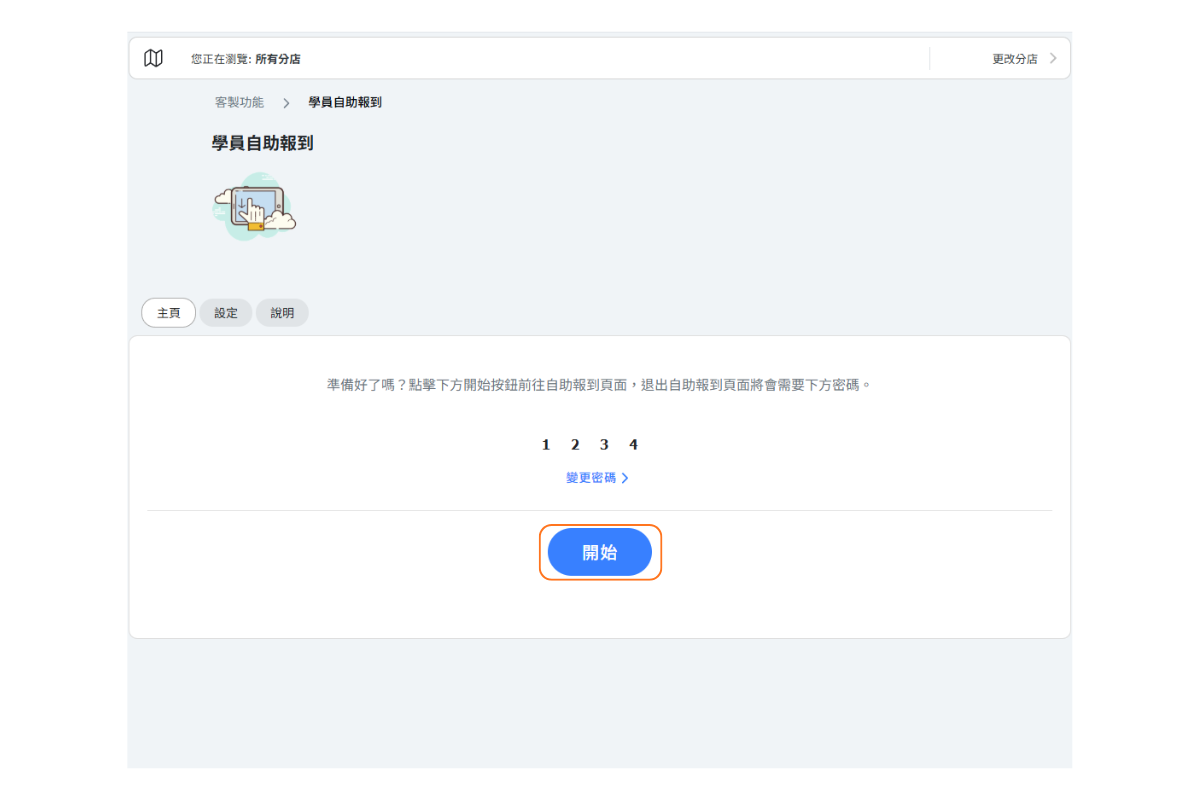
- Click START to enter kiosk mode
Important Setup Tips:
- Use the OB App - Always use the OmceanBooking app (not the web browser) for the kiosk device. The app can lock the screen to prevent users from accessing other pages.
- Create a dedicated account - Set up a separate admin account specifically for the kiosk device with only "Kiosk Customer Check In" permissions.
- Use Guided Access - Enable your device's built-in "Guided Access" mode (iOS) or similar feature to lock the device to the app.
[Operating Instructions]
-
Click "Student Self Check-in" on the left-side function menu.
-
Select the "Home" tab.
-
Set a 4-digit password (required when exiting Self Check-in and returning to the admin backend).
-
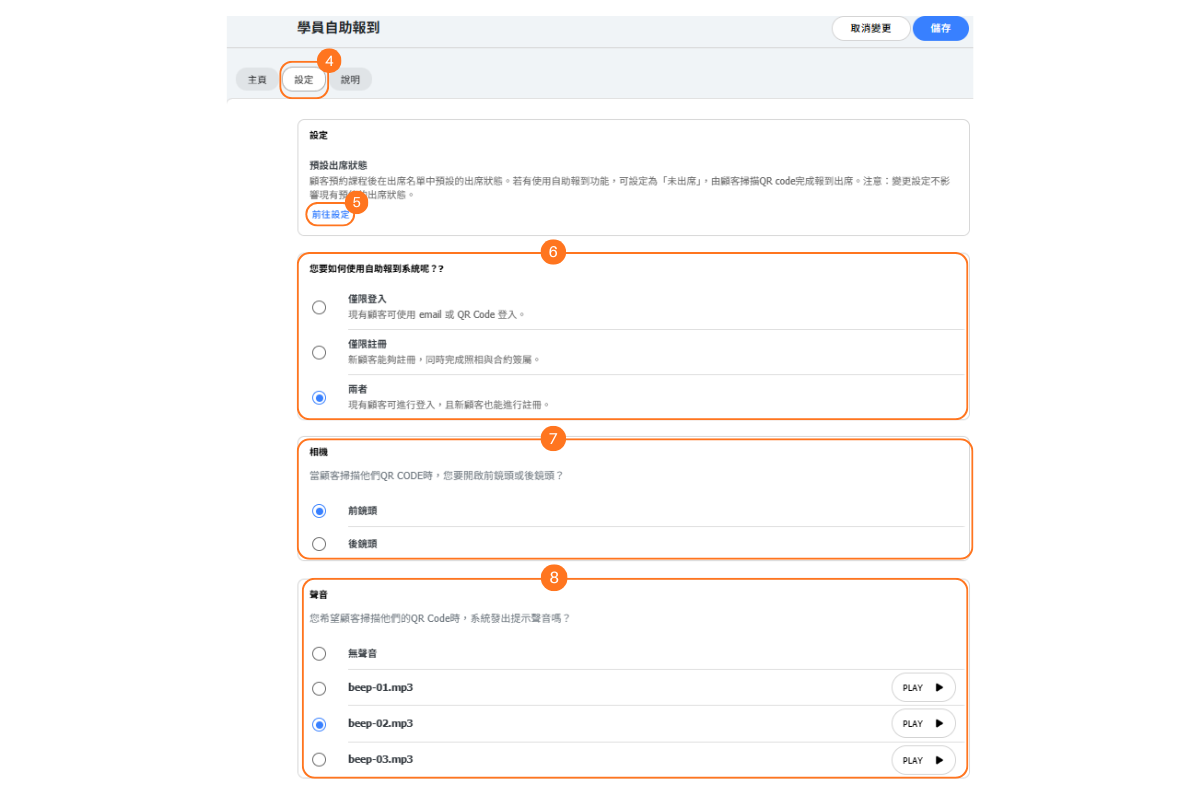
Switch to the "Settings" tab.
-
Go to "Reservation Settings" and change the reservation attendance status to "Not Attended".
-
Configure the functions of the self check-in system.
-
Set the camera orientation of the device to be used.
-
Set the sound that the device will play during scan check-in.
Sign-in and booking options on the Settings tab
- Allow reservations — on the new kiosk, this decides whether customers can book an upcoming class at the kiosk as well as check in. Choose None so the kiosk only checks customers in to bookings they already have; Valid pass only so a customer can reserve only when they already hold a valid pass, as passes cannot be bought at the kiosk; or All so a valid pass is used when one applies and the reservation is otherwise marked as unpaid for you to settle later. This option is not shown on the older kiosk screen.
- Phone number login — turn this on to let customers sign in with the last digits of their phone number. Enter how many digits they type in Number of digits (4-10). It must be a whole number from 4 to 10, and the settings cannot be saved until it is filled in correctly.
- Printed QR check-in — turn this on to print a QR code for your reception desk so customers can open check-in on their own phone. Choose Raw QR code for the code on its own, or Styled QR code for a printable page showing your location name, a "Scan to check in" heading and short instructions. Either option opens the printable page in a new browser tab, so allow pop-ups for this site.
Remember to save after changing these settings.
How Do Students Check In?
Once the kiosk is set up, students can check in using three methods:
Method 1: QR Code Scan
- Student opens their OmceanBooking app or booking page
- They find their personal QR code in their account
- They show the QR code to the kiosk camera
- The system finds their account and shows today's bookings
Method 2: Phone Number
- Available when you switch on Phone number login in the kiosk settings
- Student enters the last digits of their phone number on the keypad — as many digits as you set
- They tap "Check in"
- If more than one account matches, they pick their own name
Method 3: Email
- Student taps "Email" or "Use my email instead" on the kiosk screen
- They enter the email address on their account — no password is needed
- They see their reservations for today
- They tap to confirm their attendance
For New Customers:
Students without an account can create one directly from the kiosk with "First time here". They enter their email address and name, can optionally add a profile photo, and are asked to accept your terms if they have not already.
How Does Automatic Attendance Work?
For kiosk check-in to work properly with attendance tracking, you need to configure your reservation settings:
- Go to Settings > Reservation Settings
- Set "Activate Check-in" to "Not Attended"
How It Works:
- When a student books a class, their status is set to "Not Attended"
- When they check in at the kiosk, their status changes to "Attended"
- You can view attendance records in the class attendance list
This ensures accurate attendance tracking without manual intervention.
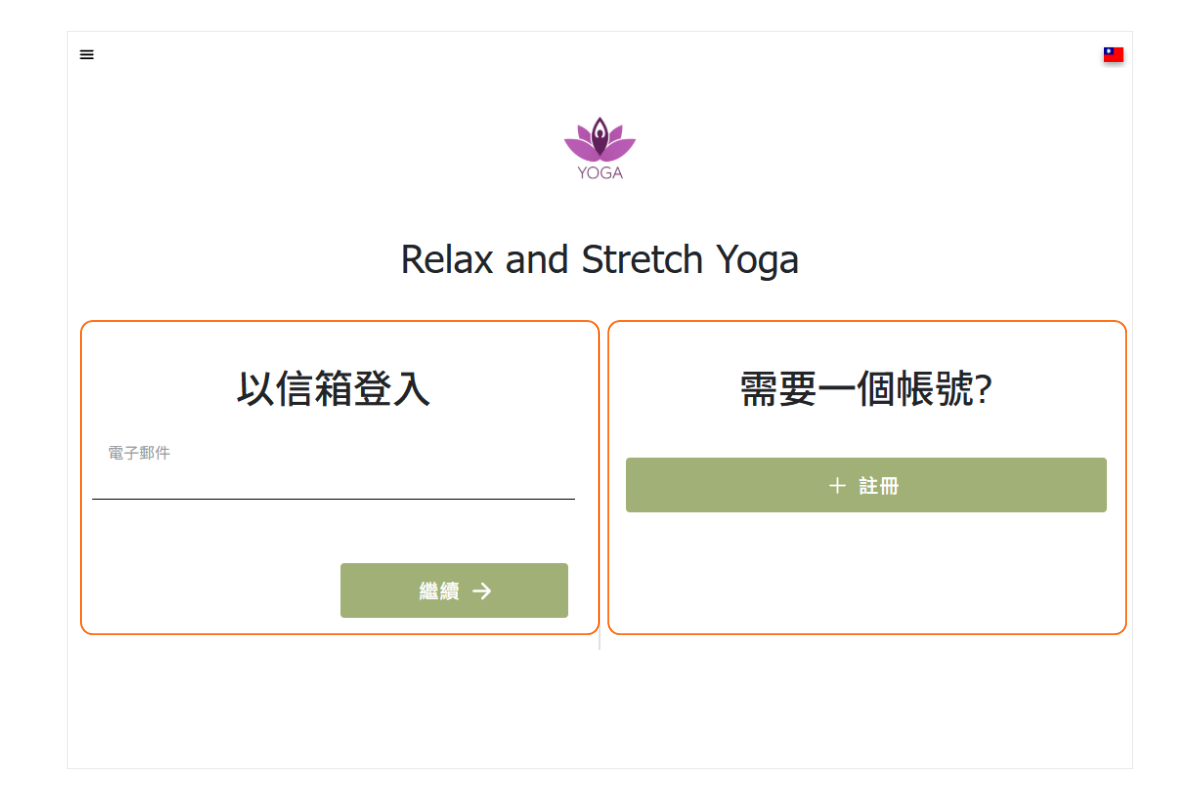
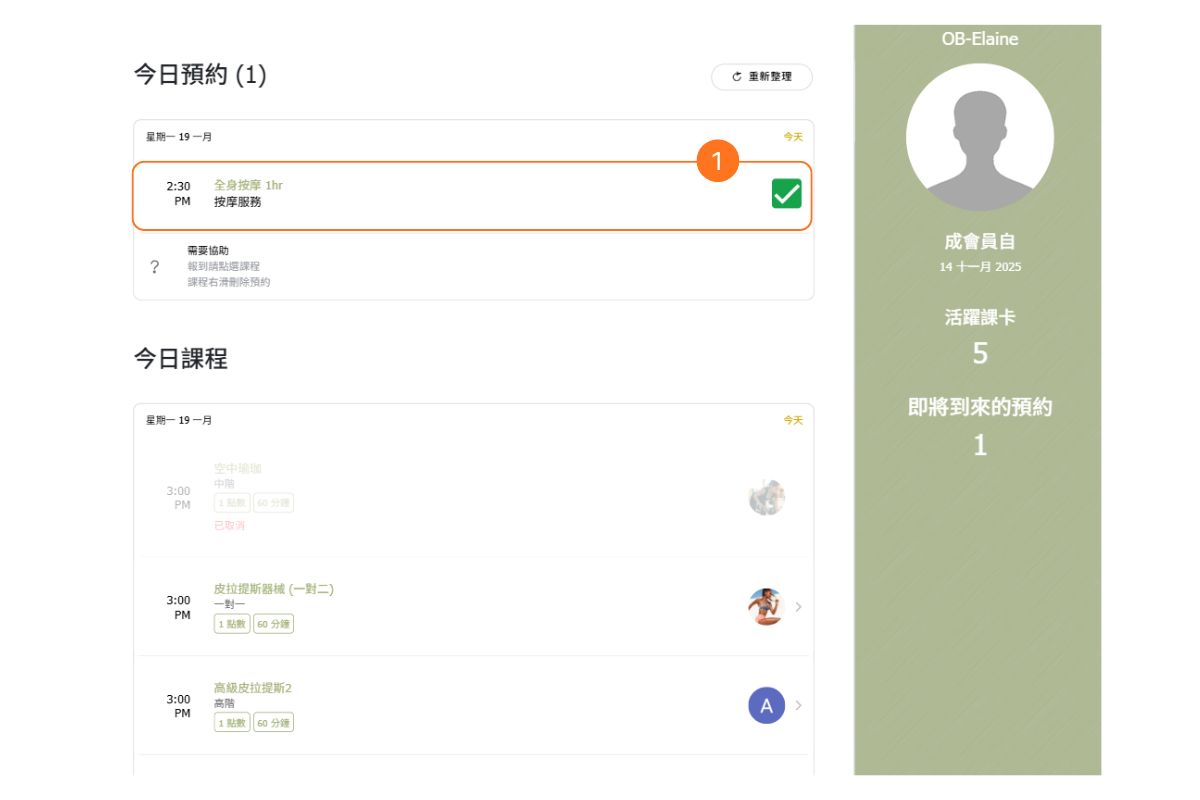
Log in with your email address, or register a new account on the right.
1. Select today's course and check it to complete the check-in.
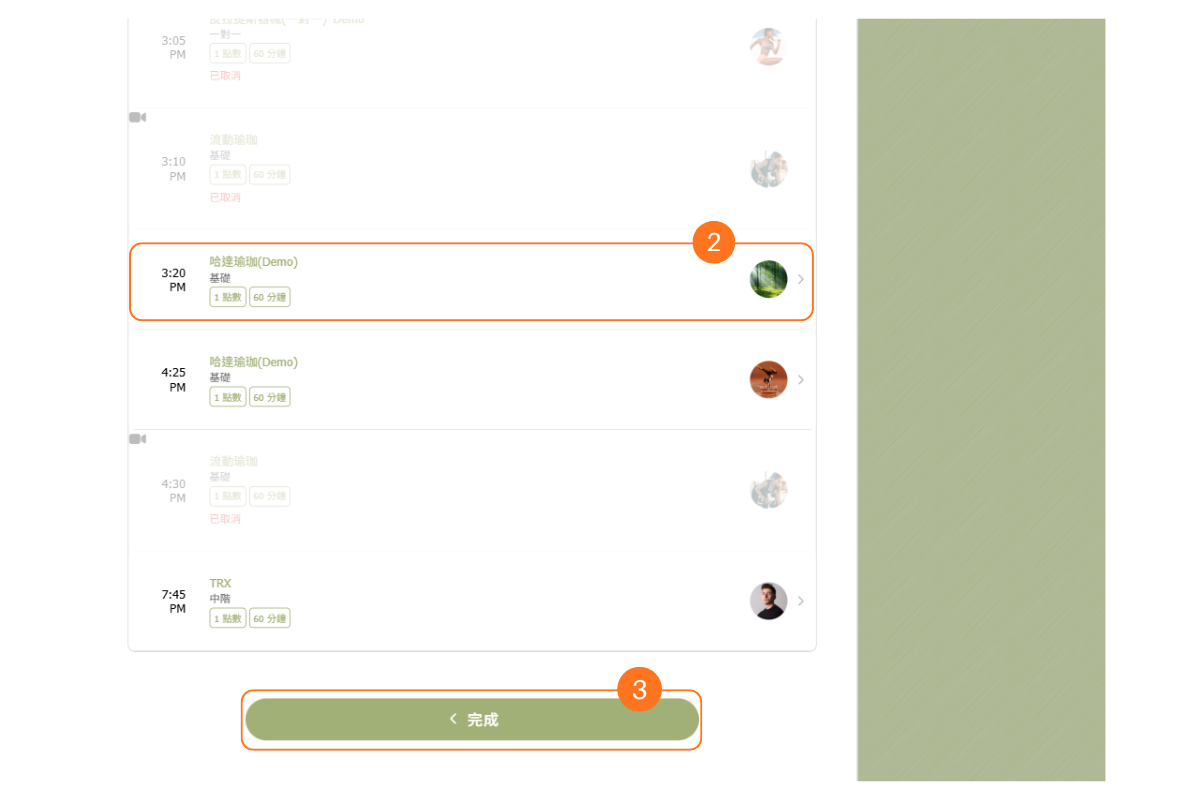
2. You may also book other courses scheduled for today.
3. Click the "Finish" button at the bottom to log out of the account.
Security Best Practices
Follow these security recommendations to protect your kiosk device:
1. Set a Strong Passcode
Avoid simple combinations like 0000 or 1234. The passcode prevents unauthorized users from exiting kiosk mode and accessing your admin panel.
2. Use a Dedicated Account
Create a separate admin account for the kiosk with only "Kiosk Customer Check In" permissions. This way, even if someone exits kiosk mode, they can't access other system functions.
3. Use the Mobile App
Always use the OmceanBooking app instead of a web browser. The app has built-in screen locking that prevents switching to other pages.
4. Enable Guided Access
On iOS devices, enable Guided Access (Settings > Accessibility > Guided Access) to lock the device to the app. Android devices have similar features like "Screen Pinning."
5. Position the Device Securely
Place the kiosk where staff can monitor it, and consider using a secure stand or mount to prevent theft.
Frequently Asked Questions
How do I exit kiosk mode?
On the new kiosk, tap the top-left corner of the kiosk header twice to reveal the menu button, tap it, then enter your 4-digit passcode to return to the admin panel. The button stays hidden the rest of the time so customers cannot leave the kiosk by accident.
Does the kiosk reset itself between customers?
Yes. The new kiosk returns to its start screen after 60 seconds without any activity, and shows a countdown at the bottom beforehand. Customers can also tap "Finished" as soon as they are done.
Can students book classes from the kiosk?
Yes, on the new kiosk, if you set Allow reservations to All or Valid pass only in the kiosk settings. A Reserve button then appears beside each eligible class in Upcoming classes, and the kiosk asks the student to confirm before booking. Where a class cannot be reserved, the kiosk shows the reason instead of the button — for example, a class that requires an intake form must still be booked through the booking page. With Allow reservations set to None, the kiosk only checks students in to bookings they already have, and they should book from the app or booking website.
What if a student forgets their password?
They can use the QR code method instead, or staff can assist with password reset from another device.
Does the kiosk work offline?
No, the kiosk requires an internet connection to verify reservations and update attendance records.
Can I use a phone instead of a tablet?
Yes, but a tablet provides a better user experience due to the larger screen size.
How do I change the passcode?
Go to Custom Features > Kiosk Customer Check In and click "CHANGE PASSCODE" to set a new code.
When using Kiosk customer check-in, if a student has two different classes booked on the same day, do they need to check in separately?
After scanning the QR code, students can select both classes and check in at the same time. They can also check in to each class separately if needed.