
What is an API?

Think of your OB data as being stored in a locked room. An API token is a unique key that lets an authorized system retrieve supported data from that room.
Your developer builds the connection between the other system and the OB API, then includes the token with each request. Without both the connection and a valid token, the other system cannot retrieve the data. Most of the API reads data. A small number of endpoints can also update it, so when you create a token you choose whether it is allowed to. A token created as Read only can never change anything in OB — if you only need reporting, that is the one to use.

Example — Step 1: Create an API token
Go to Admin → Custom Features → API → Content, select Create token, enter a label, choose an Access level and a Mode, and save. Copy the token and store it securely. Tokens are long-lived until you delete them from this page.
Access and Mode are fixed when the token is created and cannot be edited afterwards. To change either one, delete the token and create a new one. This is deliberate: an integration built against a read-only test token should never quietly gain the ability to change live data.
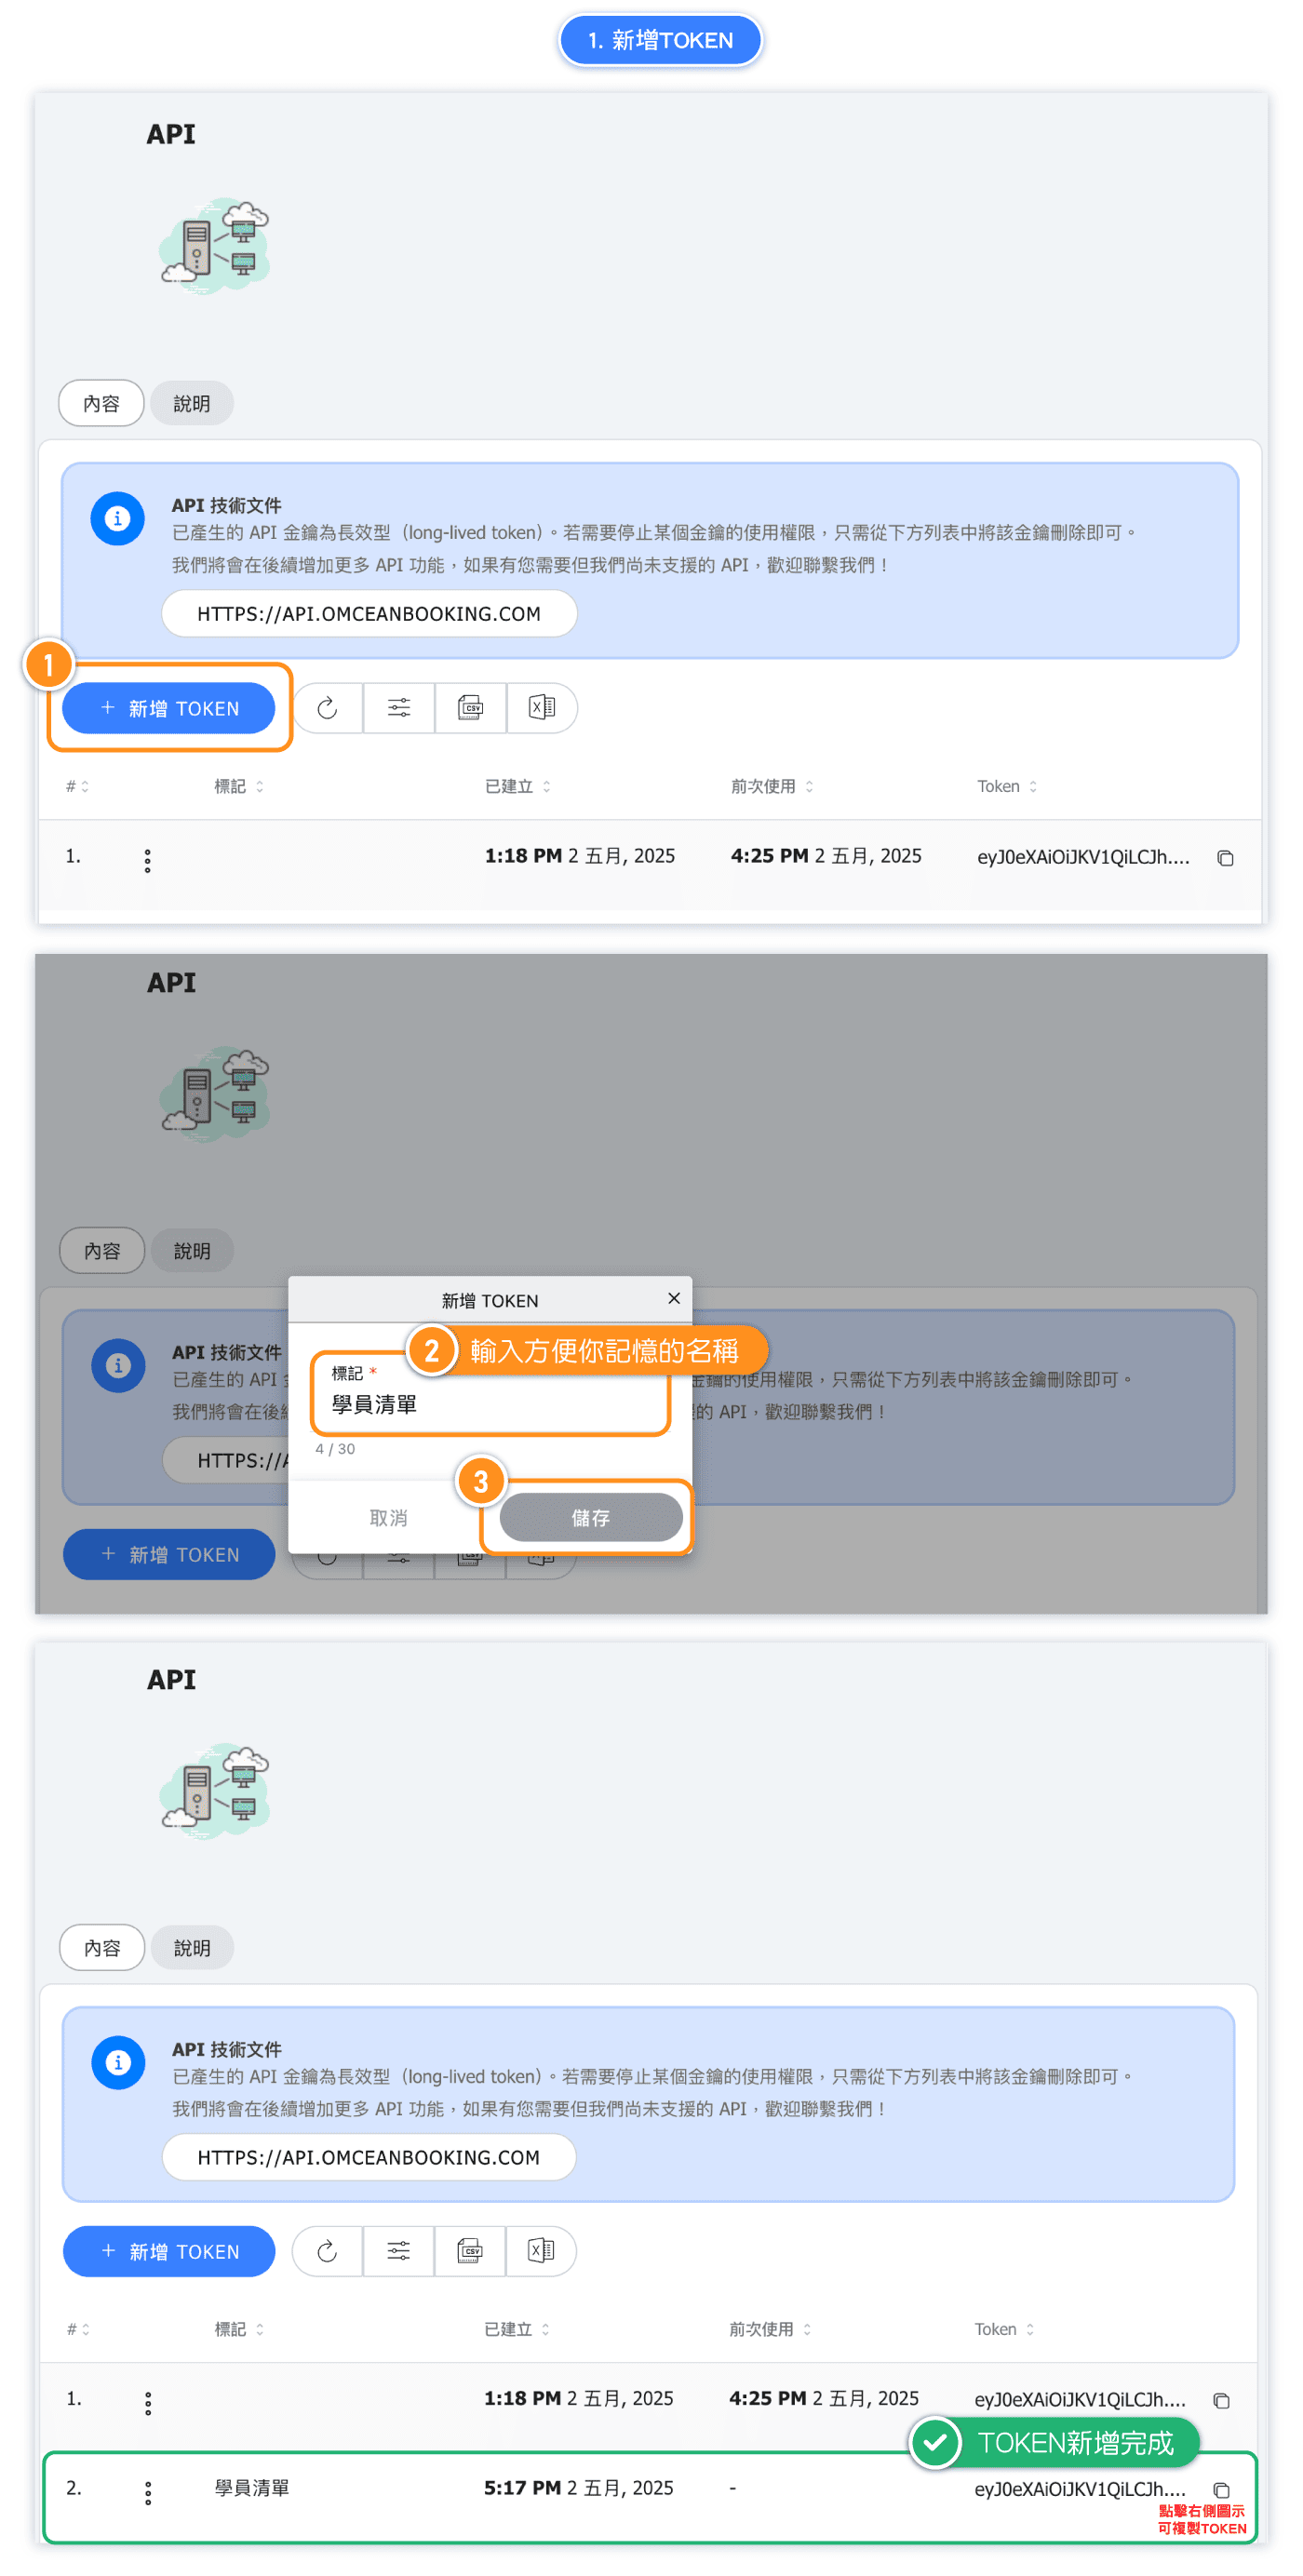
Example — Step 2: Copy a URL from the API documentation
Open the API documentation and find the GET endpoint for the data you need. For example, use /v1/users to retrieve users.
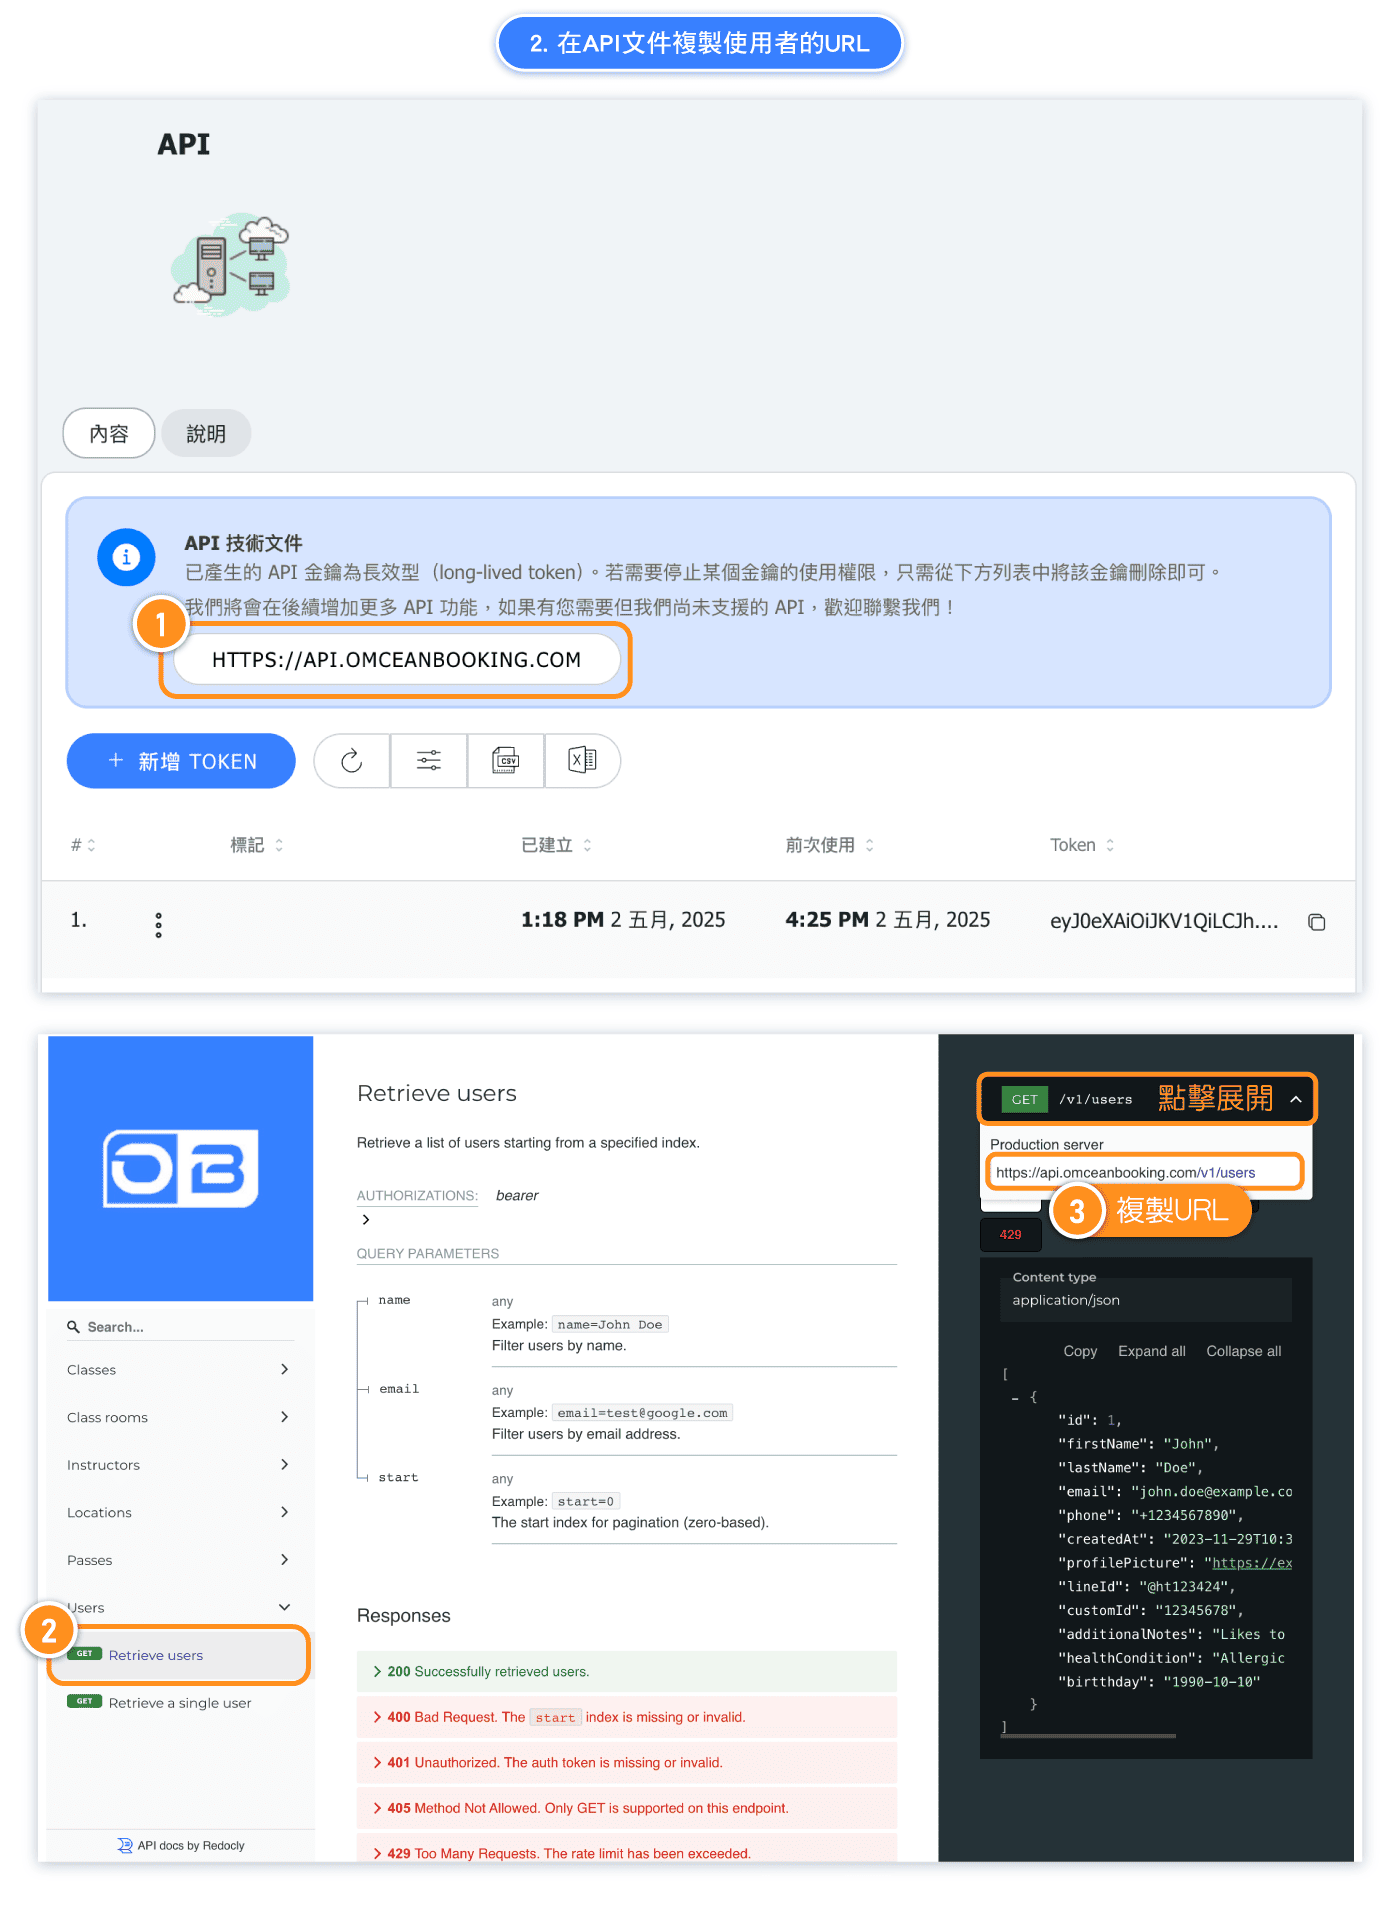
Example — Step 3: Add the URL to your API tool
Open Postman or another API tool and create a new HTTP request. Select GET, then paste the URL copied from the API documentation.
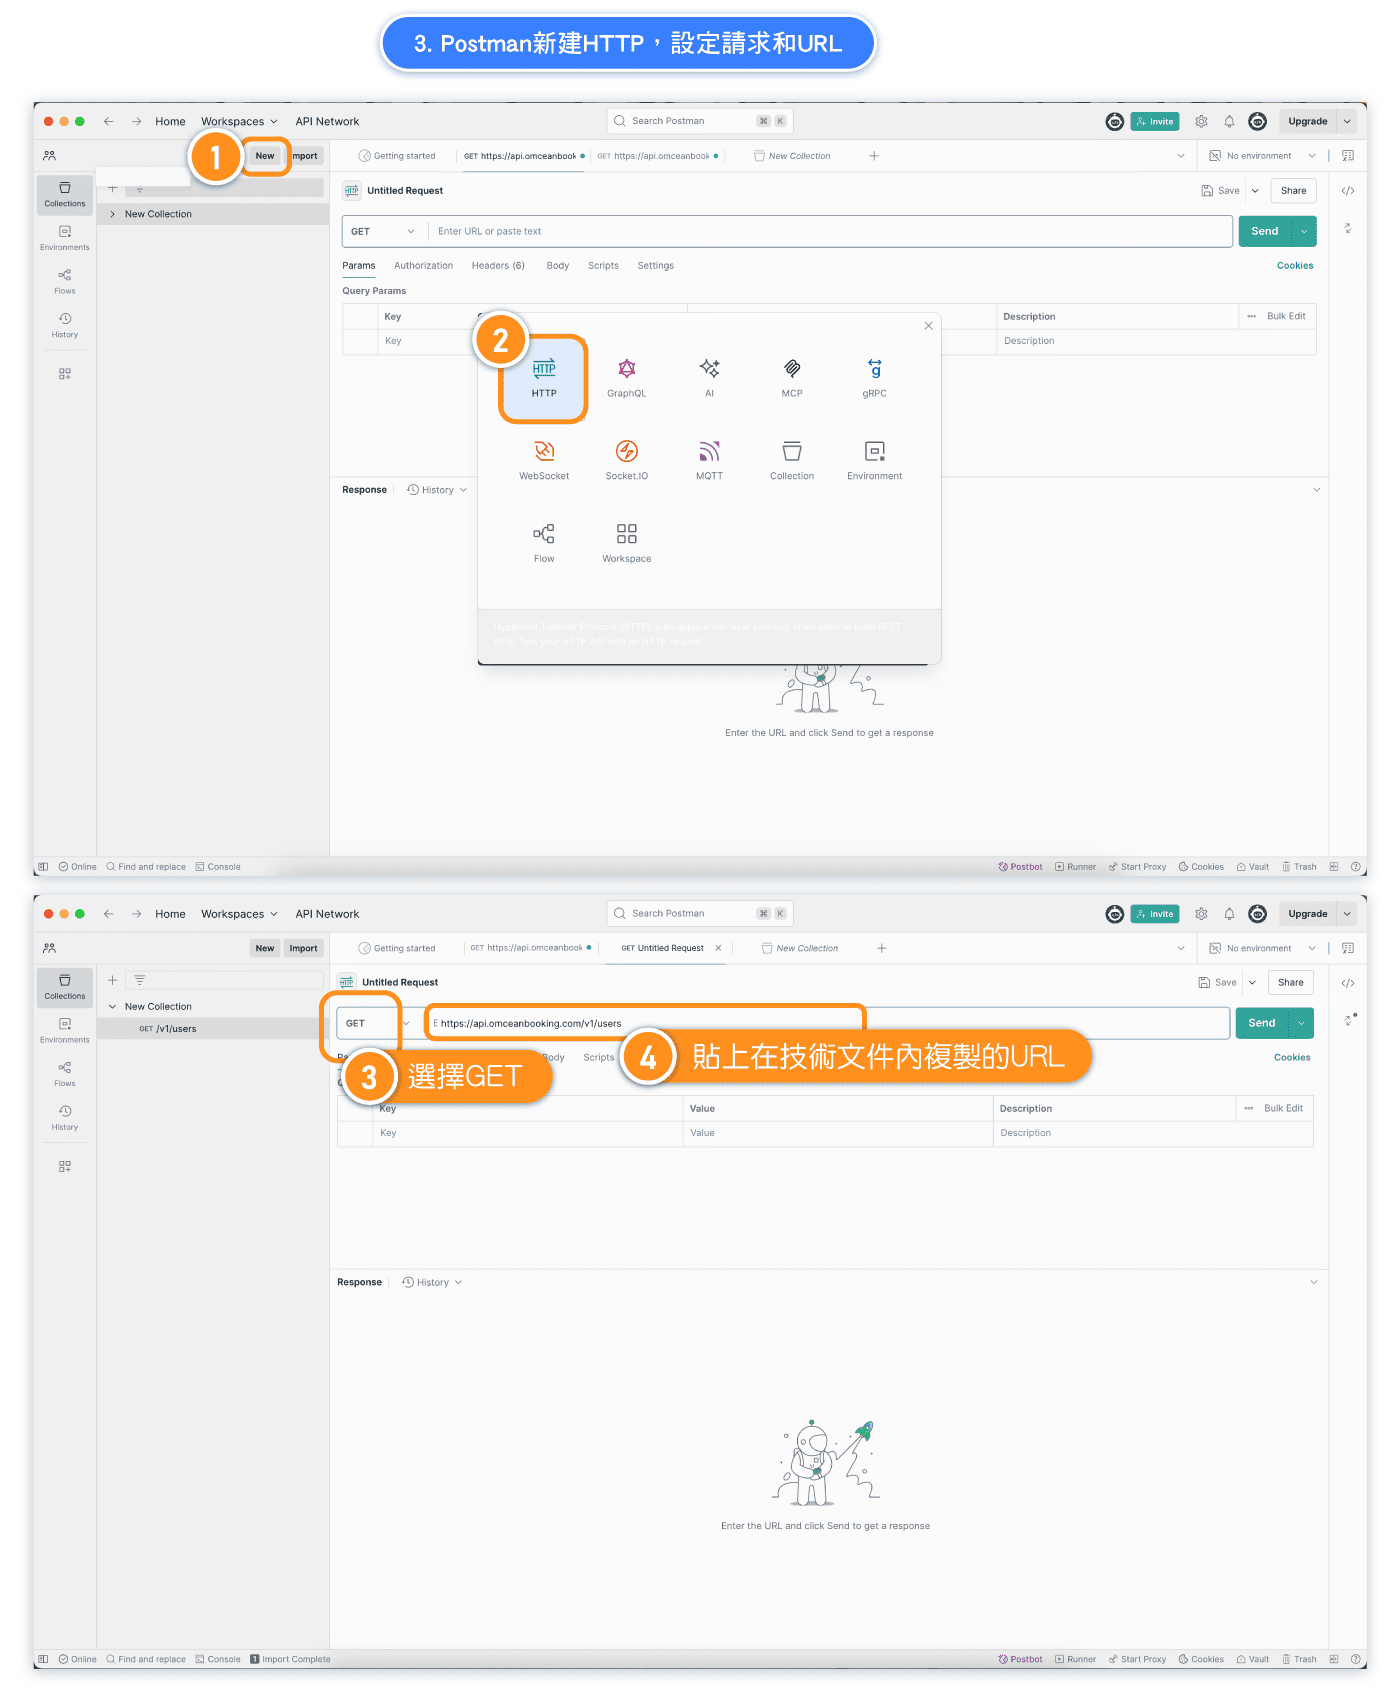
Example — Step 4: Add the authorization header and send
Add an Authorization header with the value Bearer <your-token>. Select Send to view the response.
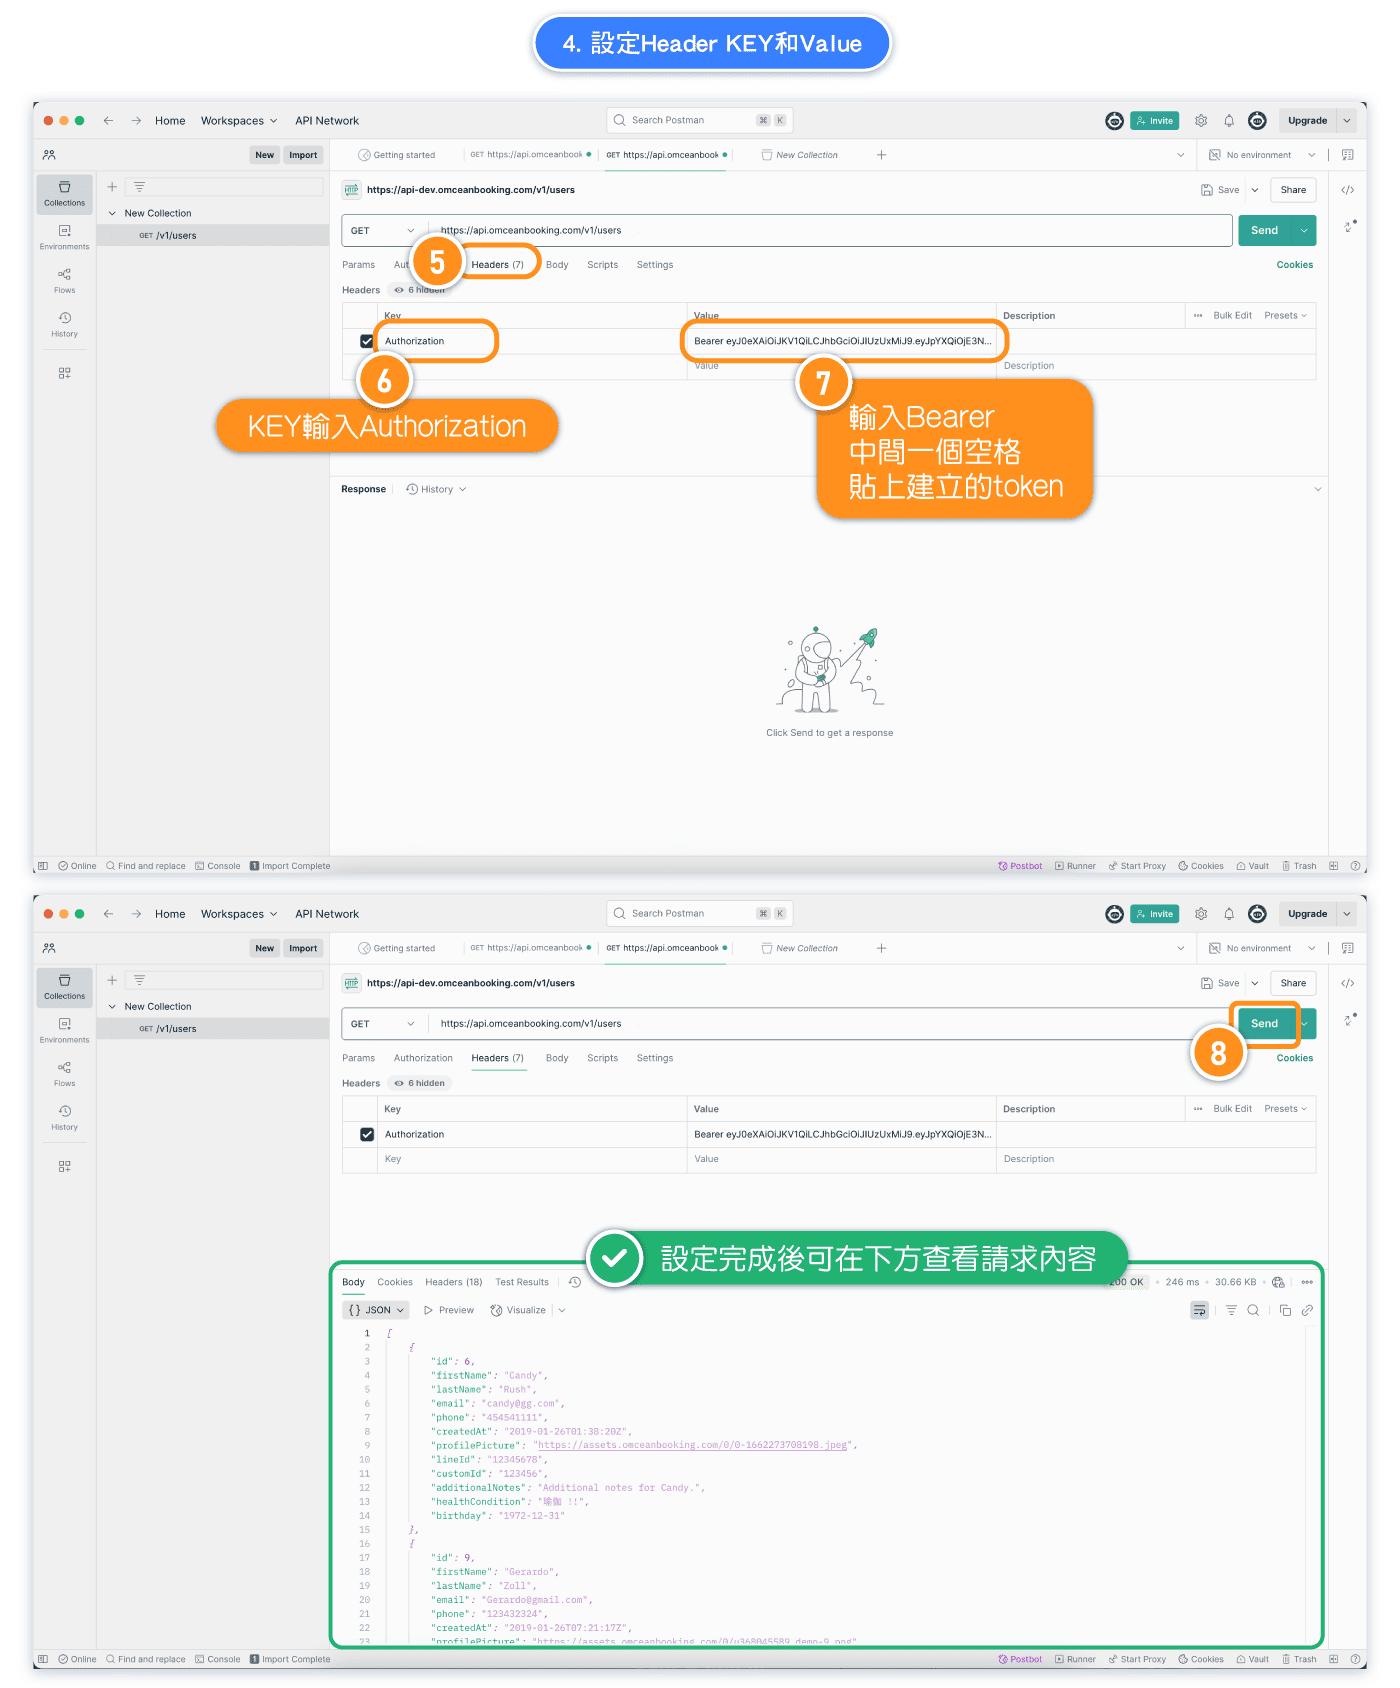
API data availability FAQ
1. Can I retrieve a member's purchased plans and remaining classes?
Partly. GET /v1/user-passes returns purchased passes, purchase and activation dates, expiration, type, and the purchased number of visits or points. The visits field is the total allocation on the purchased pass, not a calculated remaining balance. The API does not currently return a dedicated remaining-classes field.
2. Can I retrieve historical and future reservations?
Yes. Use GET /v1/reservations and filter by customer email or name plus date_from and date_to. Results are ordered by class time, most recent first. Cancelled reservations are returned separately by GET /v1/cancellations.
3. Are attended, cancelled, and no-show statuses available?
Partly. Reservations include an attended boolean. Cancellations include the cancellation time, who cancelled, and whether a penalty was applied. There is no single status field that distinguishes every state: attended: false can mean a future or not-yet-marked reservation as well as a no-show, so your integration must also consider the session time and cancellation data.
4. Can the API identify trial or experience classes?
Not with a dedicated field. Class responses do not currently include a trial-class flag. If your business uses a specific class ID or naming convention for trial classes, your integration can identify them using that convention.
5. Can I retrieve a member's most recent class date?
Yes. GET /v1/users and GET /v1/users/{id} return lastAttendance, which is the member's most recent recorded class attendance and may be null when no attendance has been recorded.
6. Can I retrieve payment or purchase history?
For purchased passes. GET /v1/user-passes returns purchase time, payment status, payment method, price, customer, and pass. GET /v1/user-passes/{id} also returns the payment reference. The current API does not provide a general ledger covering every payment or shop purchase type.
Webhooks and event notifications
The API does not provide webhooks or event notifications. An integration that needs to know when something changes must poll the relevant endpoint and stay within the rate limit. This is separate from write access: the API can now update a few things, but it will never call your system when something changes in OB.
Authentication, rate limits, and token management
Authentication: The API uses a JWT bearer token, not OAuth. After the API custom feature is enabled, go to Admin → Custom Features → API → Content and select Create token. There is no separate API-key application process. Send the token in every request as Authorization: Bearer <your-token>.
Access — what the token may do. A Read token may only issue GET requests; anything that would change data is refused with HTTP 403 Forbidden. A Read / write token may do both. Prefer Read for reporting and analytics integrations: it is the safer choice, and because access cannot be edited later, a read token can never be widened by accident.
Mode — which data the token touches. A Live token acts on your real business data. A Test token is redirected to a shared sandbox business, so you can exercise the endpoints that change data without any risk to your own records. See Testing with a test token below.
The two are independent, so a token can be read-only on live data, read/write on the sandbox, or any other combination. Both are shown against every token on the API Content page.
How many tokens you can hold. Each business may hold a maximum of three live tokens at once. Once you reach that limit, Live mode is no longer offered when you create a token — the Mode selector lists only Test (sandbox), and the help text under it tells you the live limit has been reached rather than describing the sandbox. Test tokens are not limited, because they only ever reach the shared sandbox. Deleting a live token frees a slot immediately and Live mode becomes selectable again, so you can still rotate a token by deleting the old one and creating its replacement.
Token security: Tokens are long-lived and should be treated like passwords. Do not place them in browser code or public repositories. To revoke a token, open its row menu on the API Content page and delete it.
Rate limits: Each API token is limited to 100 requests per fixed one-hour window. Responses include X-RateLimit-Limit, X-RateLimit-Remaining, and X-RateLimit-Reset. An exceeded limit returns HTTP 429 with Retry-After. A separate burst guard allows approximately five requests per second per IP address. List endpoints return up to 100 records at a time and use the zero-based start parameter for pagination.
Track API usage
For a focused guide to the Usage table, its filters, response codes, and troubleshooting workflow, see Track API usage.
Testing with a test token
A Test token lets you try the API — including the endpoints that change data — without touching your real records. Create one exactly as above, choosing Mode: Test, and send it in the same Authorization: Bearer header. Nothing else about your integration needs to change.
Where the requests go. Every request made with a test token is redirected to a shared sandbox business. Your own data is never read or written by a test token, so a mistake in a script cannot cancel a real class or change your booking window.
Nothing is ever sent from the sandbox. No emails and no notifications leave it, no matter how many bookings you create or cancel. Cancelling a class in test mode will not message any customer or member of staff.
The sandbox is reset every night. Treat everything in it as disposable and never store a sandbox id in your own system — it will not exist tomorrow. If a test run suddenly stops making sense, the overnight reset is the first thing to check.
Its ids are not your ids. The sandbox is a different business, so do not reuse class, customer, or pass ids from your live data. Discover them first: list the calendar with a GET, take an id from the response, then use that id in the request you are testing.
It is shared. Other businesses test against the same sandbox, so data you did not create will be present and may change while you work. Write your checks against what your own request returned rather than against totals or counts.
Going live. Create a separate Live token and swap it in. Because a token's mode cannot be changed after creation, there is no way to accidentally point a test integration at real data — going live is always a deliberate act of issuing a new token.