
What are News, Blog, and Announcement posts?
The News/Blog feature allows you to publish content directly to your booking platform. There are three types of posts, each designed for different purposes:
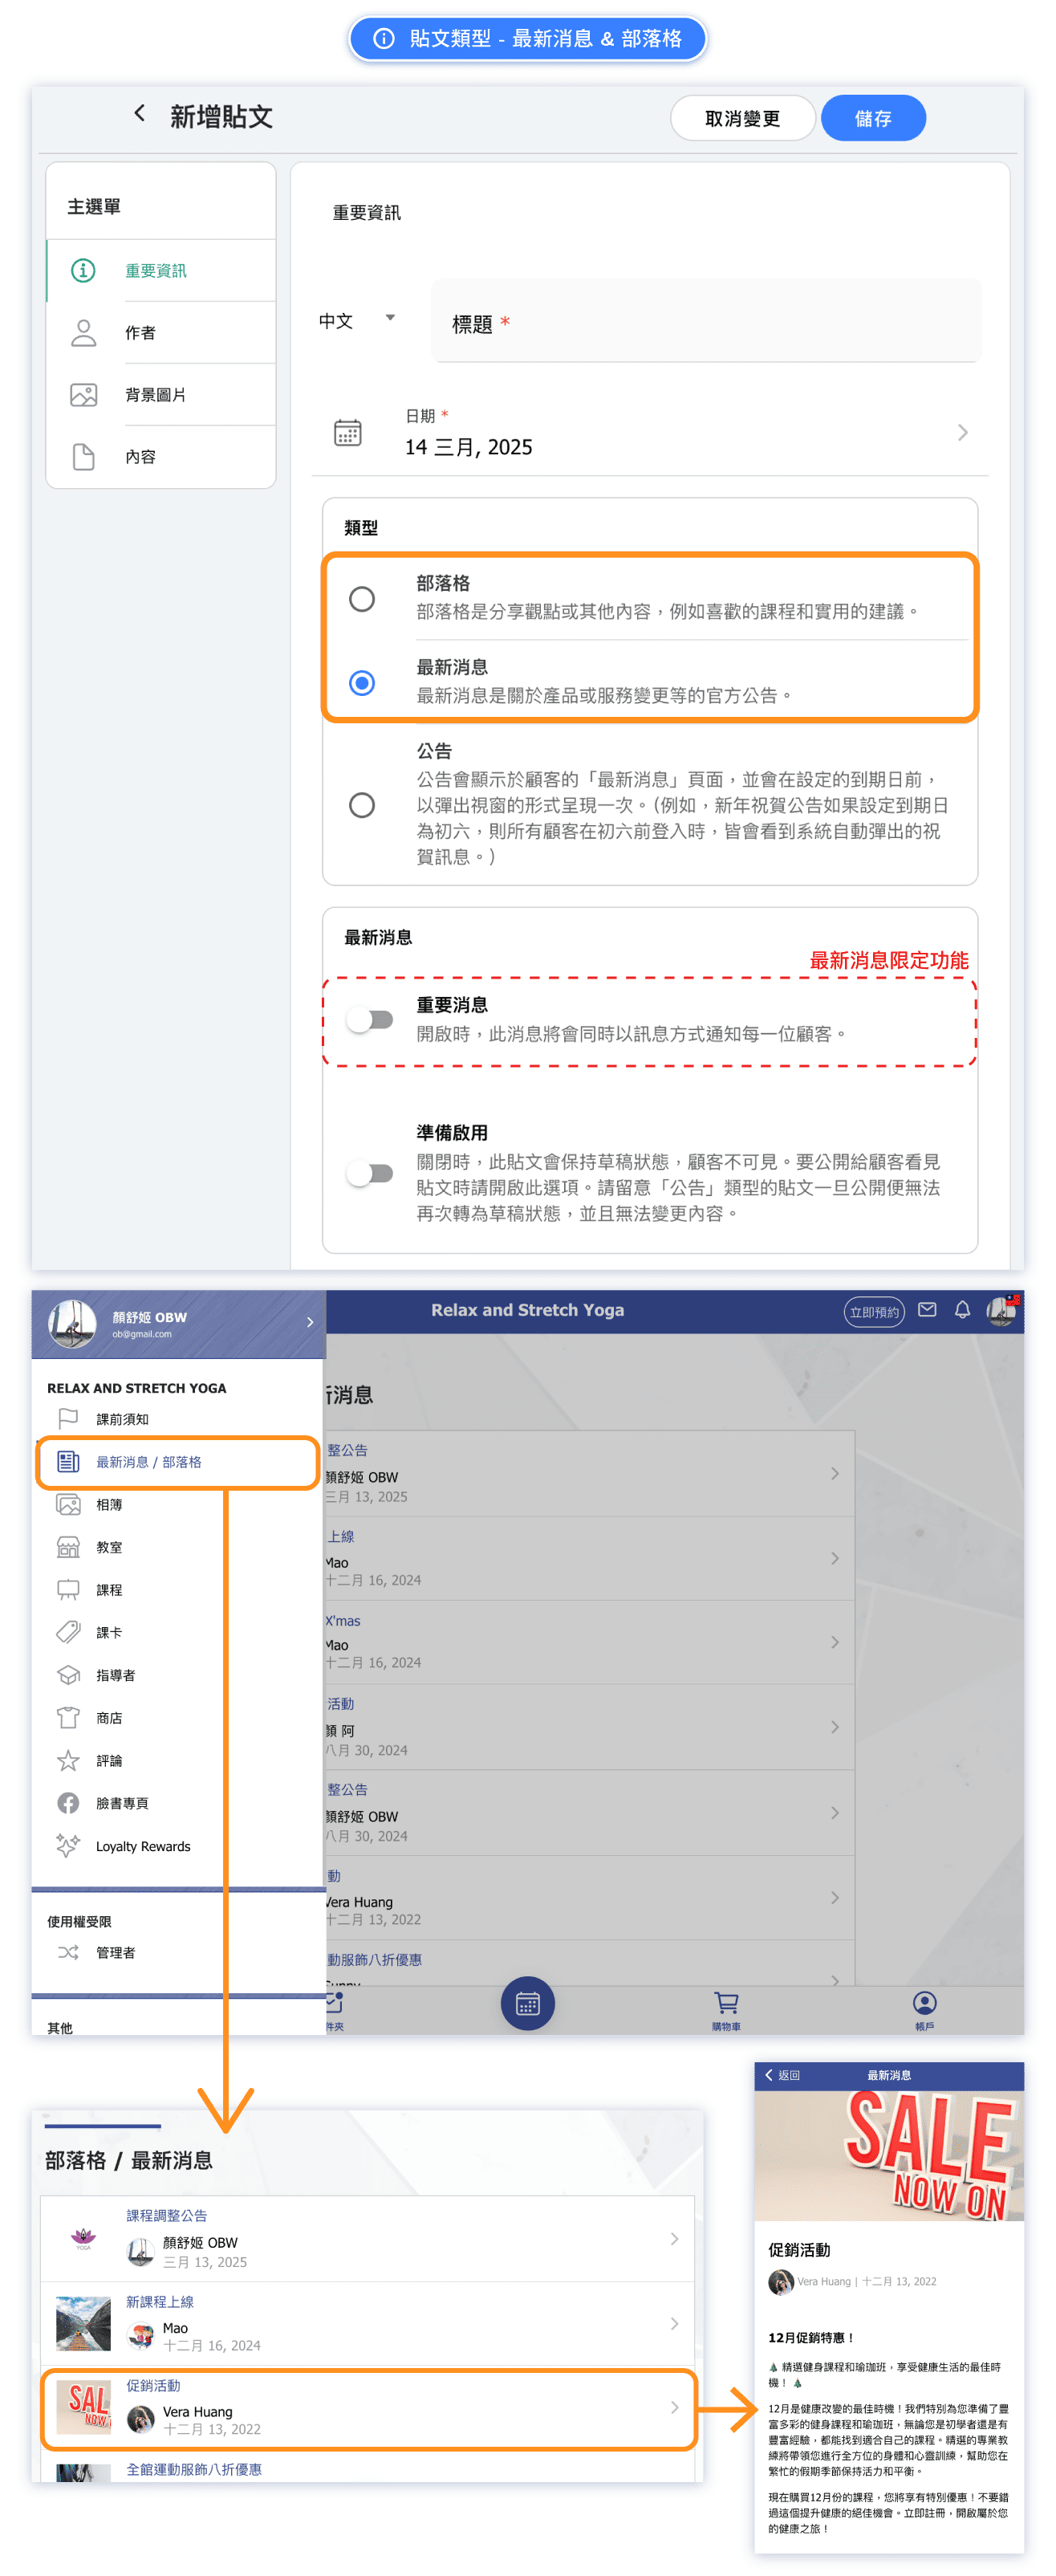
- News: Time-sensitive updates that can be sent as notifications to all customers
- Blog: Articles, tips, and content to engage customers and build your brand
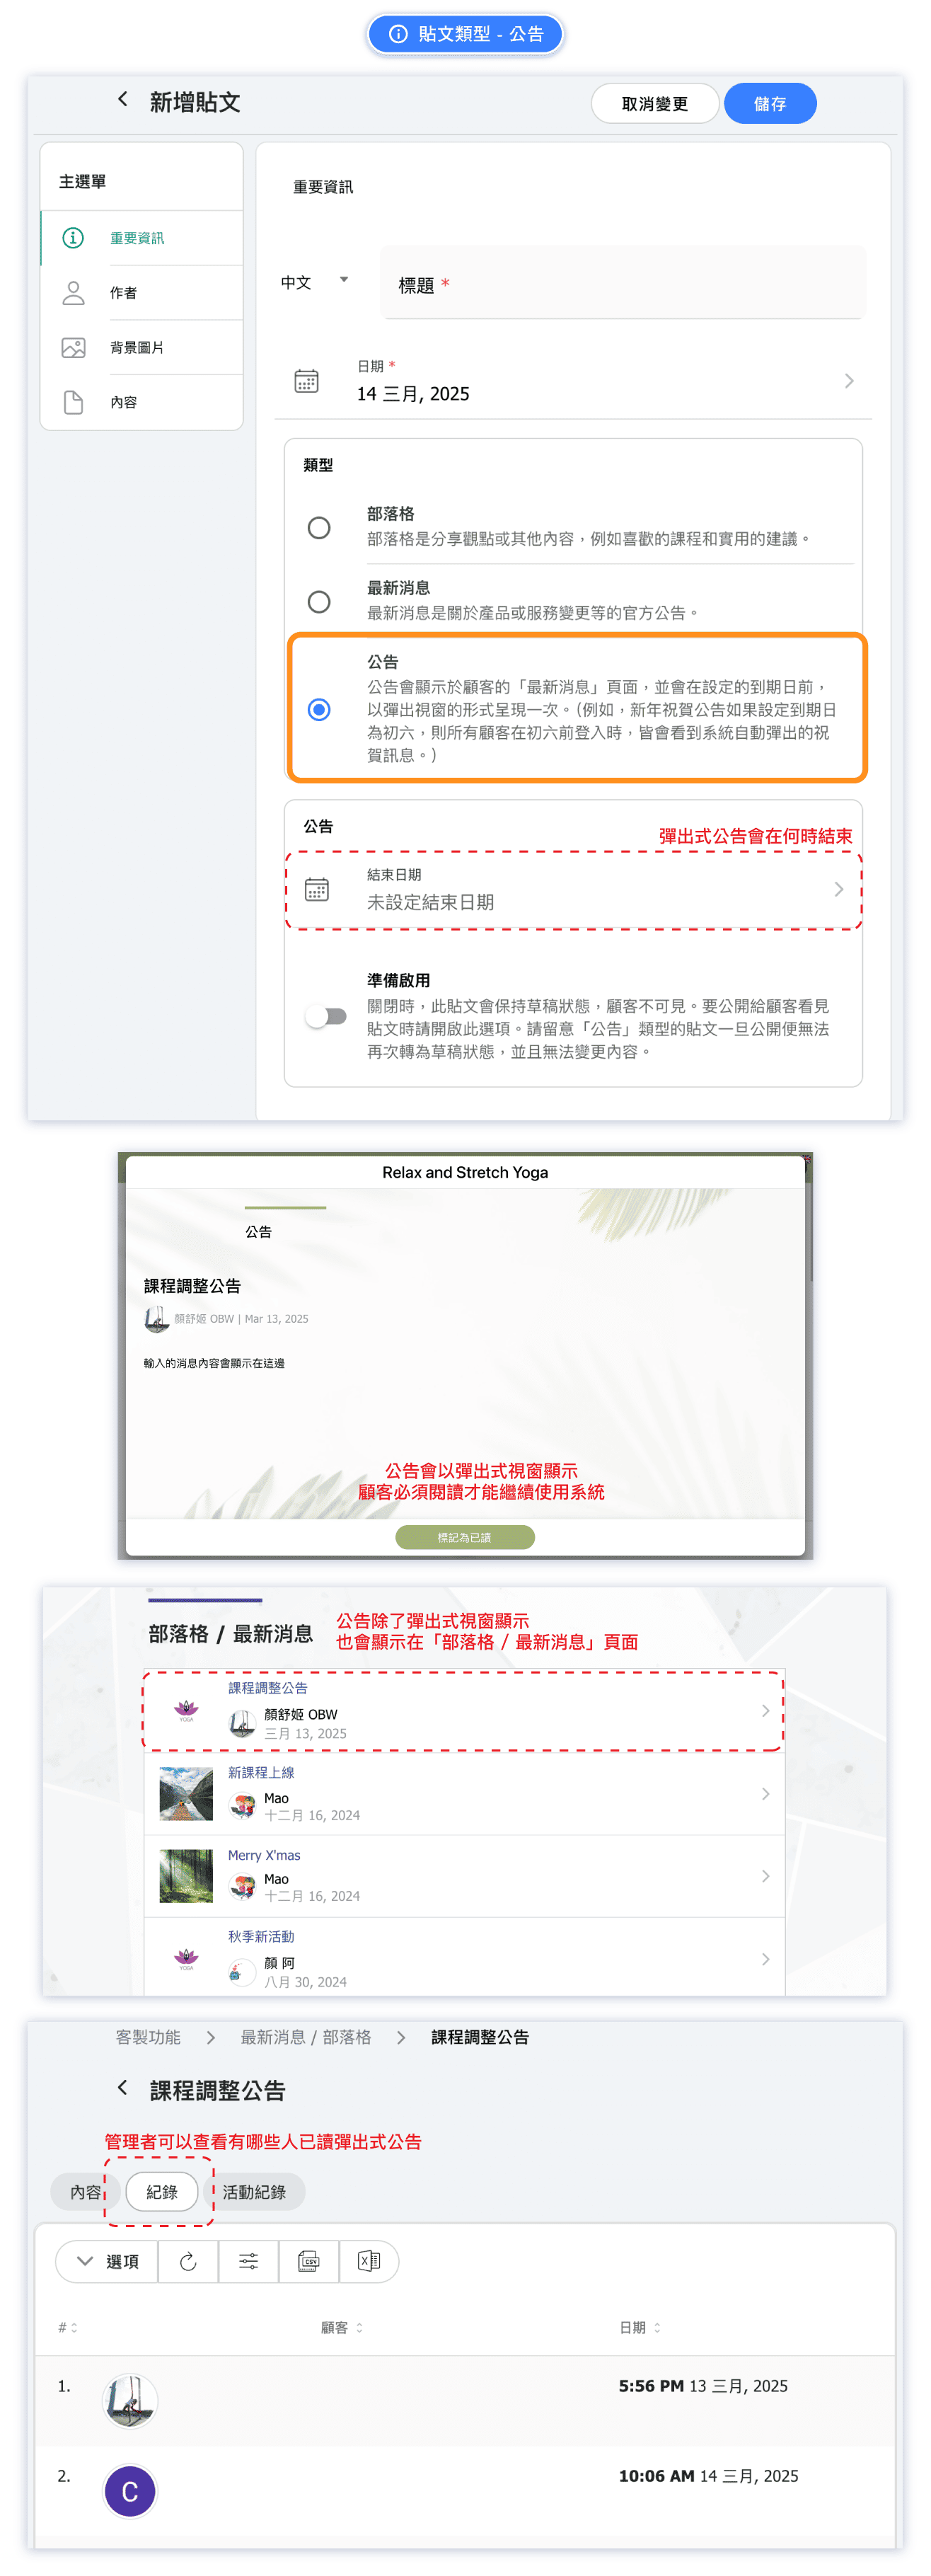
- Announcement: Important information displayed as a popup that customers must acknowledge
All posts appear in the News/Blog section of your customer-facing booking page, but each type has unique features that make it suitable for different situations.
When should I use a News post?
Use News when you have urgent or time-sensitive information that customers need to know right away. News posts can optionally send a notification message to all customers.
Best for:
- Schedule changes or class cancellations
- New class or service launches
- Limited-time promotions or flash sales
- Important operational updates
- Holiday hours or temporary closures
Key feature: When creating a News post, you can choose to send a push notification or message to all customers, ensuring they see your update immediately rather than waiting for them to check your page.
When should I use a Blog post?
Use Blog for content that builds your brand and keeps customers engaged over time. Blog posts are perfect for sharing expertise and creating a connection with your audience.
Best for:
- Wellness tips and health advice
- Instructor spotlights and team introductions
- Success stories and customer testimonials
- Industry insights and trends
- Behind-the-scenes content
- Seasonal content and themed articles
Key feature: Blog posts remain visible on your page for customers to browse at their leisure. They help establish you as an expert in your field and give customers a reason to keep coming back to your page.
When should I use a general Announcement?
Use a general Announcement when every customer needs to read and acknowledge important information. Announcements appear as a popup that customers must acknowledge before continuing.
Best for:
- Policy changes such as cancellation policies or booking rules
- Terms and conditions updates
- Safety guidelines and studio rules
- Price changes effective from a certain date
- Important notices that apply across the business
If the information applies only to one scheduled class or appointment, use a class schedule announcement instead. This avoids interrupting customers who are not attending.
How do I create a new post?
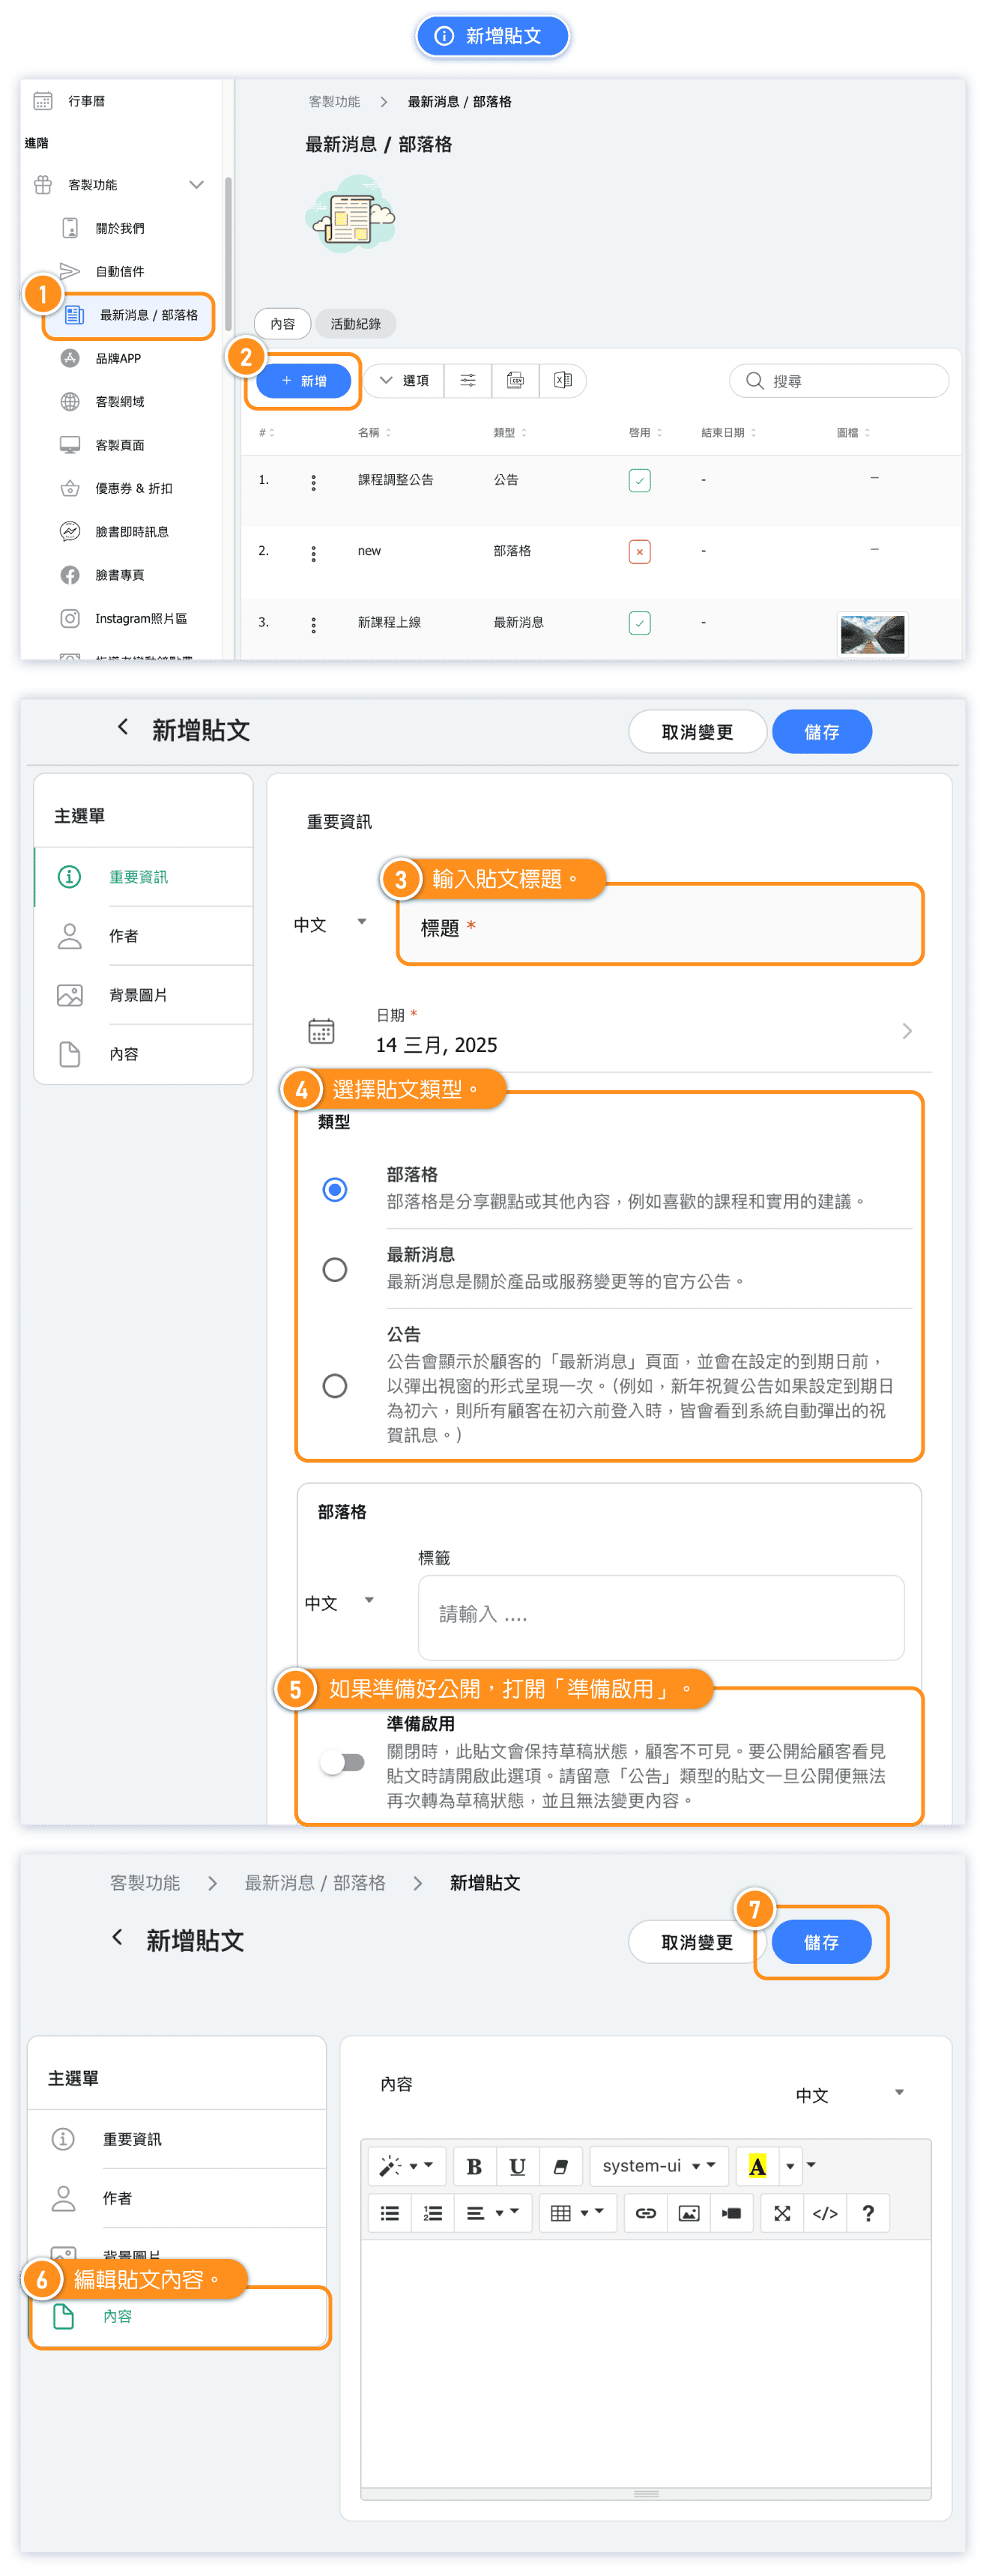
Follow these steps to create a News, Blog, or Announcement post:
- Go to Custom Features in the admin menu
- Click on News / Blog
- Click the + NEW button
- Fill in the Important Information:
- Title for your post
- Post type (News, Blog, or Announcement)
- Publish date and optional end date
- Add an Author (optional)
- Upload a Cover Photo to make your post visually appealing
- Write your Content using the rich text editor
- Click Save to publish
Which post type should I choose?
Here's a quick comparison to help you choose:
| Feature | News | Blog | Announcement |
|---|---|---|---|
| Best for | Urgent updates | Content marketing | Must-read info |
| Notification | Can send to all customers | No notification | No notification |
| Display | In news feed | In news feed | Popup window |
| Customer action | Optional reading | Optional reading | Must acknowledge |
Rule of thumb:
- Need customers to act quickly? → News with notification
- Building brand and sharing content? → Blog
- Policy or terms customers must accept? → Announcement
How do I post an announcement to one class session?
Besides site-wide announcements, you can write an announcement for a single scheduled class. Only customers with an active confirmed reservation for that session see it, including customers already booked when it is published and customers who book afterwards. This area belongs to the News / Blog feature, so it is available when News / Blog is switched on for your business, and it appears on a class session only after that session has been saved — you will not see it while you are still creating the class.
- Open the scheduled class from Schedule or from the calendar.
- Select the Announcements area. The table lists every announcement for that session with its title, whether it is live, whether it sends a push notification, and when it was created. The search box matches the English and Chinese titles.
- Click New announcement to write a new one, or click a row to open an existing one.
- Fill in the Title (up to 300 characters) and the Announcement message (up to 8,000 characters). Both are required in English and Chinese.
- Turn on Send push notification if you want everyone currently booked to be notified when the announcement goes live. Customers who book the session afterwards are notified too. These push notifications do not create inbox messages.
- Turn on Ready to go and save to publish it to the people booked on that session. Leave it off while you are still drafting.
Publishing locks the announcement. Once it is live, the title, message and both toggles become read-only and the save button disappears — you can still open the announcement to read it, but you cannot change it. Draft it fully, then publish last.
To remove an announcement, open the … menu at the end of its row and choose Delete announcement, then confirm when you are asked. Deleting also removes it from the app for attendees who have not read it yet.
What do customers see when I publish a class session announcement?
Customers with an active confirmed reservation for the session see the announcement in the app as soon as it is live — it appears on the next update check, so they do not need to reload the app. Customers who book after publication see it too.
- The announcement opens with the class cover photo, an Announcement badge and the class time. A placeholder image is used when the class has no cover photo.
- Below the title, the customer sees which class the announcement belongs to, plus the session date and time, followed by your message.
- To dismiss it, the customer taps the tick in the header, which records that they have read it against their account. The acknowledgement follows their account across devices, and the announcement is then cleared from their app.
- If you turned Send push notification on, current attendees receive a push when the announcement goes live and later attendees receive one after booking. These pushes do not create inbox messages.
Class session announcements sit after site-wide announcements and before any pending surveys, so customers work through them in one pass.