
What is the Photo Album Feature?
The Photo Album feature allows you to create and share photo galleries with your customers. It's designed for businesses that want to:
- Document classes - Instructors can capture memorable moments during classes
- Share with students - Students who attended a class can view photos from their session
- Showcase your services - Create public albums to attract new customers
- Control privacy - Choose who can see each photo (private, restricted to attendees, or public)
Two Ways to Add Photos:
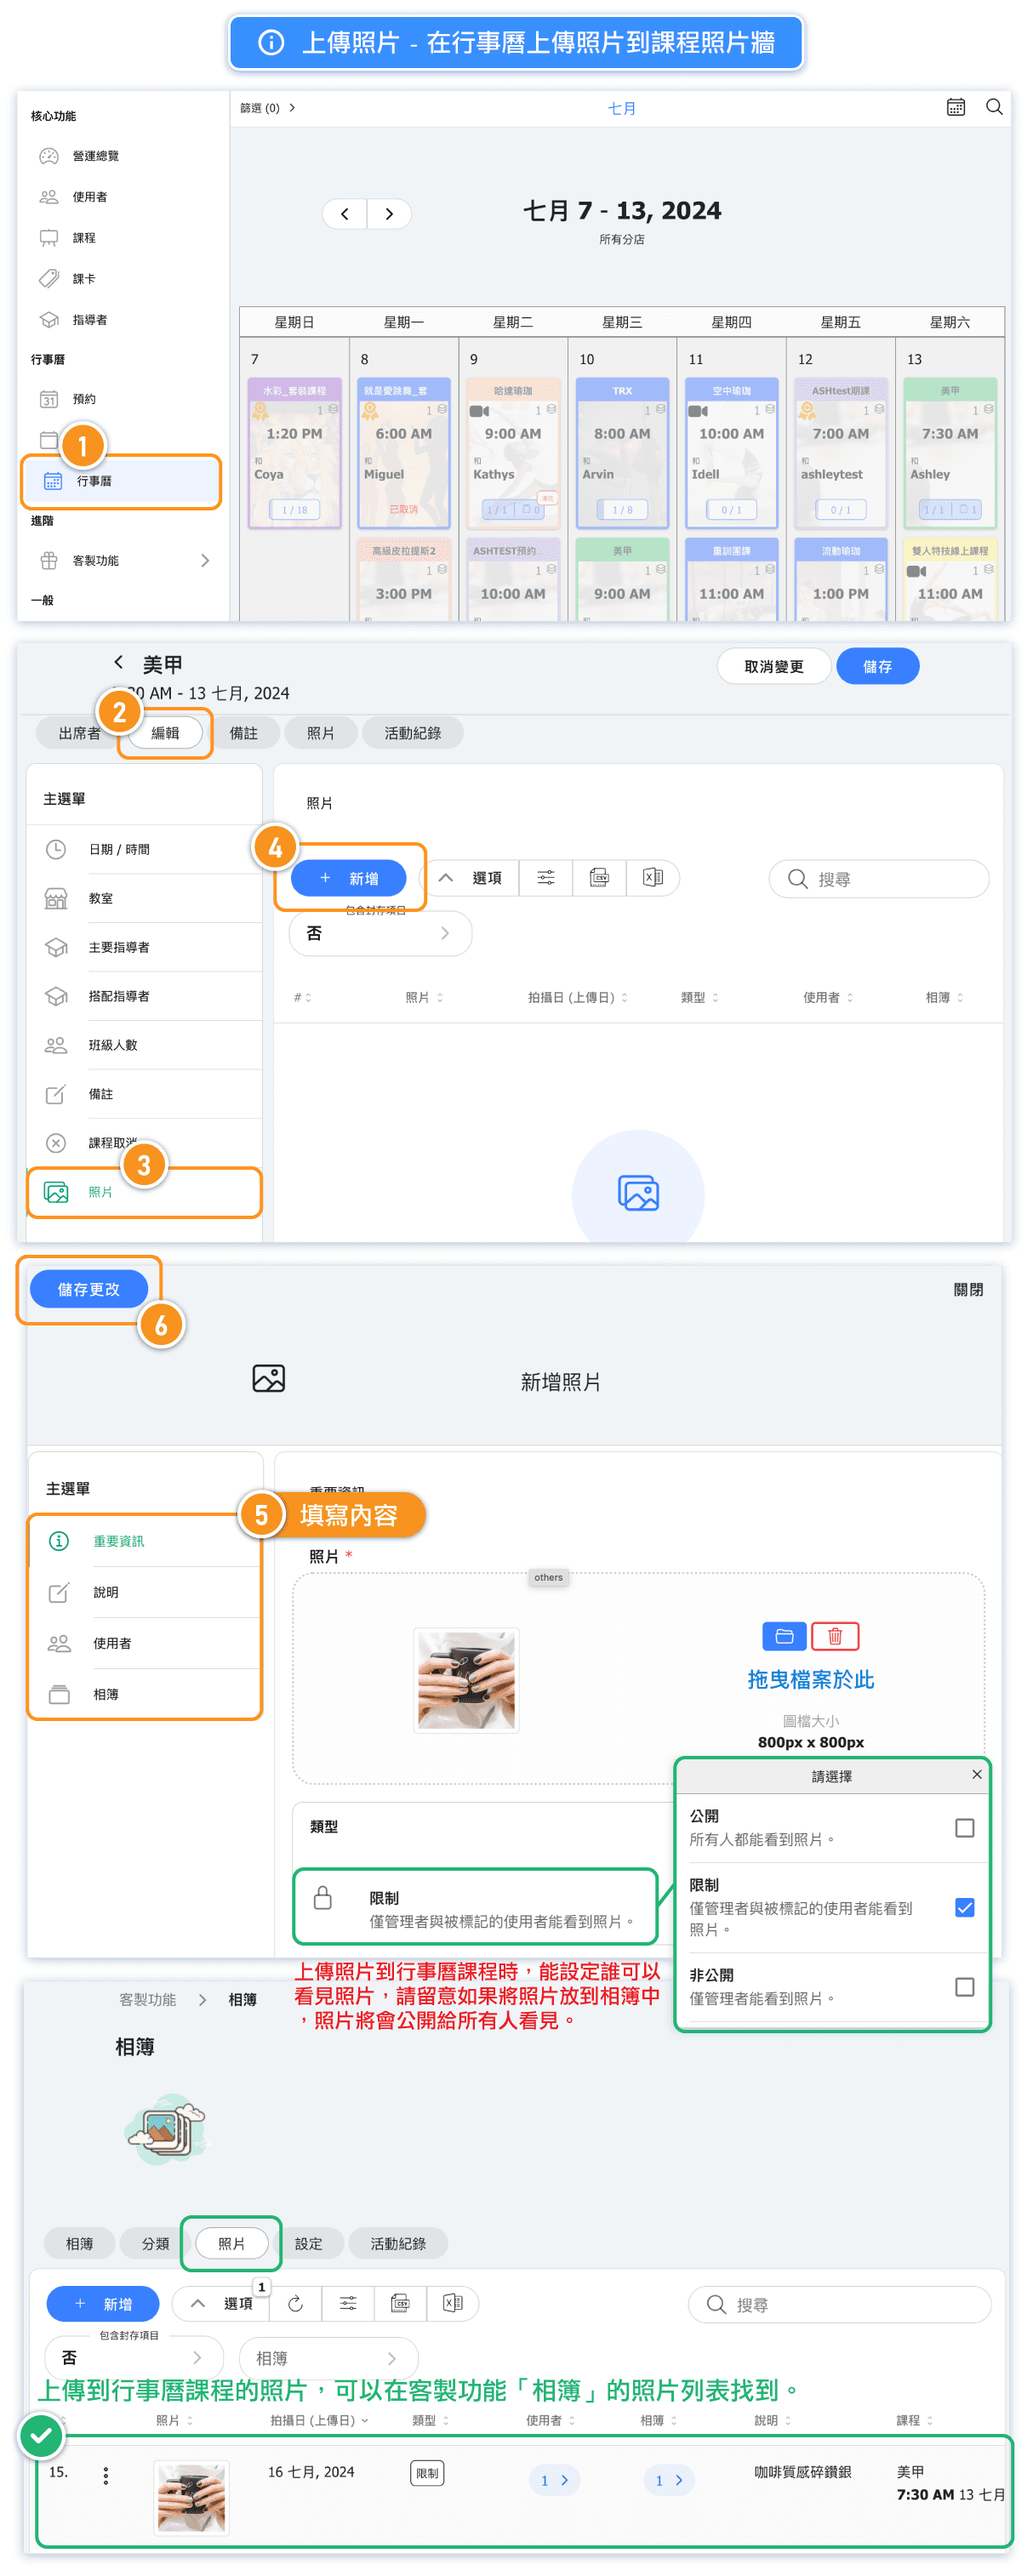
- Class Photo Wall - Upload photos to a specific class date in the calendar. Great for sharing class-specific photos with attendees only.
- Photo Album Page - Upload photos to your central album gallery. Better for curated collections and public showcases.
How Do I Upload Photos to a Specific Class?
The Class Photo Wall is perfect for instructors who want to share photos from a specific class session with the students who attended.
Steps to Upload:
- Go to Calendar in the left sidebar
- Click on the class you want to add photos to
- Select the Photos tab
- Click Upload or drag and drop your photos
- Set the visibility for each photo (see visibility options below)
Visibility Options for Class Photos:
- PRIVATE - Only you (admins) can see the photo
- RESTRICTED - Only students who attended this specific class can see the photo
This is ideal for photos that include students' faces or personal moments that shouldn't be shared publicly.
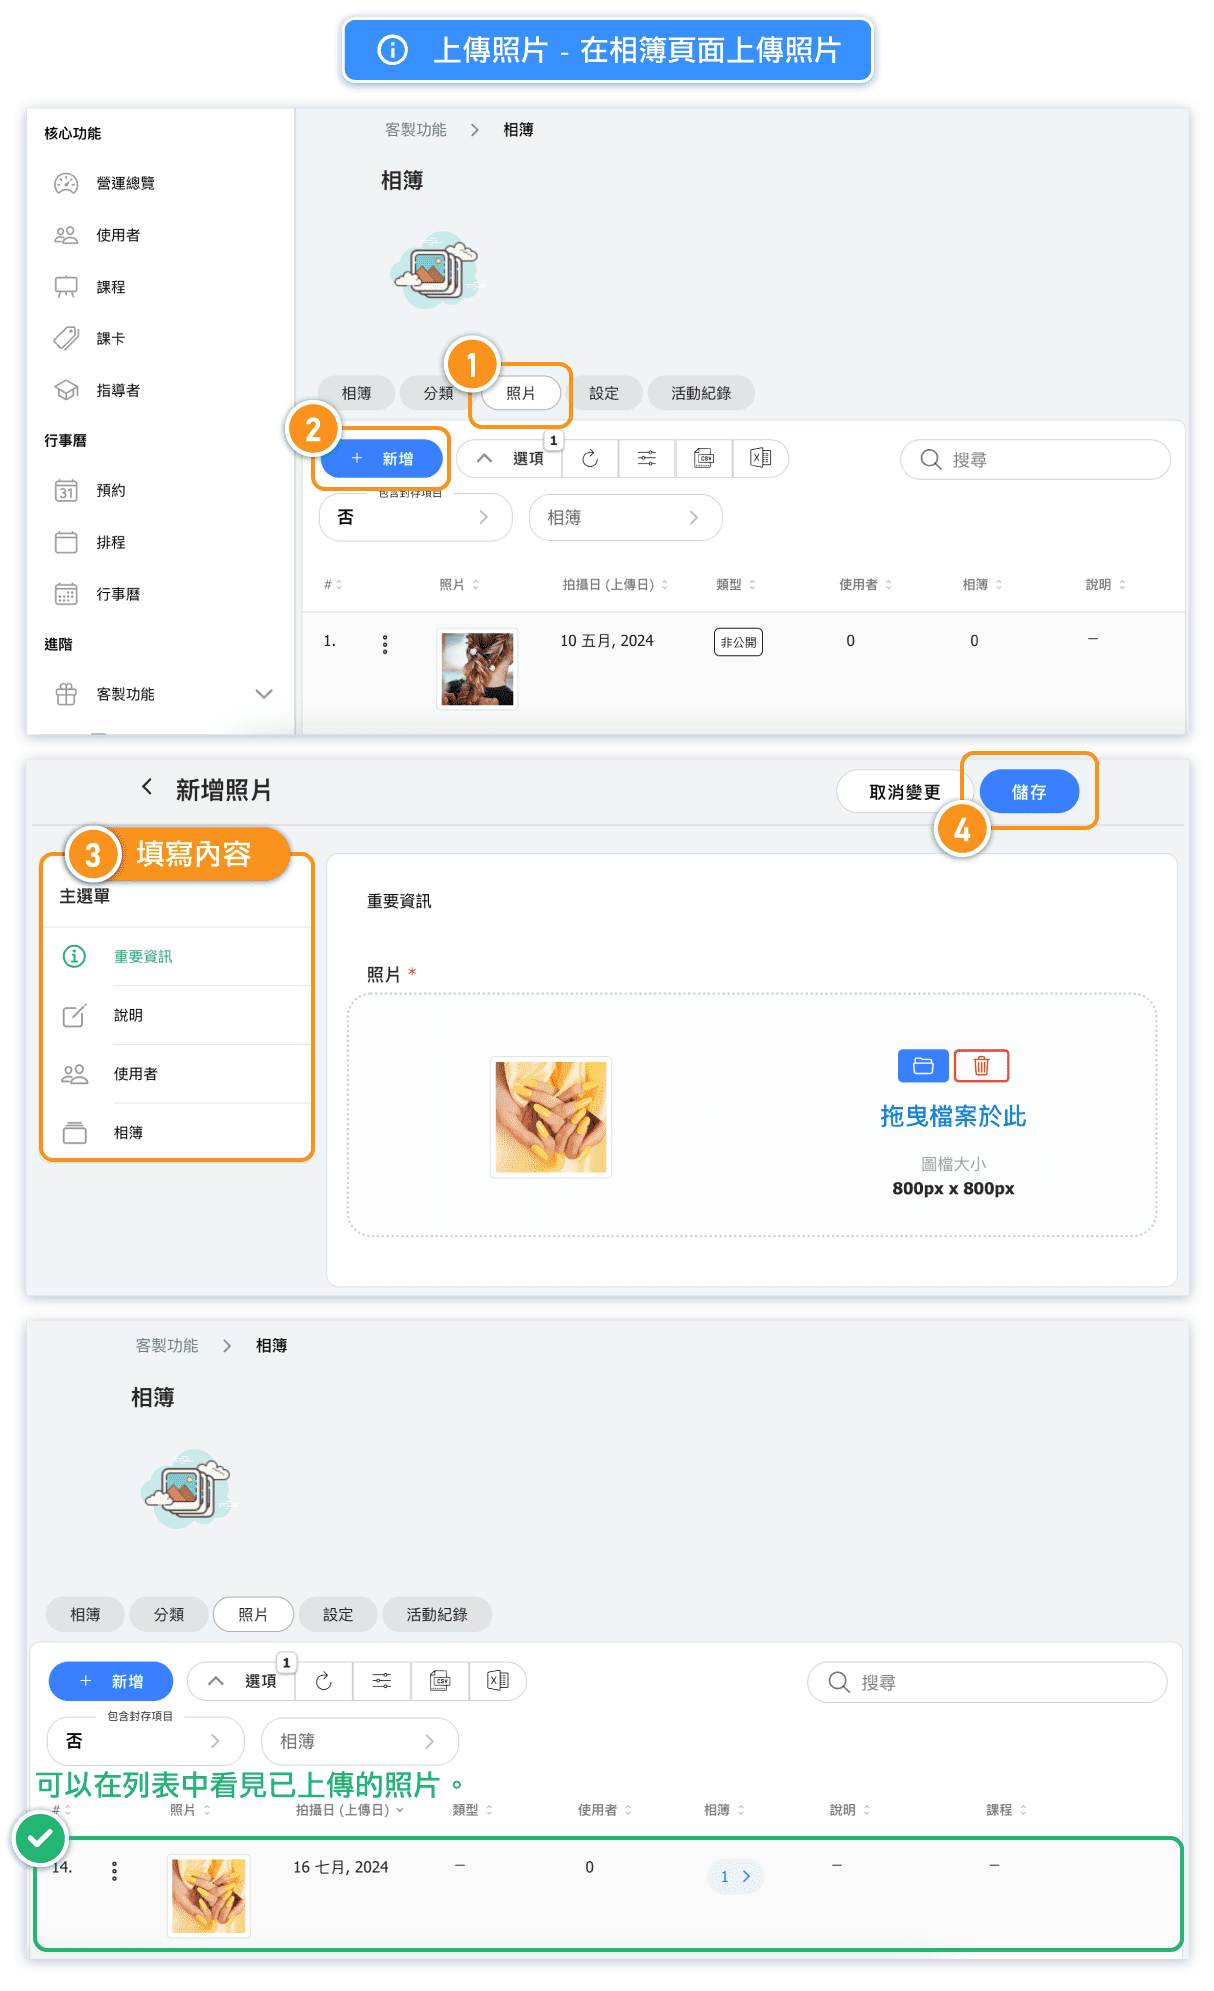
How Do I Upload Photos to the Photo Album Page?
The Photo Album page is your central gallery where you can organize and showcase photos. This is better for creating curated collections that you want to display publicly.
Steps to Upload:
- Go to Custom Features > Photo Album in the left sidebar
- Click on the Photos tab
- Click Upload Photos
- Select photos from your computer
- Add descriptions or tags if needed
Note: Photos uploaded directly to the Photo Album page can be organized into albums and shared publicly. Use the Class Photo Wall instead if you want to restrict visibility to class attendees.
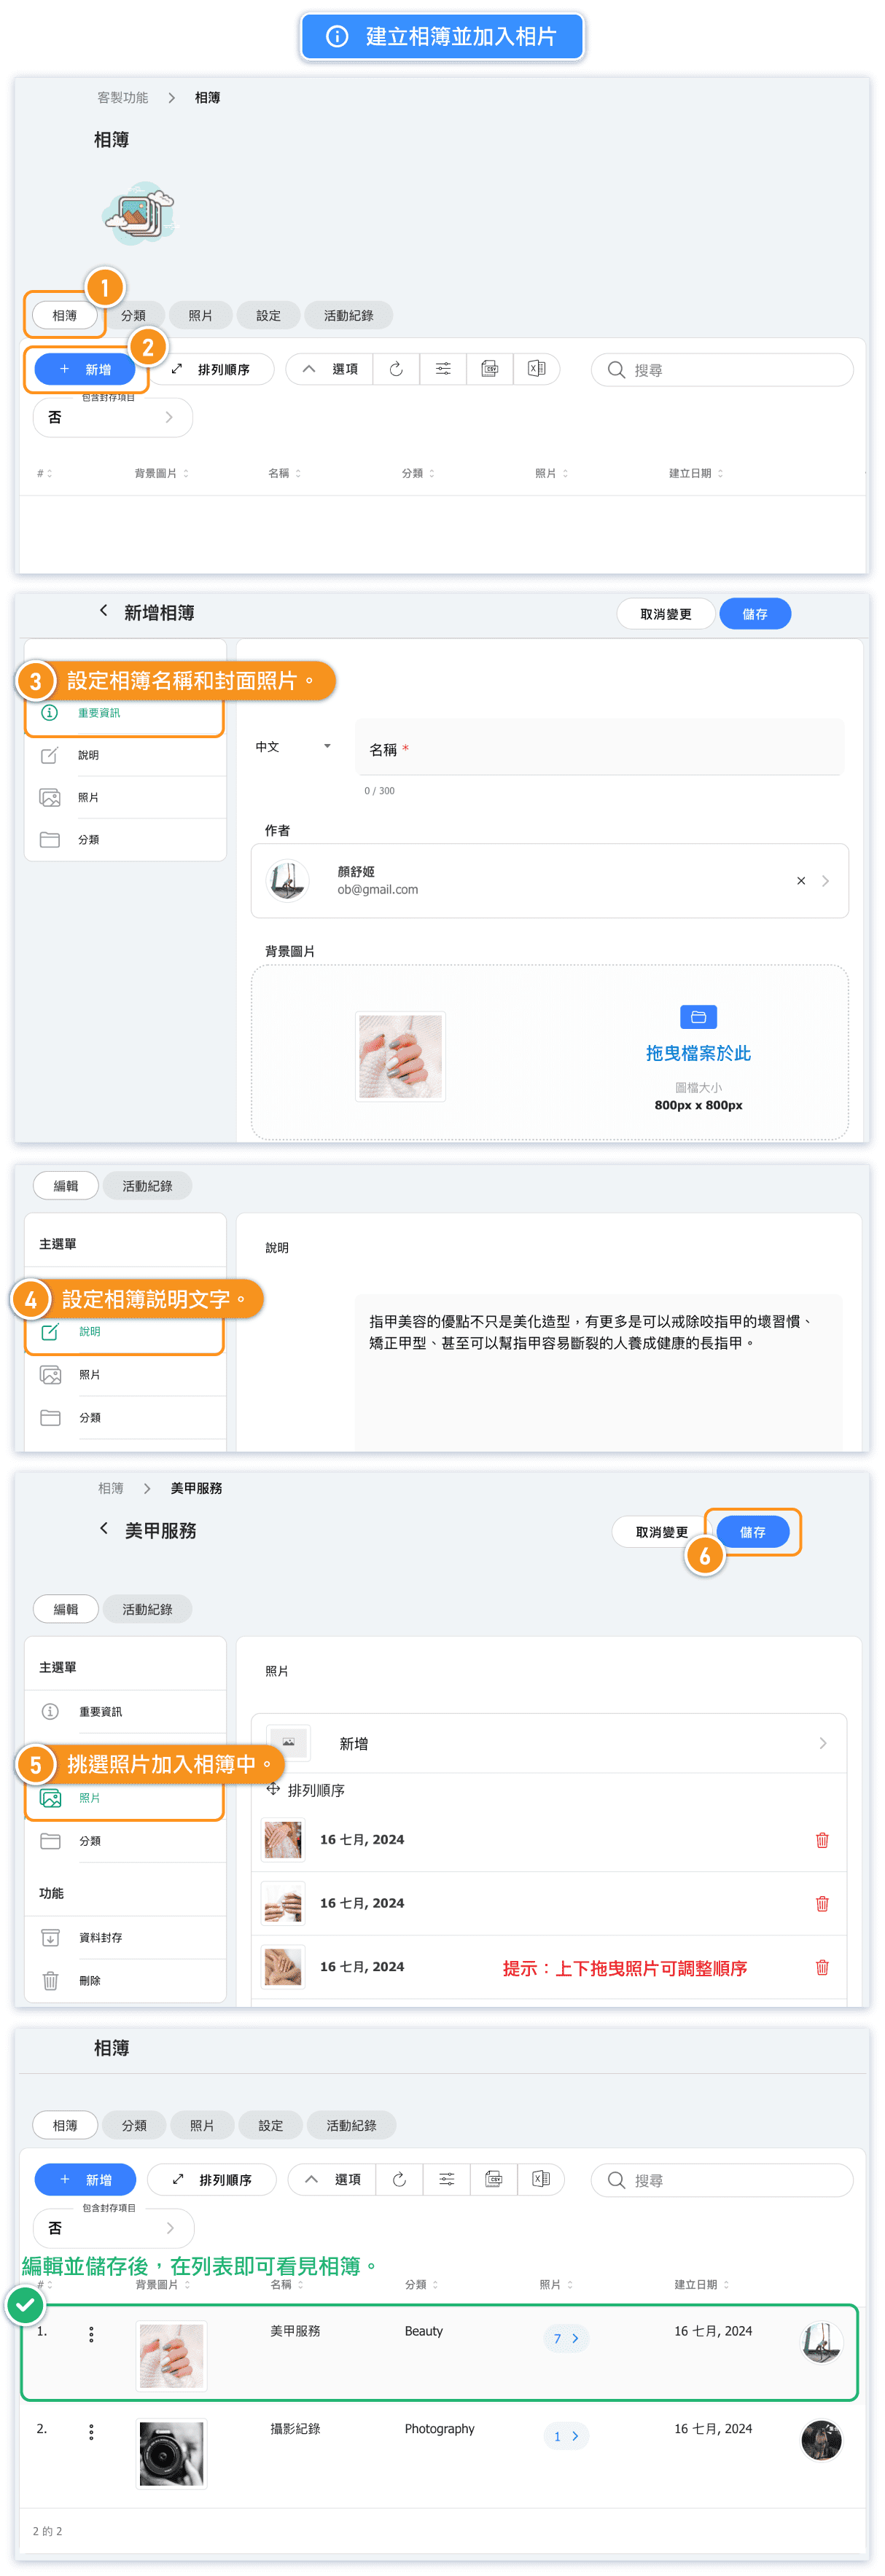
How Do I Create an Album and Add Photos?
Albums let you group related photos together for easy browsing. You can create albums for different themes, events, or class types.
Steps to Create an Album:
- Go to Custom Features > Photo Album
- Click on the Albums tab
- Click Create New Album
- Enter an album name and description
- Select a category (optional)
- Click Save
Adding Photos to an Album:
- Open the album you created
- Click Add Photos
- Select photos from your uploaded photos
- Click Add Selected
Important Privacy Note:
When you add photos to an album, they become visible to everyone, regardless of their original visibility settings. This includes photos that were previously marked as PRIVATE or RESTRICTED on the class photo wall.
Before adding photos with people's faces to a public album, we recommend obtaining consent from the individuals in the photos.
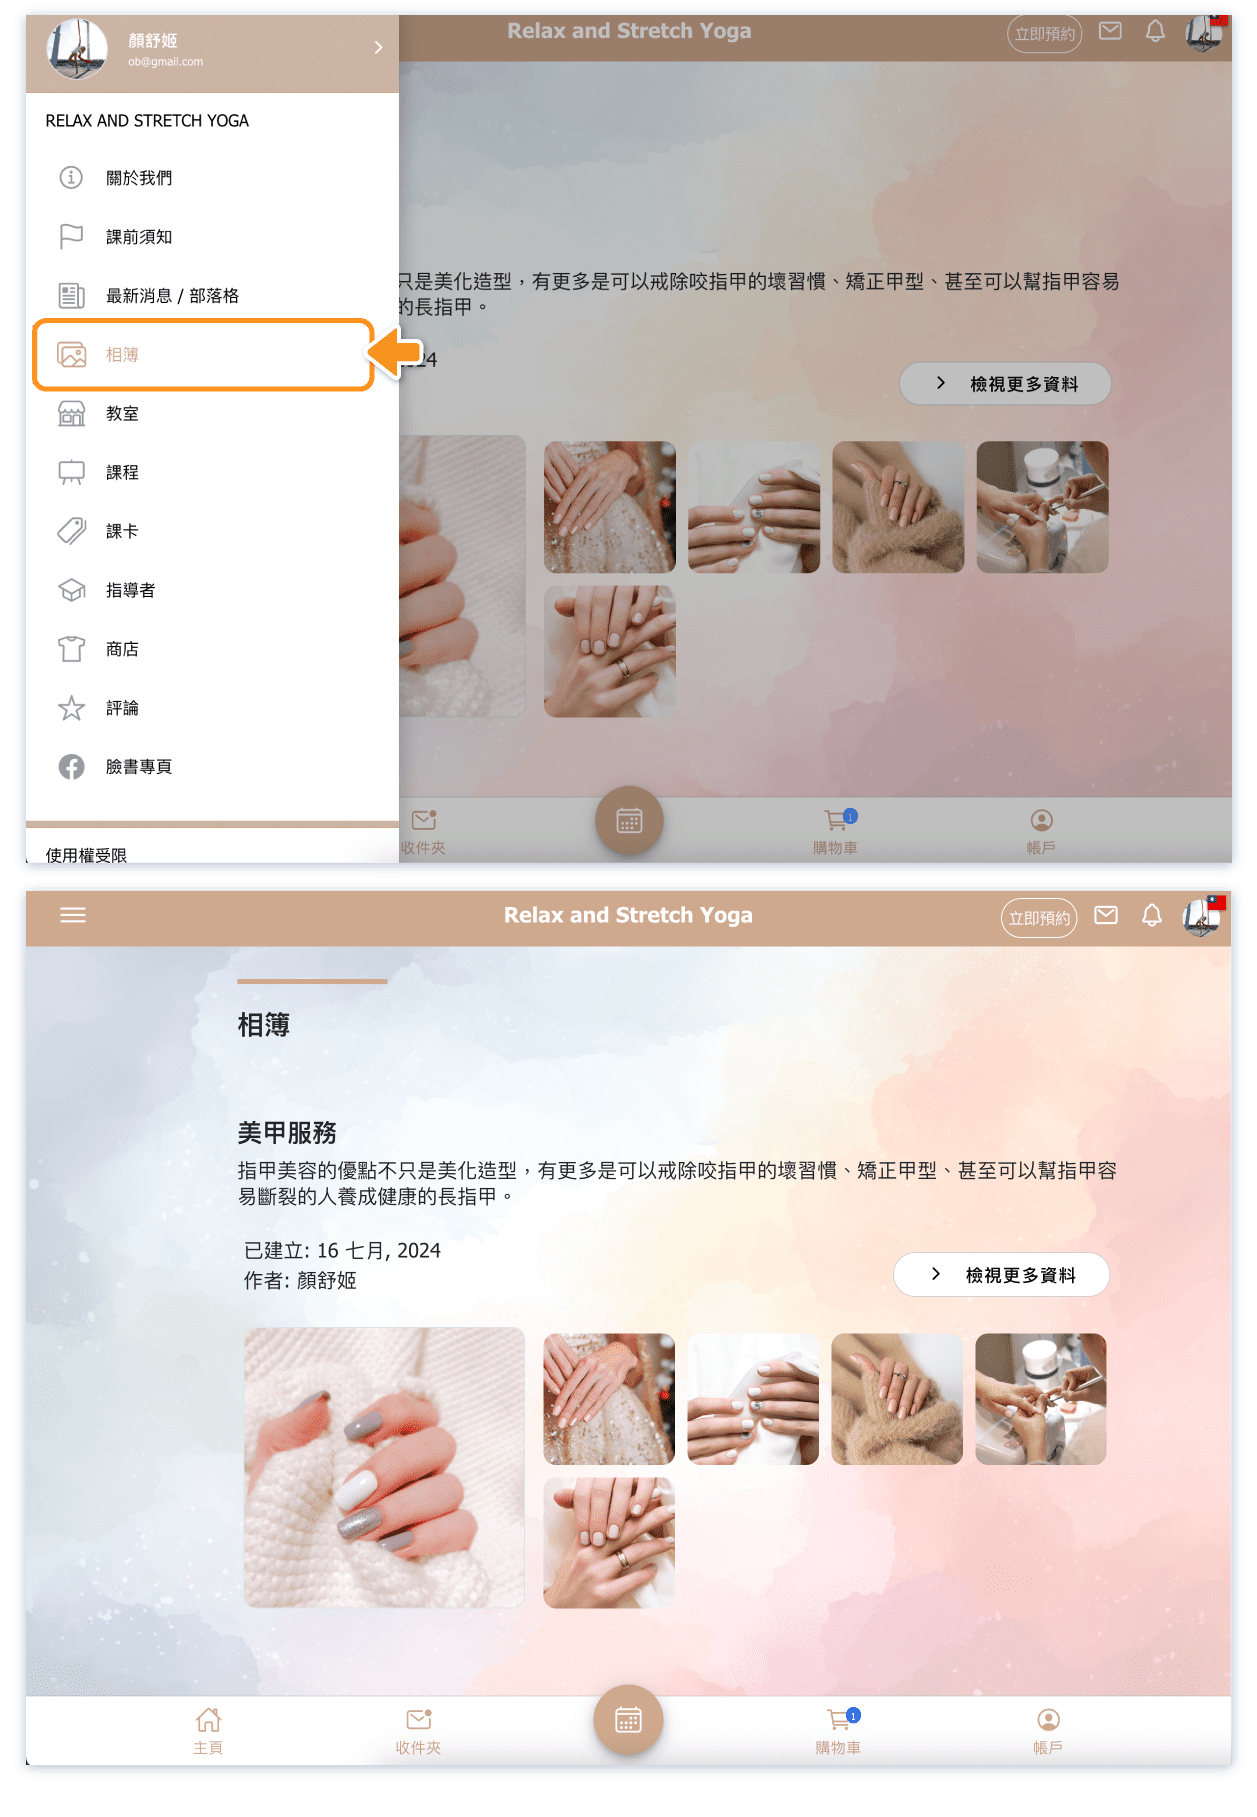
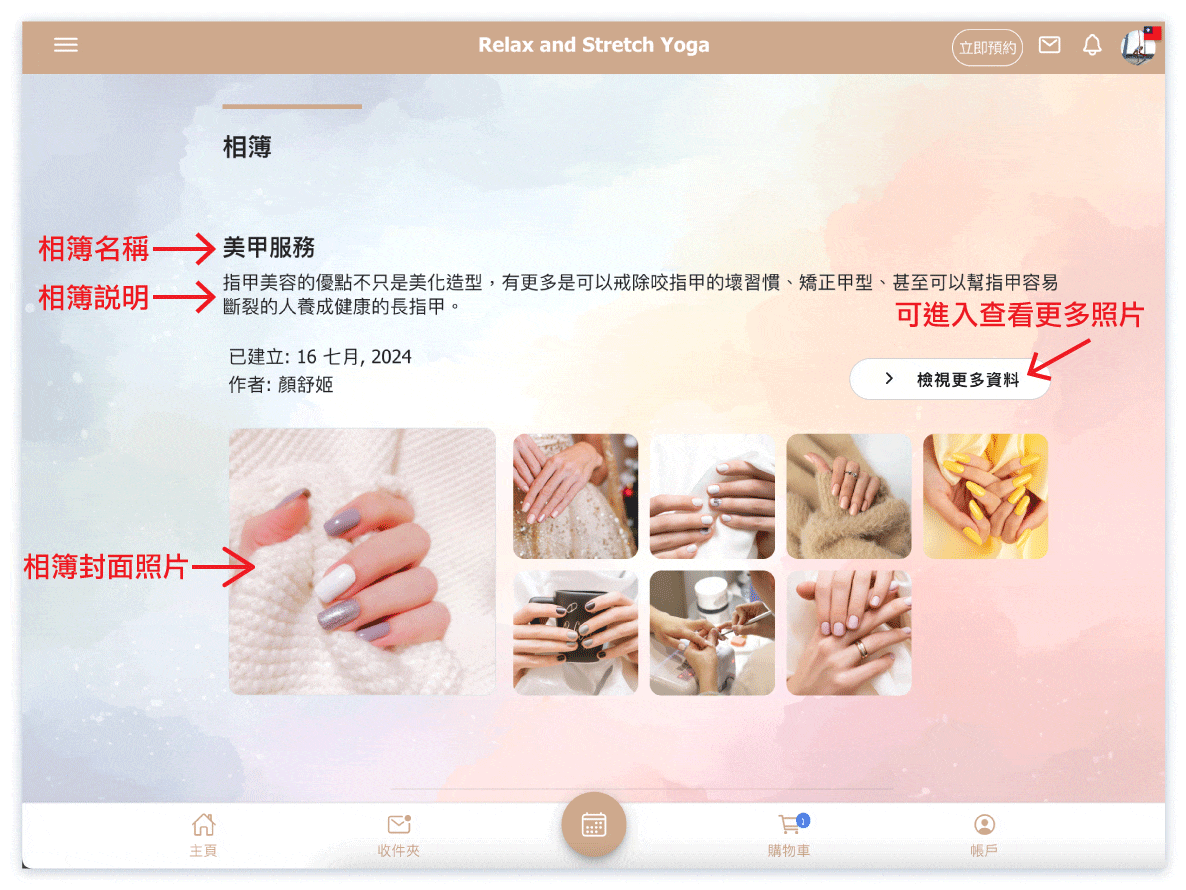
Customer View:
Here's how customers see your albums on the booking website:
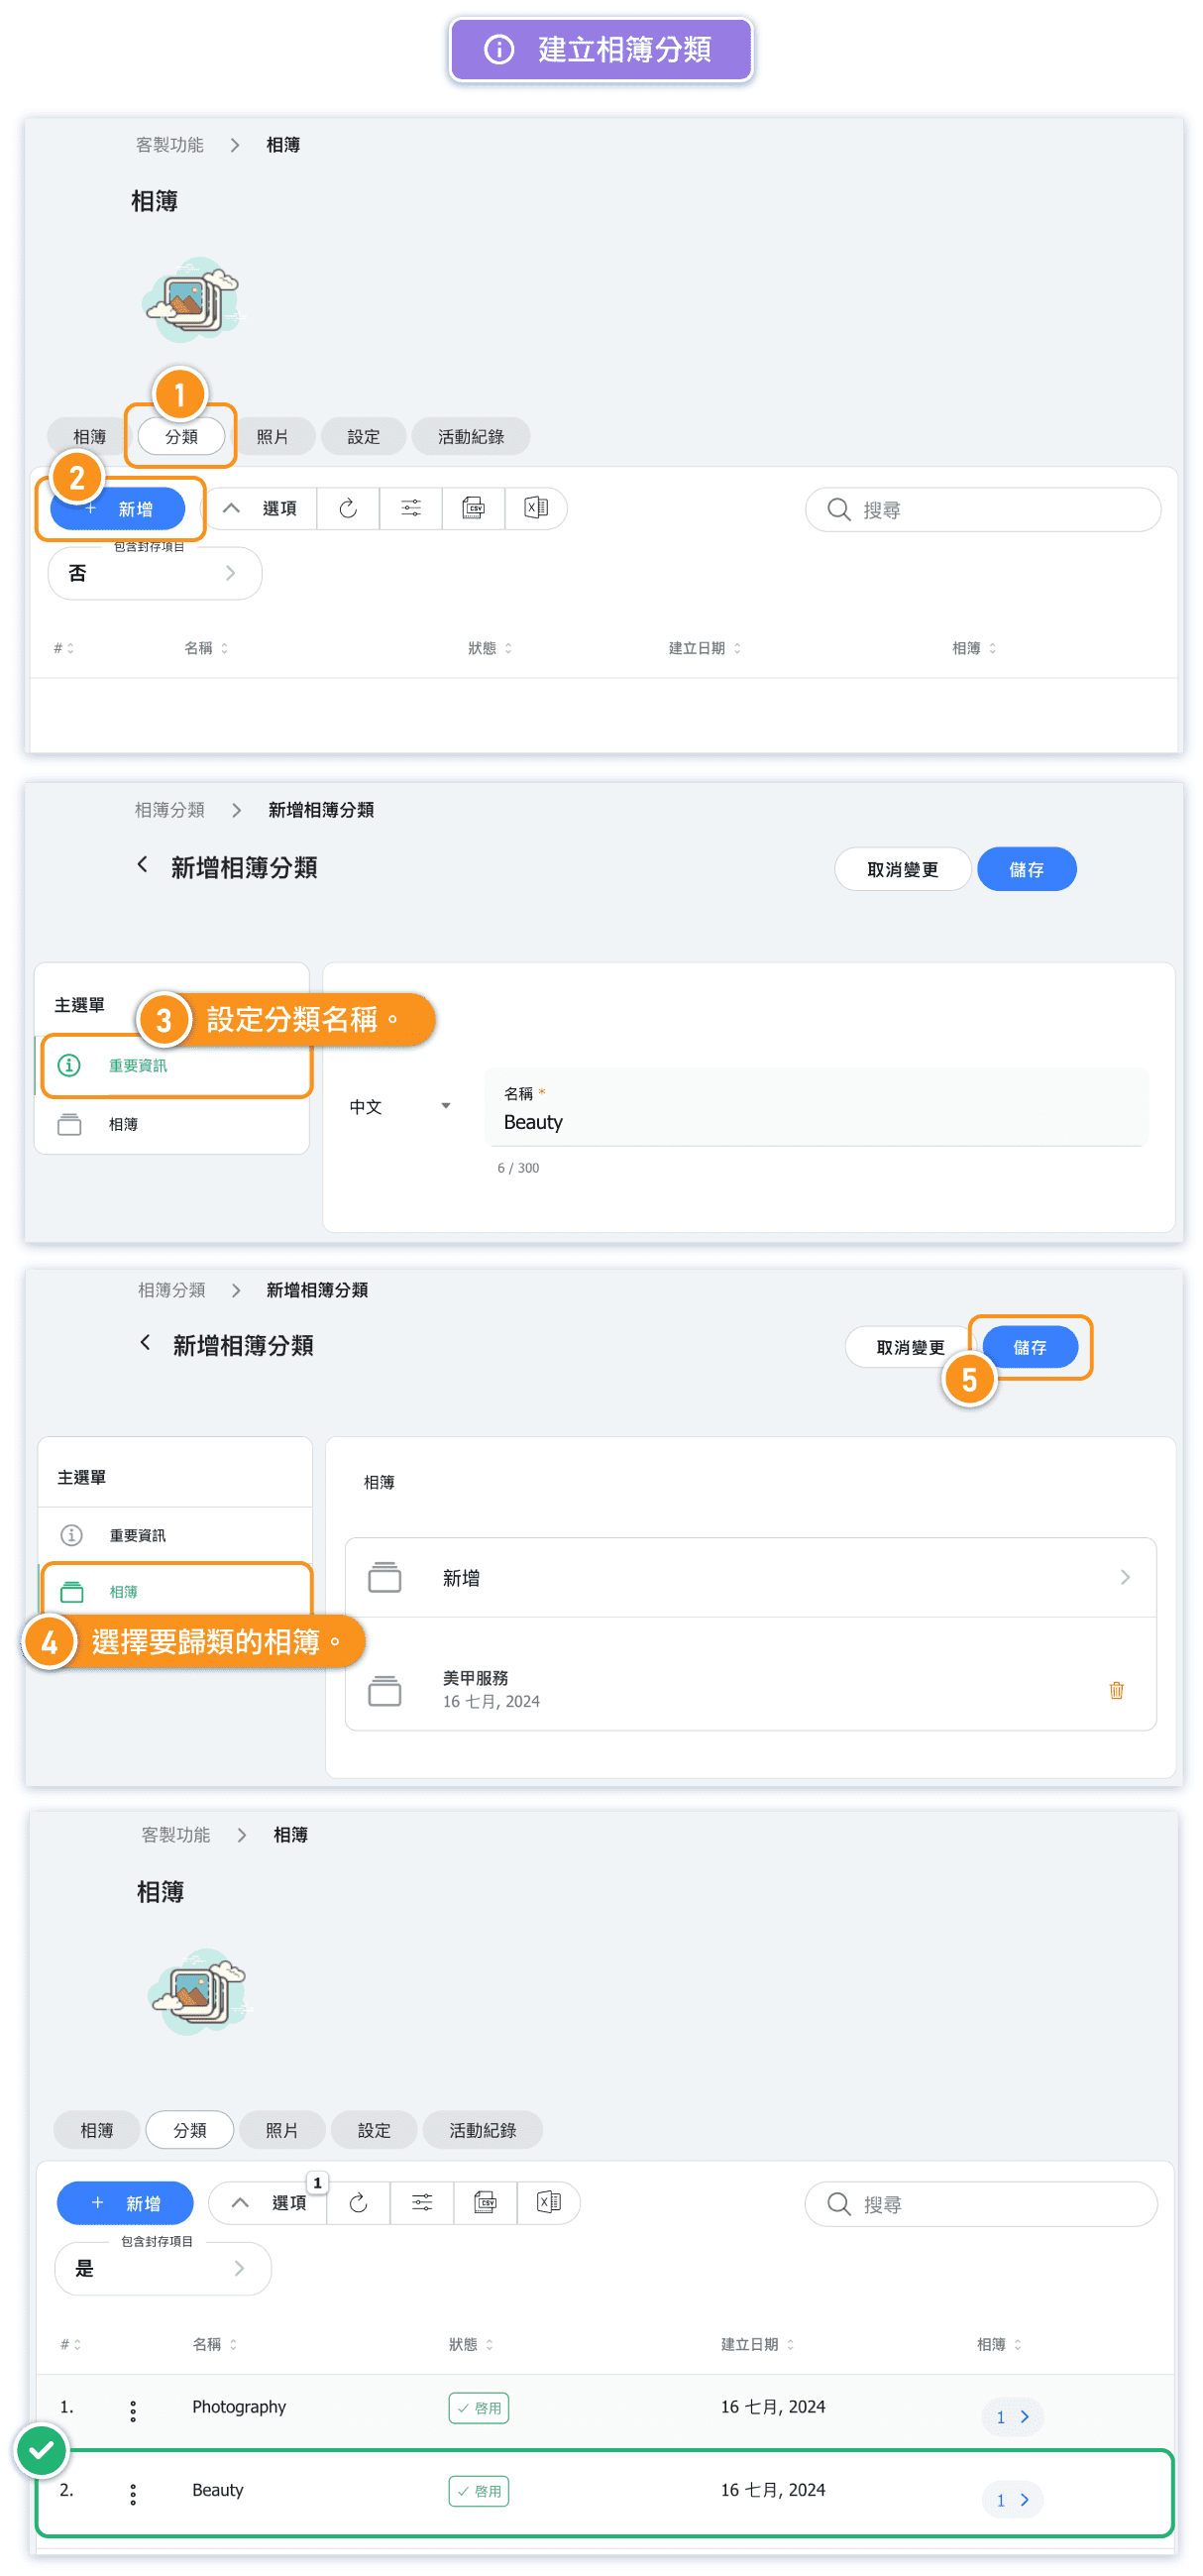
How Do I Organize Albums with Categories?
Categories help you organize albums logically, making it easier for customers to find what they're looking for.
Steps to Create a Category:
- Go to Custom Features > Photo Album
- Click on the Categories tab
- Click Add Category
- Enter a category name
- Click Save
Example Categories:
- By Class Type: Yoga, Pilates, Dance, Fitness
- By Level: Beginner, Intermediate, Advanced
- By Event: Workshops, Retreats, Special Events
- By Instructor: Photos organized by instructor
When creating or editing an album, you can assign it to a category. Customers can then browse albums by category on your booking website.
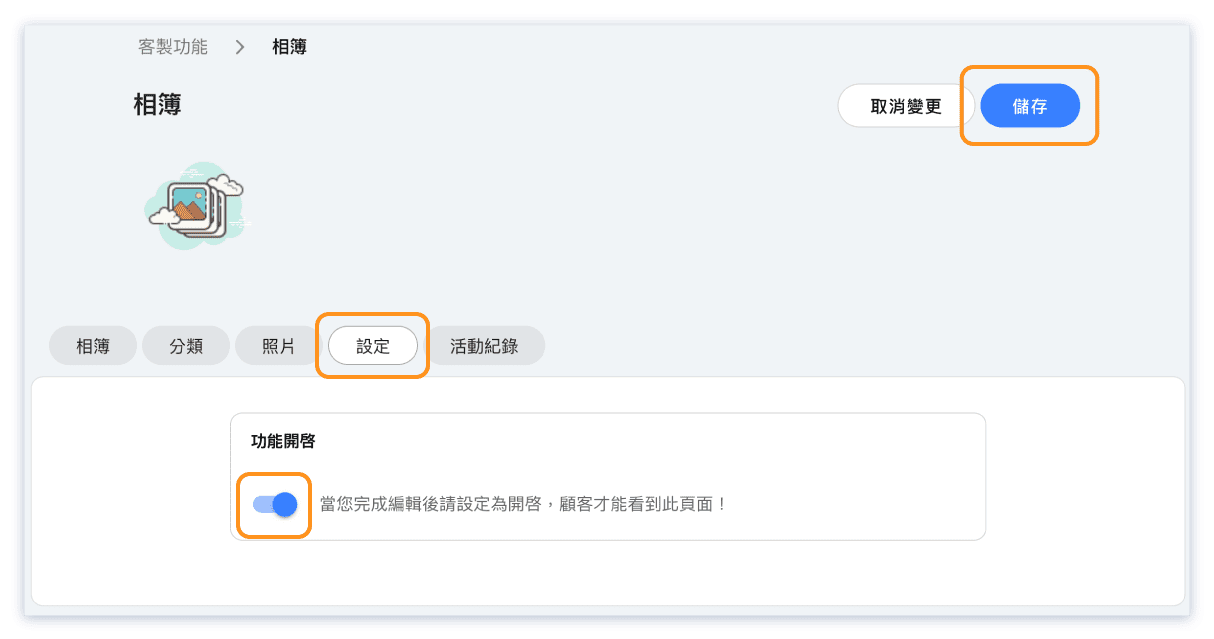
How Do I Make My Photo Albums Public?
By default, your photo album page is not visible to customers. You need to enable the "Ready to Go" setting to make it public.
Steps to Make Albums Public:
- Go to Custom Features > Photo Album
- Click on the Settings tab
- Toggle Ready to Go to ON
- Click Save
Once enabled, customers can access your photo albums from your booking website. The album page will appear in your website navigation.
Before Making Public:
- Make sure you have at least one album with photos
- Verify all photos in your albums are appropriate for public viewing
- Check that you have consent for any photos showing identifiable people
Where Can Students View Their Class Photos?
Students can view photos in two places depending on how you've shared them:
1. Class Photo Wall (RESTRICTED Photos)
If you uploaded photos to a specific class with RESTRICTED visibility:
- Students who attended that class can see the photos in their booking history
- They go to their bookings, find the class, and view the photos
- Only students who were booked for that specific class can see these photos
2. Public Album Page
If you added photos to a public album:
- Anyone can view these photos on your booking website
- Navigate to the Photo Album section in your website menu
- Browse albums by category or view all
Related Article: Where can I view the photos uploaded to the course photo wall?
Frequently Asked Questions
Can I move photos between the Class Photo Wall and Photo Albums?
Yes. Photos uploaded to the Class Photo Wall can be added to albums. However, once added to an album, they become publicly visible regardless of their original PRIVATE or RESTRICTED setting.
What happens if I delete a photo from an album?
The photo is removed from the album but remains in your photo library. You can add it to another album later if needed.
Can customers download photos from my albums?
This depends on your settings and browser capabilities. Photos displayed on the web can generally be saved by users, so only share photos you're comfortable being downloaded.
How many photos can I upload?
There's no strict limit, but we recommend keeping albums manageable (20-50 photos) for better customer experience. Large numbers of photos may take longer to load.
Can instructors upload photos directly?
Yes, instructors with appropriate permissions can upload photos to the Class Photo Wall for their classes. Check your role permissions settings to enable this.
How do I delete an album?
Go to the Albums tab, find the album you want to delete, and click the delete button. Photos in the album will not be deleted - only the album grouping.
Best Practices for Sharing Class Photos
Follow these guidelines to make the most of the Photo Album feature while respecting privacy:
Privacy and Consent
- Always get consent before sharing photos that show identifiable people
- Use RESTRICTED visibility for class-specific photos with faces
- Consider posting a notice in your studio about photography during classes
- Only add photos to public albums when you have appropriate consent
Photo Quality Tips
- Use good lighting for better photos
- Capture a mix of action shots and group photos
- Avoid blurry or poorly composed images
- Compress large images before uploading for faster loading
Organization Tips
- Create categories that match your class types
- Use descriptive album names (e.g., "Summer Yoga Retreat 2024")
- Regularly review and remove outdated photos
- Keep albums focused - don't mix different events in one album
Using Photos for Marketing
- Public albums can attract new customers by showcasing your classes
- Use your best photos in albums you plan to make public
- Consider creating "highlight" albums for your most popular classes