
What is the Intake Form Feature?
The Intake Form feature lets you collect information at five different points in the customer journey.
Key Benefits:
- Gather customer information - Collect health conditions, preferences, experience levels, or other details during booking or pass purchase
- Welcome new members - Ask joining questions once, when a customer registers
- Understand cancellations - Ask why a customer is cancelling before the class reservation is removed
- Automate feedback collection - Ask attendees for post-class feedback
- Conduct surveys - Send time-limited questionnaires to a chosen customer audience
- Track responses - Review completed form data from one history view
Five Form Types Available:
- Intake Form - Shown during class booking or pass purchase
- Registration - A one-time form completed when a customer registers
- Cancellation - Shown before a customer cancels a class reservation
- Feedback - Offered after an attended class
- Survey - Sent to selected customers, roles, or tags
Reusable Form Items
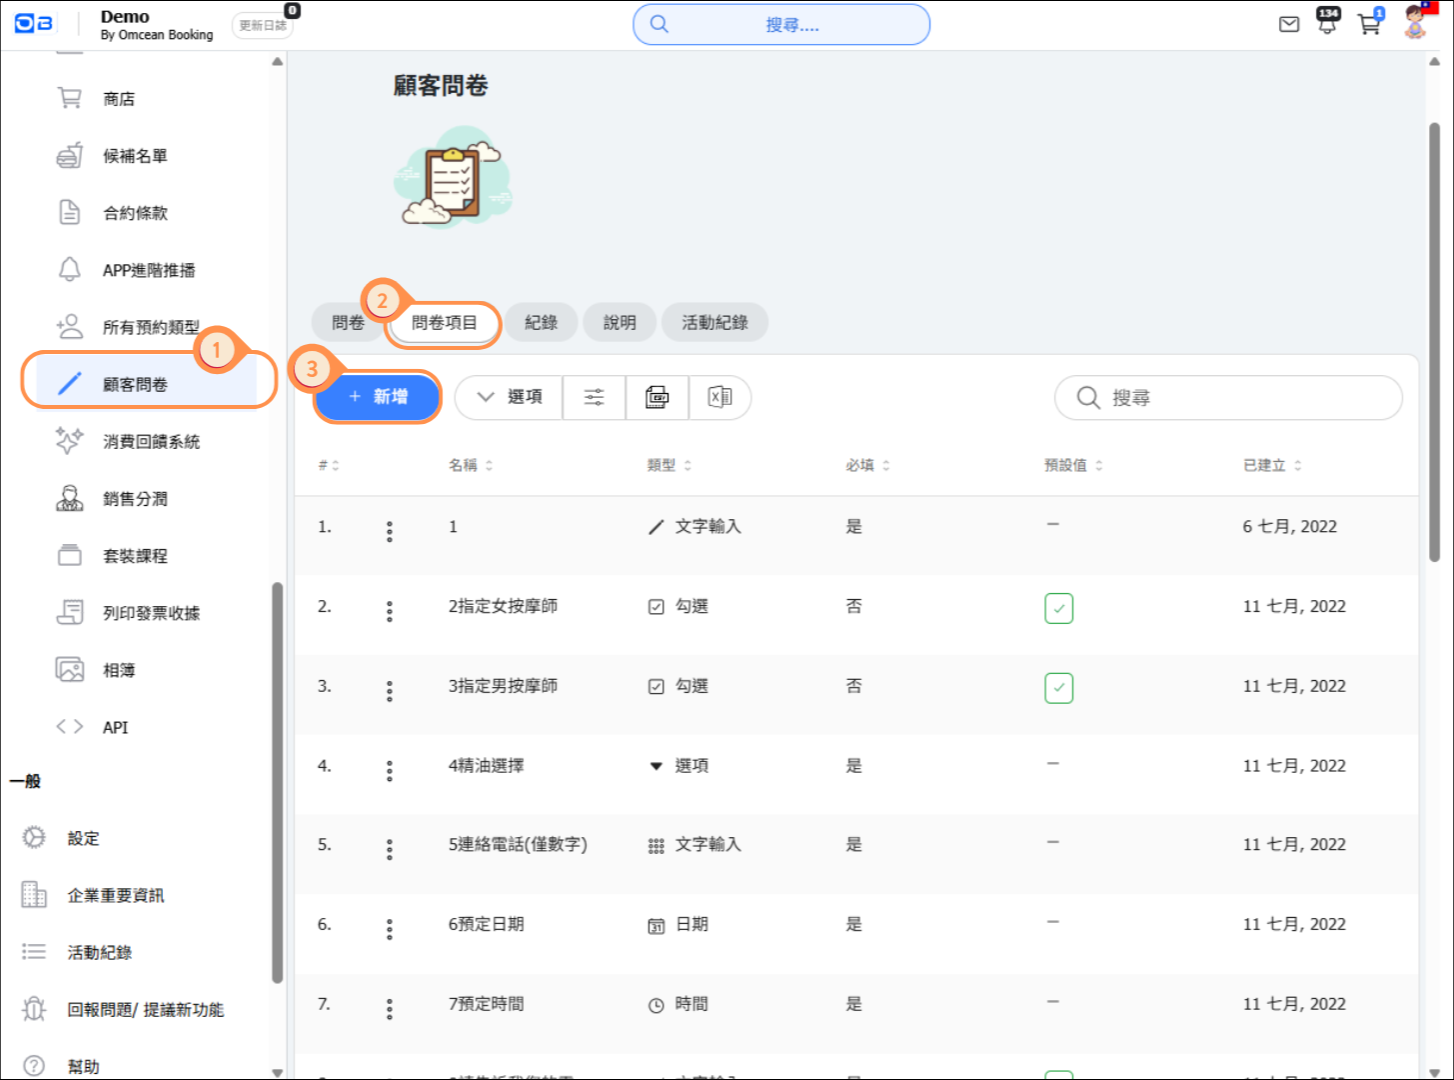
You can start a new form before visiting the reusable item library. Add existing questions, create questions or choose a template inside the new form. Use this separate library when you specifically want to manage reusable items.
Form Items are reusable questions and content blocks. Create them once, then add them to the forms that need them.
- Go to Custom Features > Intake Form > Form Items and choose New.
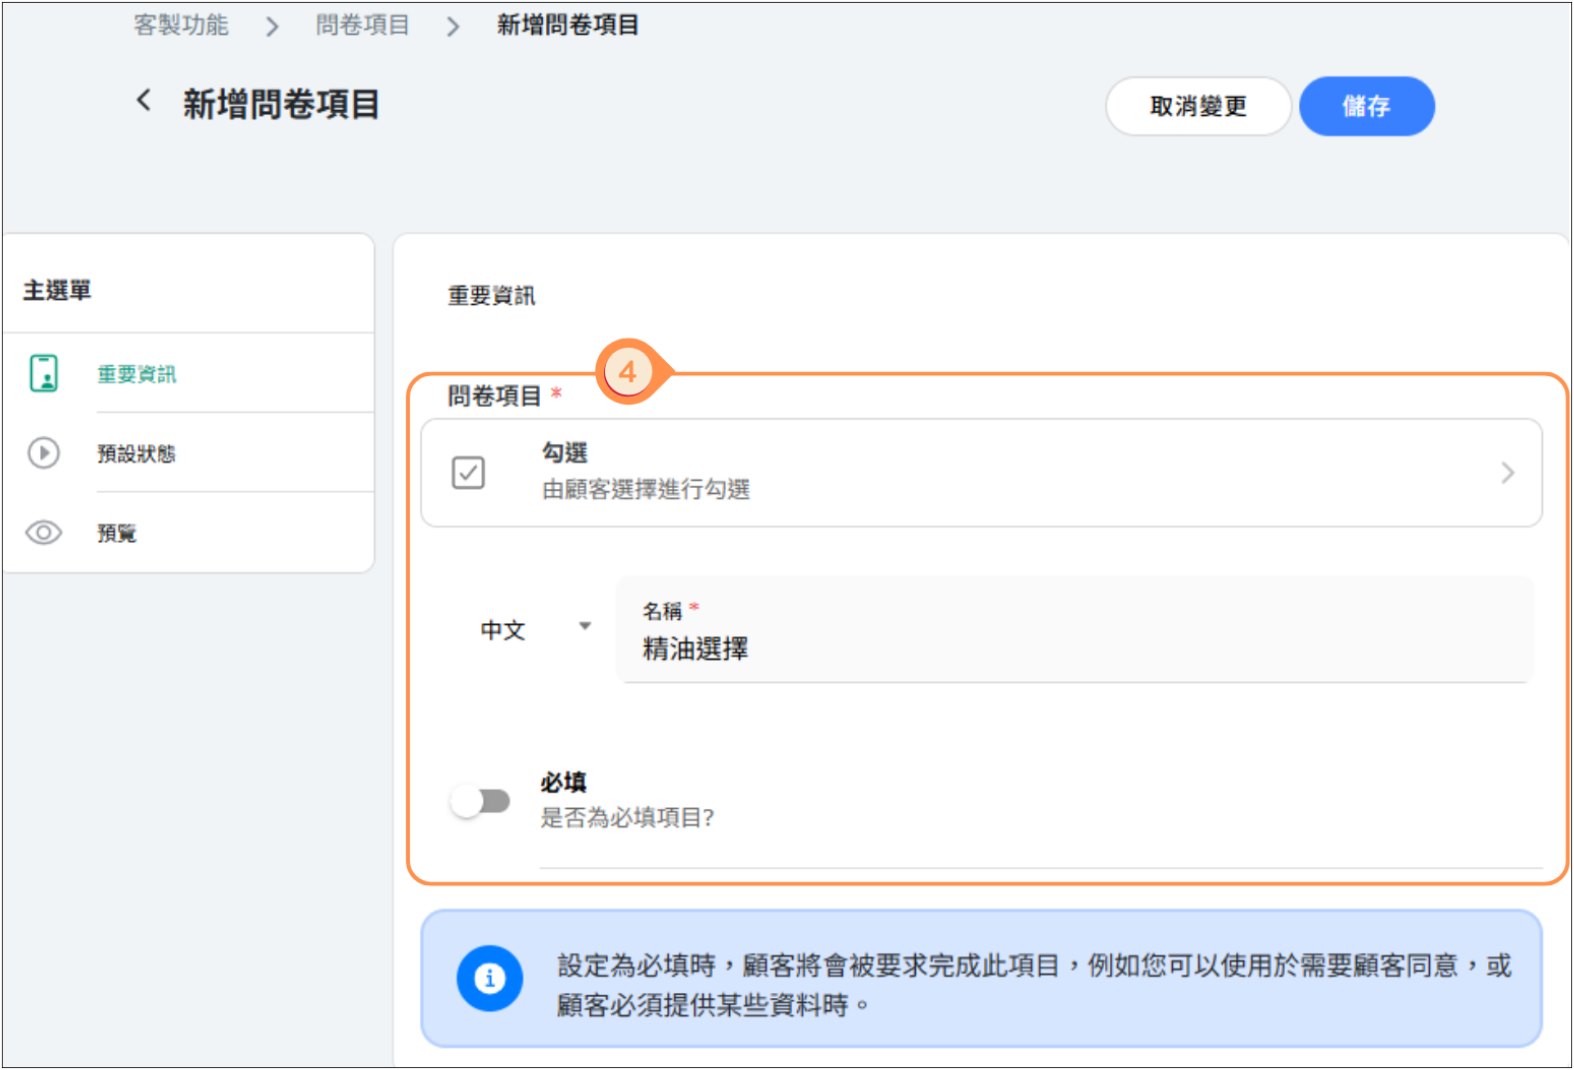
- Choose the item type. The picker groups related types and defaults to the single-line Textbox.
- Enter its English and/or Chinese name. For questions, set Required and a default value where supported; Select boxes also need choices. Info box and Paragraph need message content instead of answer settings.
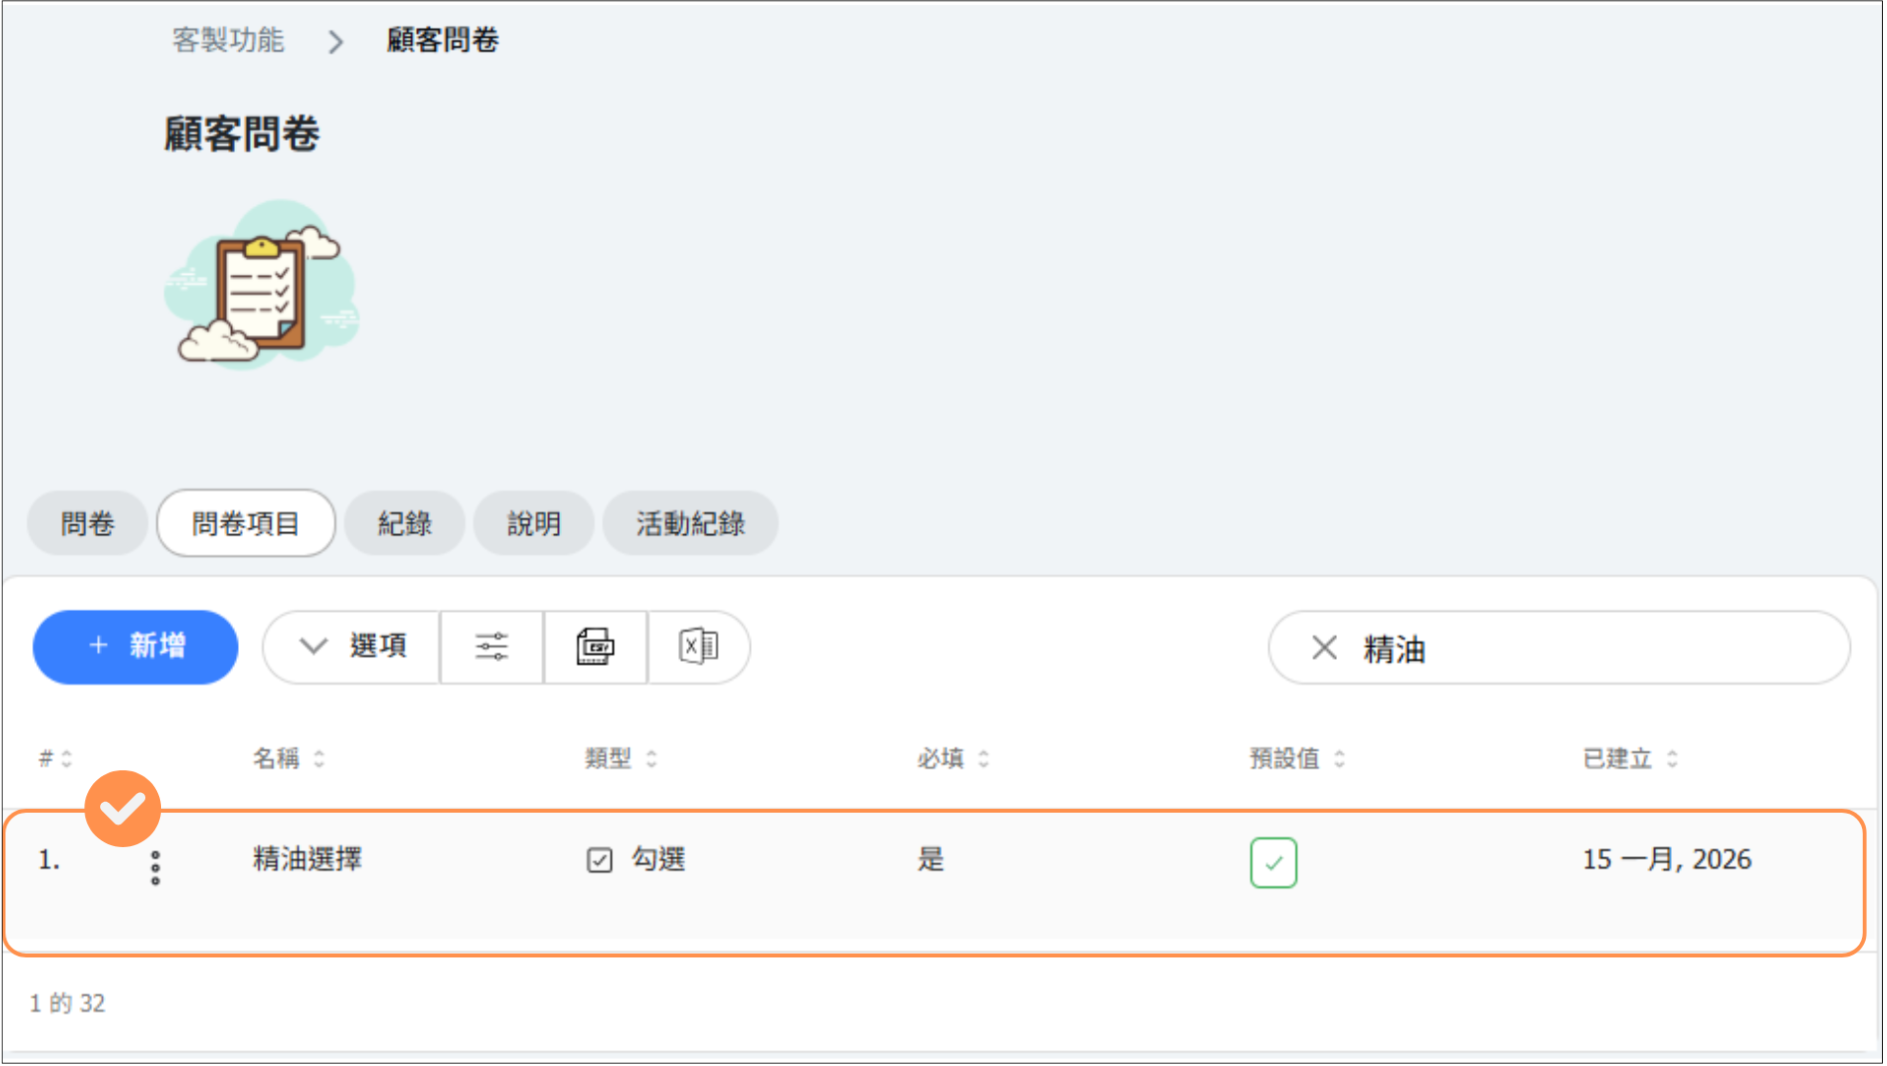
- Preview the item and save it. Its type cannot be changed after creation.
All available item types:
- Text fields: Textbox — single line, multi line, or digits only.
- Choices: Select box — choose one dropdown option; Checkbox and Switch — a yes/no answer; Rating — one to five.
- Dates and times: Date, Time, and Date and time.
- Content: Info box — a callout with an optional emoji; Paragraph — plain text. Both support English and Chinese content and need no answer. Signature — customers draw their signature with a finger or mouse.
- Dependents: Add Dependent — collect details and add a dependent to the customer account when the form is submitted.
Signature items: when you first choose Signature as the type, Required is turned on. You can turn it off to make the signature optional. A signature has no default value, so the Default state tab is hidden. A form can have only one signature, and it always appears at the bottom of the form beside the form's buttons. Customers can sign intake forms and registration forms, including guests who complete a registration form at checkout.
Create a Form
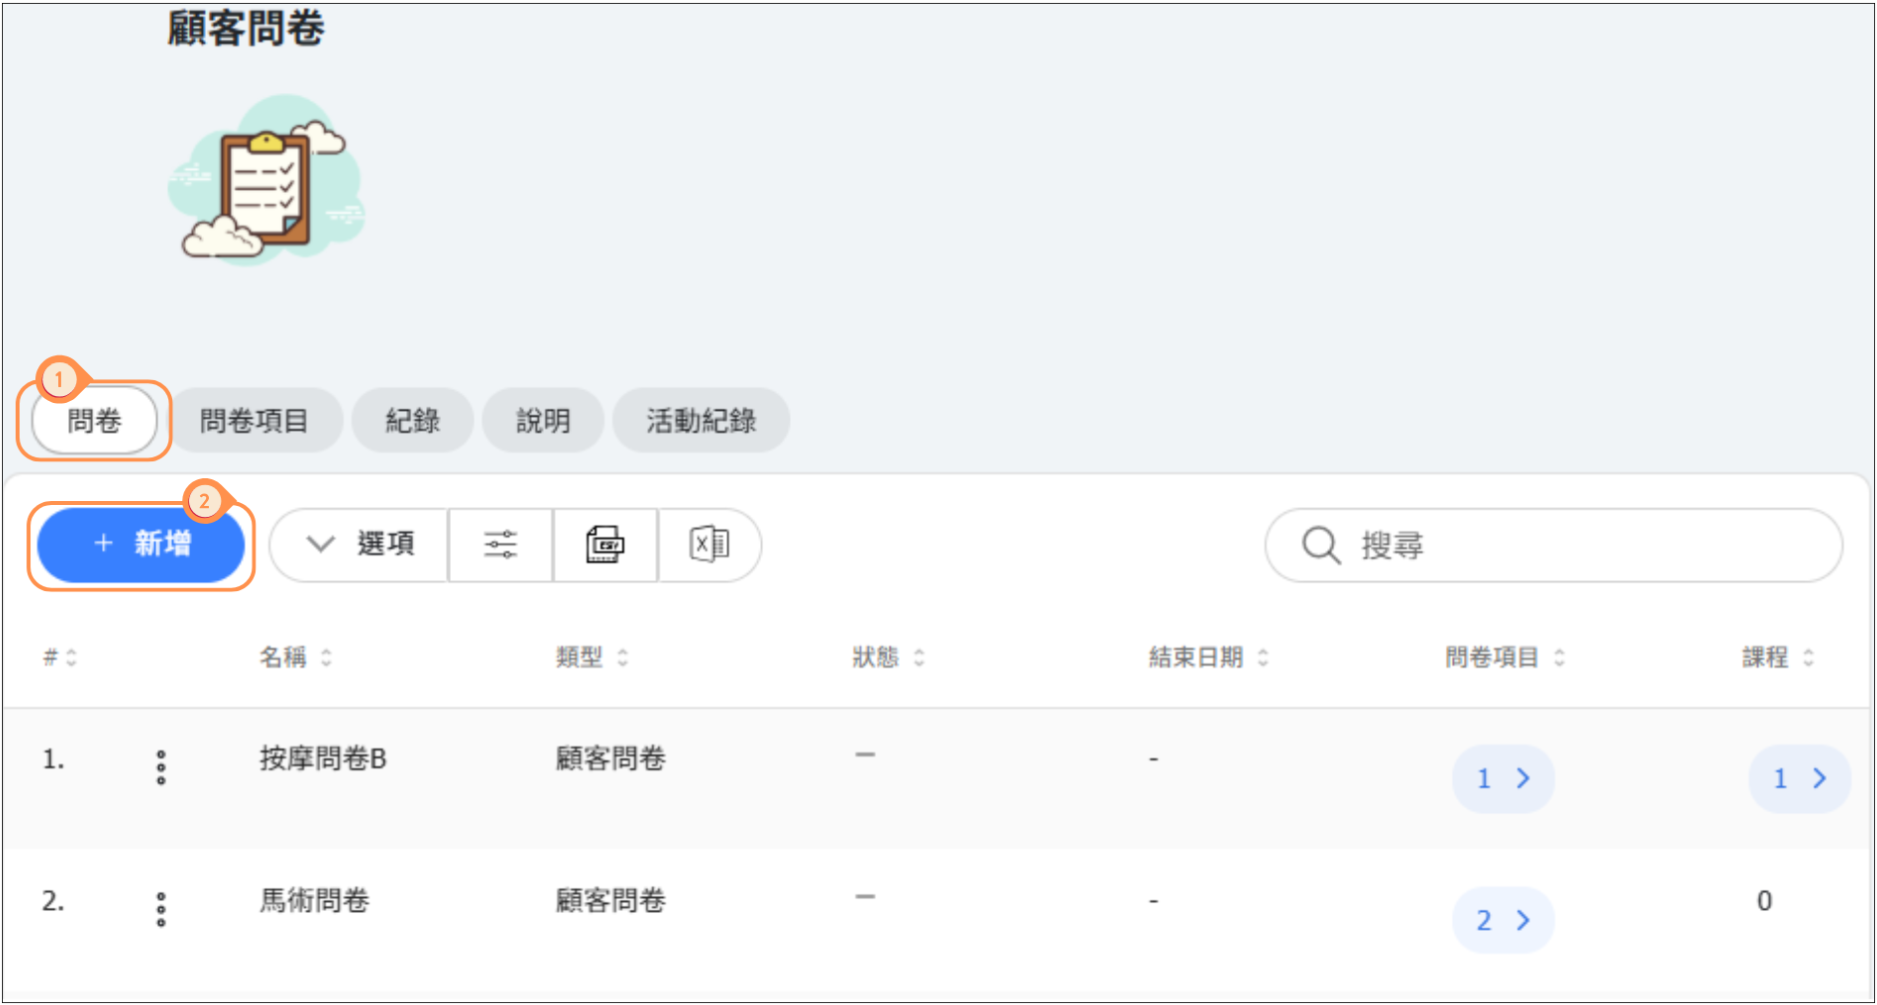
Open the enabled Intake Form feature using its cog, stay on Forms and choose New. You can add questions after choosing the form type.
How to Create a Form:
- Go to Custom Features > Intake Form
- Stay on the Forms tab
- Click + NEW
- Enter the form name and description
- Select Intake Form, Registration, Cancellation, Feedback, or Survey
- Add reusable form items or choose a template
- Configure the targeting for that form type
- Click Save
Targeting Rules:
- Intake Form - Select at least one class or pass
- Registration - No classes or passes are selected. Set a start date, optionally an end date, and publish when ready
- Cancellation - Select classes, or leave Classes empty to apply it to all class cancellations; passes are not used
- Feedback - Select at least one class
- Survey - Select customers, roles, or tags, then publish when ready
Adding Questions:
- Open the Add list in Form Items and tap a question. It is added to the end of the form and the list closes. Open the list again to add another question.
- Questions already in the form appear greyed out and cannot be added again. Once the form has a signature, every other Signature item is also greyed out.
- Drag the questions under Reorder to change their order. The signature is shown in a separate section below the reorderable list. It has no drag handle or move buttons, because it always stays at the bottom of the form.
Preview the Form:
Use Preview on the form edit page to see the form as customers will. You can fill it in and confirm it to check that required questions, such as the signature, work as expected, then close it with the close button. Nothing you enter in Preview is saved.
Start From a Template:
The Templates step offers ready-made forms you can use as a starting point instead of building the questions yourself. Selecting a template fills in the questions and sets the matching form type, and you can then add, remove, or reword anything before saving. You can preview a template and choose it without filling in sample answers.
- Class feedback - Post-class review questions
- Survey - A general questionnaire
- New member registration - The joining questions to ask every new customer once
- Purchase pass - Questions asked when a pass is bought
- Reserve class - Questions asked when a class is booked
- Cancellation - Understand why customers cancel their reservations, collecting a cancellation reason and any extra details before the cancellation is made
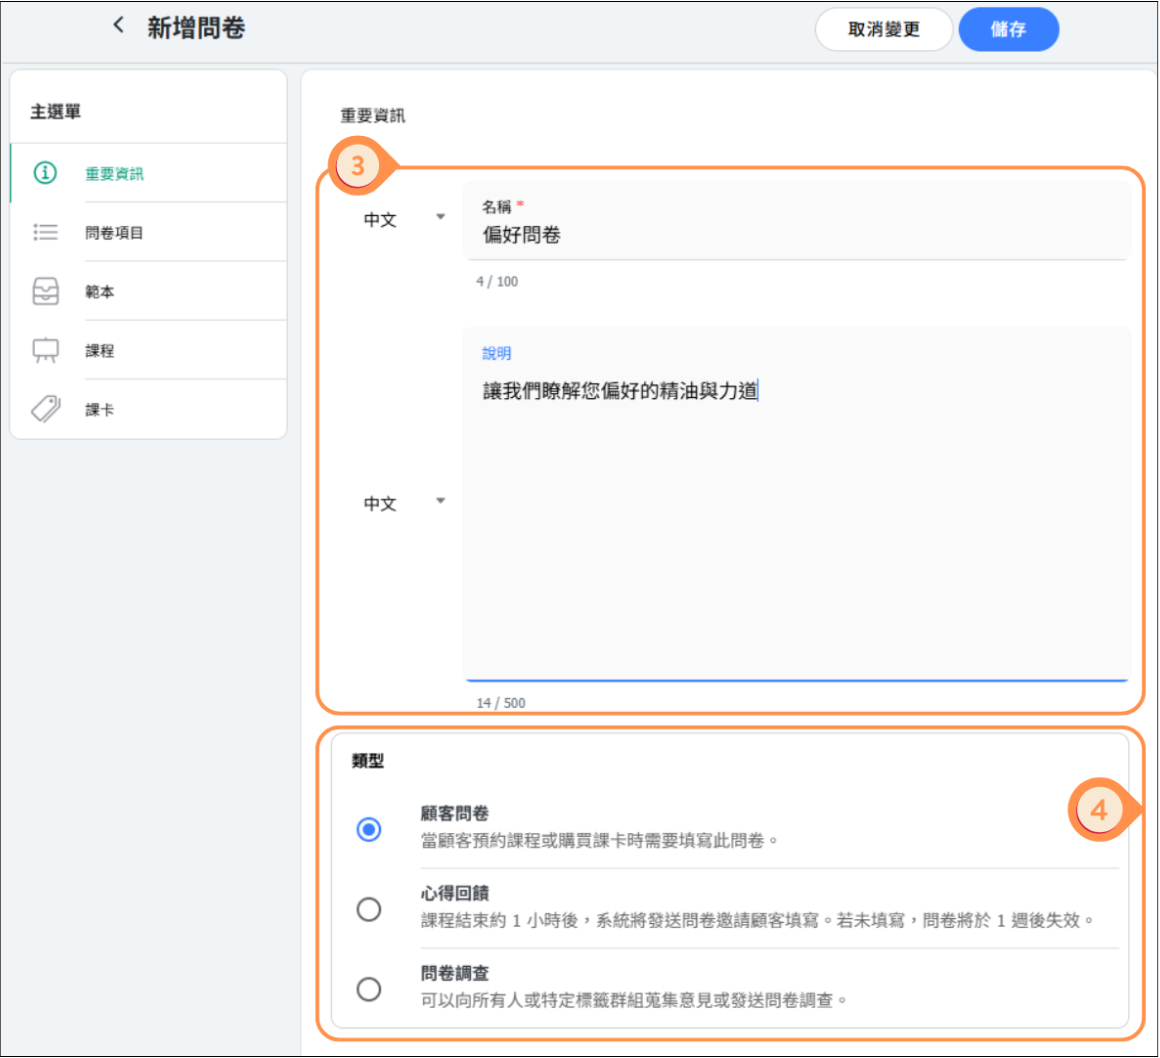
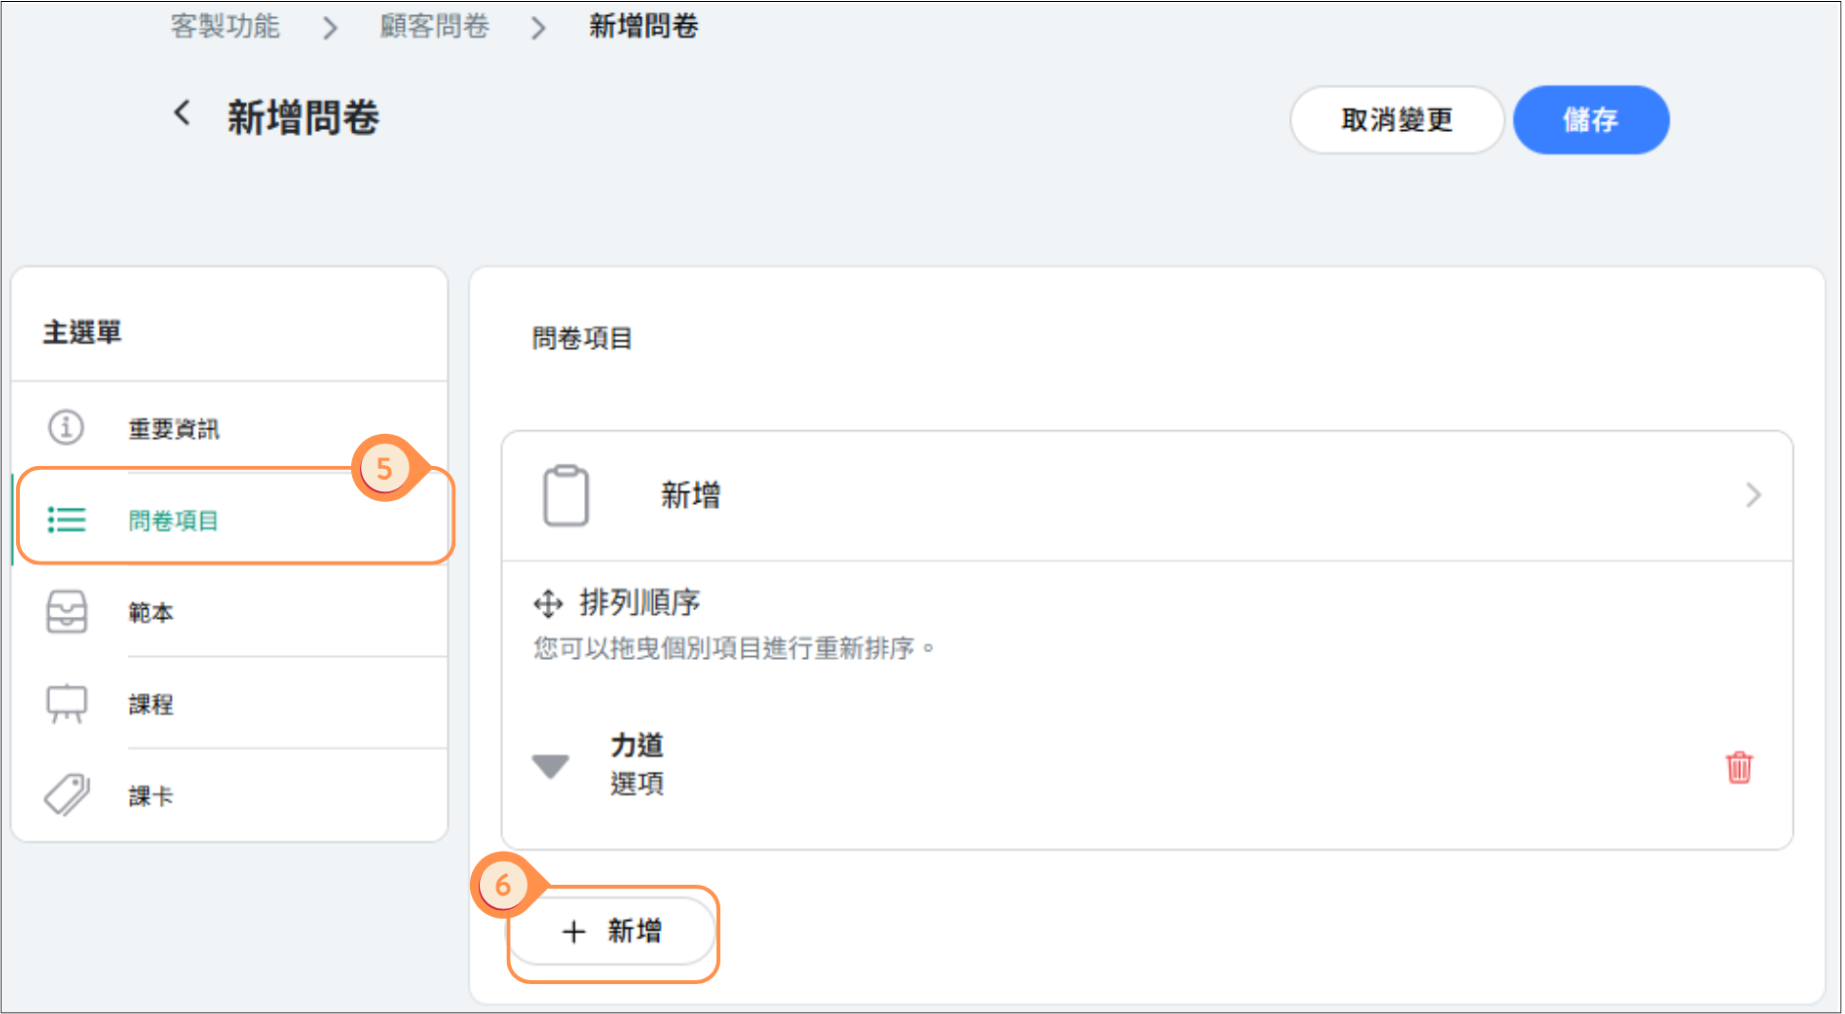
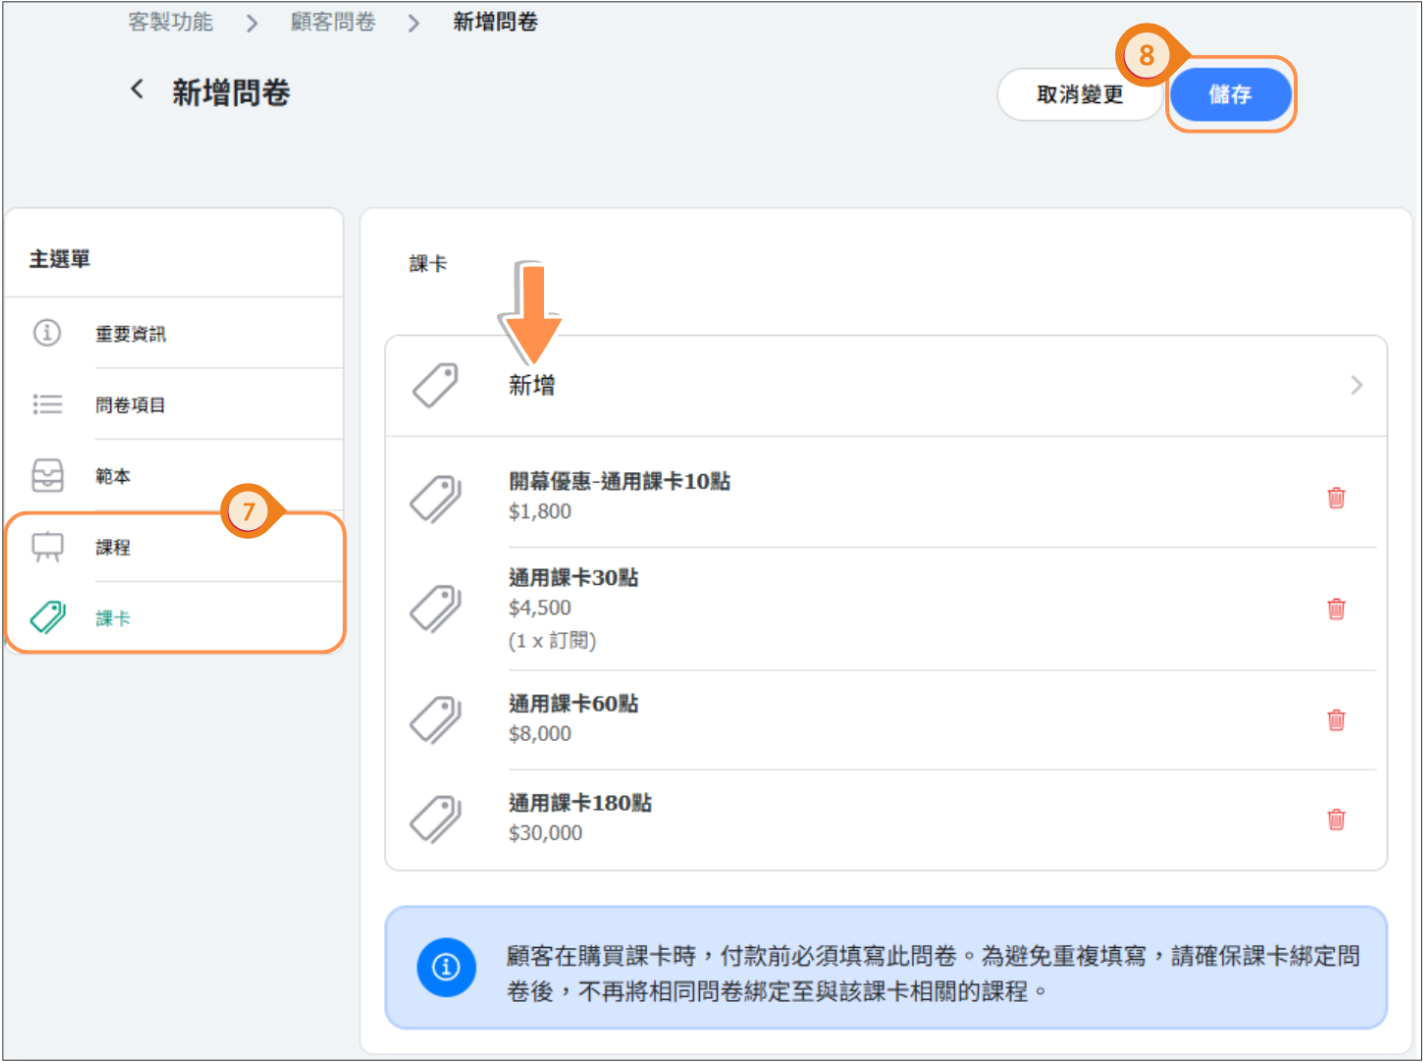
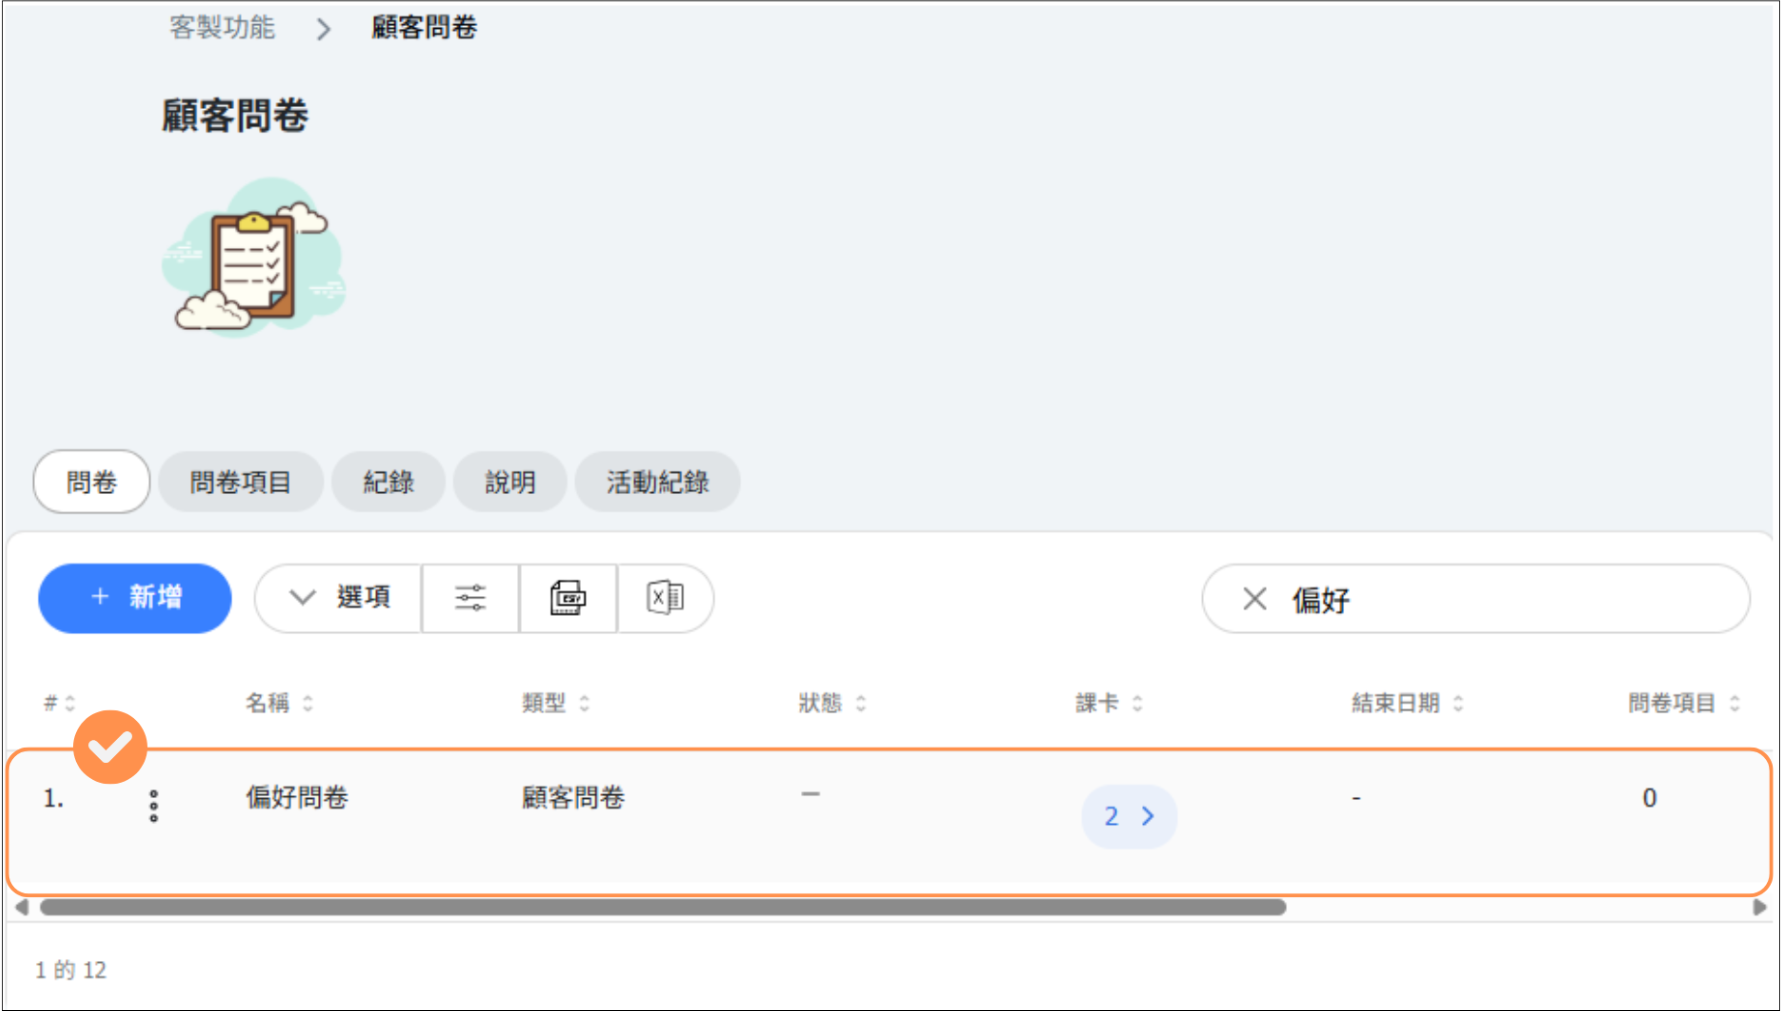
[Instructions]
- Open the Forms tab and click + Add.
- Enter the form name and description.
- Select the form type.
- Add form items or select a template.
- Configure the classes, passes, or users allowed for that type.
- Click Save.
Conditional inputs: show or require an item based on an answer
Conditional rules belong to an item within this form. Reusing the item in another form does not copy these rules. Each question can have one Show this question rule and one Require an answer rule. An Info box or Paragraph can only have one Show this content rule.
- Add the question that supplies the answer and the item you want to control to the form.
- In Form Items, find the target item in the list and click the Add rule button beside it. A rule card opens beneath that item. The button is disabled once the item already has its maximum number of rules.
- Choose the rule type: Show this question (or Show this content for an Info box or Paragraph) or Require an answer.
- Under If, choose Always, Never, or Conditional. For a conditional rule, pick another question, a condition, and an answer. The conditions are Equals, Does not equal, Is empty, and Is not empty; number and rating questions also offer Greater than and Less than. The answer field matches the chosen question: a date, time, or date-and-time picker, Yes/No for a Checkbox or Switch, the options of a Select box, or a text or number field. Is empty and Is not empty need no answer.
- Click Save to apply the rule, or Cancel to discard your changes. Then save the form to keep the rules.
- A saved rule appears as a one-line summary under the item with an Edit link (View when the form is read-only). Open it to change the rule, or click Delete in the rule card to remove it.
If you remove an item from the form, its rules are removed too. If the rules on the form are invalid, a red error banner appears below the item list.
Visibility and required answers are separate: a visibility rule hides the item until its condition matches. A required-answer rule makes a visible question required when the condition matches and optional otherwise; it does not make a hidden question appear. Hidden questions are not required and their answers are excluded from submission.
Example: add a Select box called "Do you have an injury?" with Yes and No options. Add a multi-line Textbox called "Describe the injury". On the description item, save a visibility rule: If "Do you have an injury?" Equals Yes, Then Show this question. Add a required-answer rule with the same condition if a description must be provided.
Choose a different, simple question as the source. An item cannot depend on itself; Add Dependent, Info box, Paragraph, and Signature cannot be condition sources. Circular references are not allowed. If the source question is hidden, the rule does not match. Save rules before publishing a Survey or Registration form, whose items are locked once live.
Add Dependent: collect and create dependent details
Choose Add Dependent from the Dependents group to embed the existing dependent details form. Customers fill in Name, Profile picture, Birthday, and Notes without leaving the intake form.
Name is required when adding a dependent. The photo, birthday, and notes are optional. The profile picture and birthday rows open their usual pickers, and an unset value shows Not set.
A successful submission creates the dependent under the customer account and links it to the saved answer. It is not just a text answer with a child's name. Previewing or editing the form definition does not create a dependent. An optional, completely blank dependent item can be skipped; once details are entered, a name is needed.
You can show or require this item based on another question, such as "Are you registering a child?". The Add Dependent item itself cannot be used as the source of another condition. Each Add Dependent item captures one dependent.
Info box and Paragraph: add bilingual instructions
Use the Content group for information customers should read without answering a question.
- Info box: a shaded callout for a reminder or explanation. Enter the message using the English/Chinese selector. Emoji starts as Not set; use the chevron to choose one, or Clear to remove it.
- Paragraph: plain text without a callout frame or emoji. Use the language selector to write separate English and Chinese versions; line breaks are preserved.
Enter content in at least one language and use Preview to check the result. Content items are never required answers and are not stored as customer answers. They can have a visibility rule, but cannot have a required-answer rule or act as another rule's source.
The Content group also includes Signature. Unlike Info box and Paragraph, a signature is an answer the customer gives; see Reusable Form Items above.
Form Type: Intake Form
Intake Forms are designed to collect information from customers when they book specific classes. This is perfect for gathering important details before the appointment.
Common Use Cases:
- Health questionnaires - Ask about injuries, medical conditions, or physical limitations before fitness or yoga classes
- Experience level assessment - Determine if a customer is a beginner, intermediate, or advanced
- Preferences - Massage pressure preferences, aromatherapy scent choices, etc.
- Contact information - Emergency contact, preferred contact method
- Special requirements - Dietary restrictions, accessibility needs
How It Works:
- Customer books a class that has an Intake Form linked
- After confirming the booking, they are prompted to fill out the form
- Customer completes and submits the form
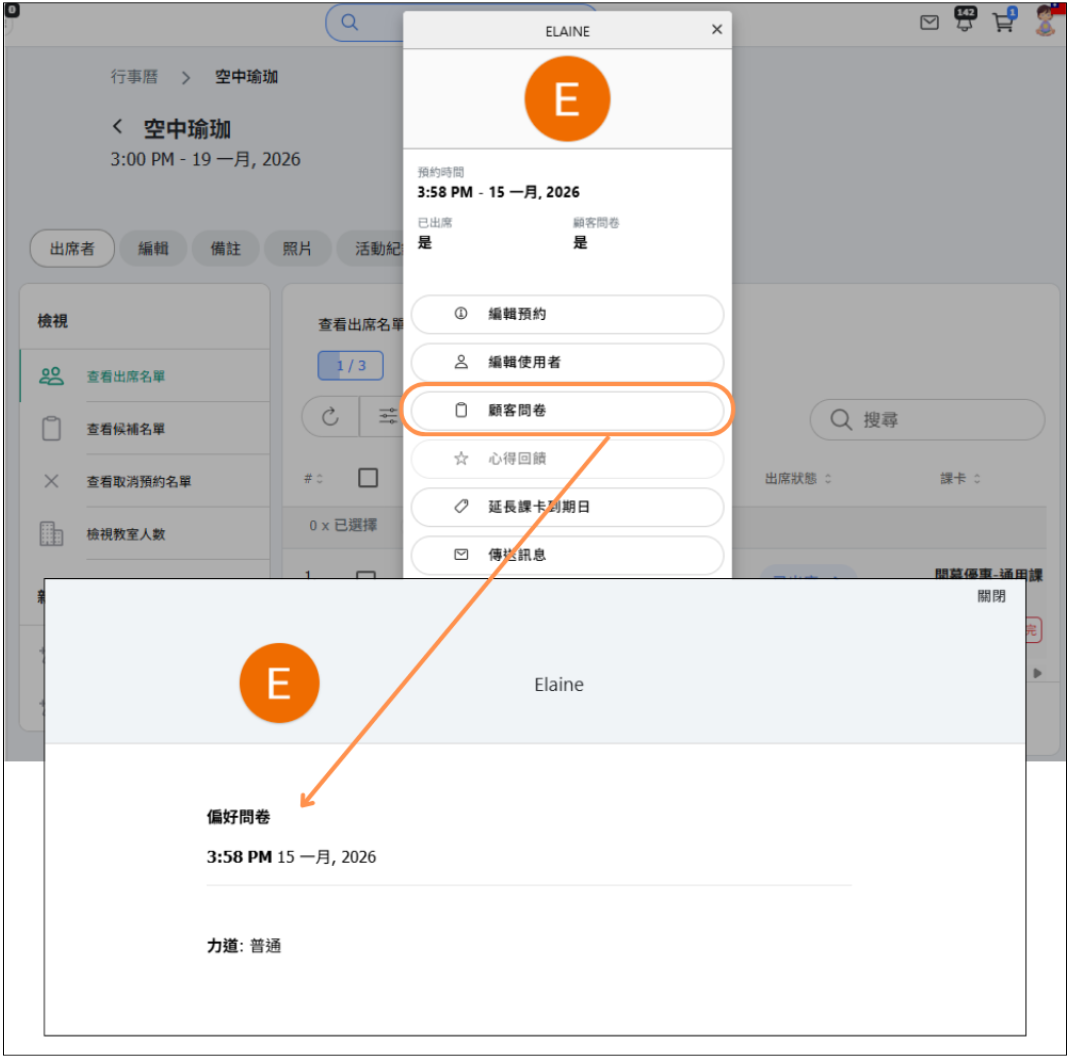
- You can view their responses in the History tab before the class
[Instructions – Customer Survey]
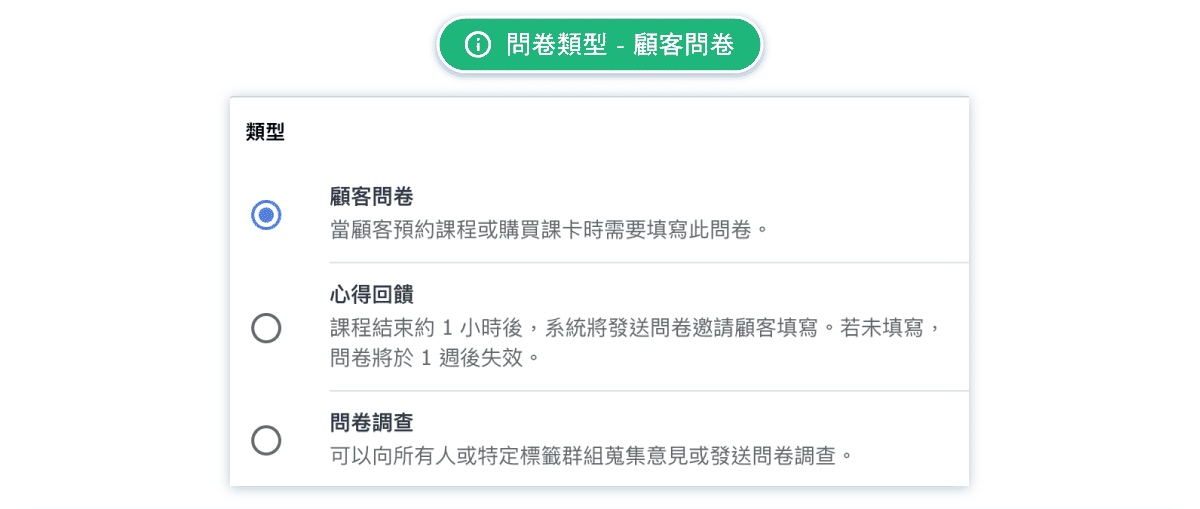
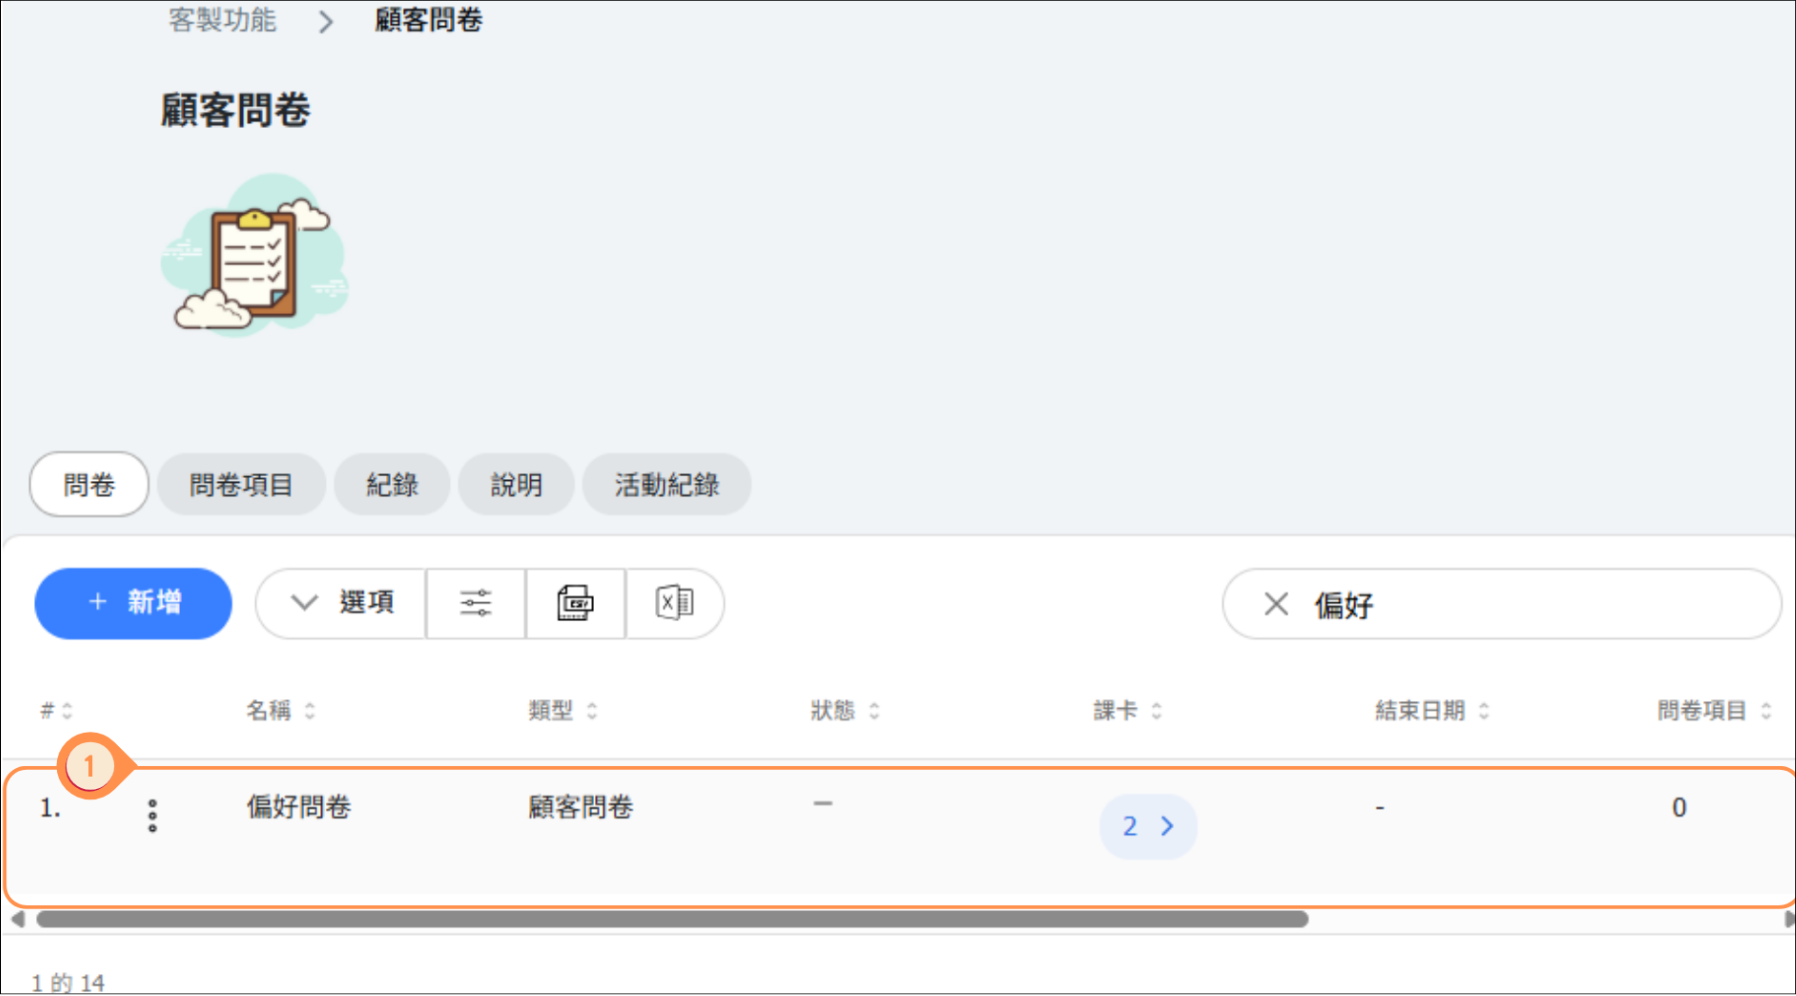
- Bind the survey to a Pass so that customers are required to fill it out at the time of purchase.
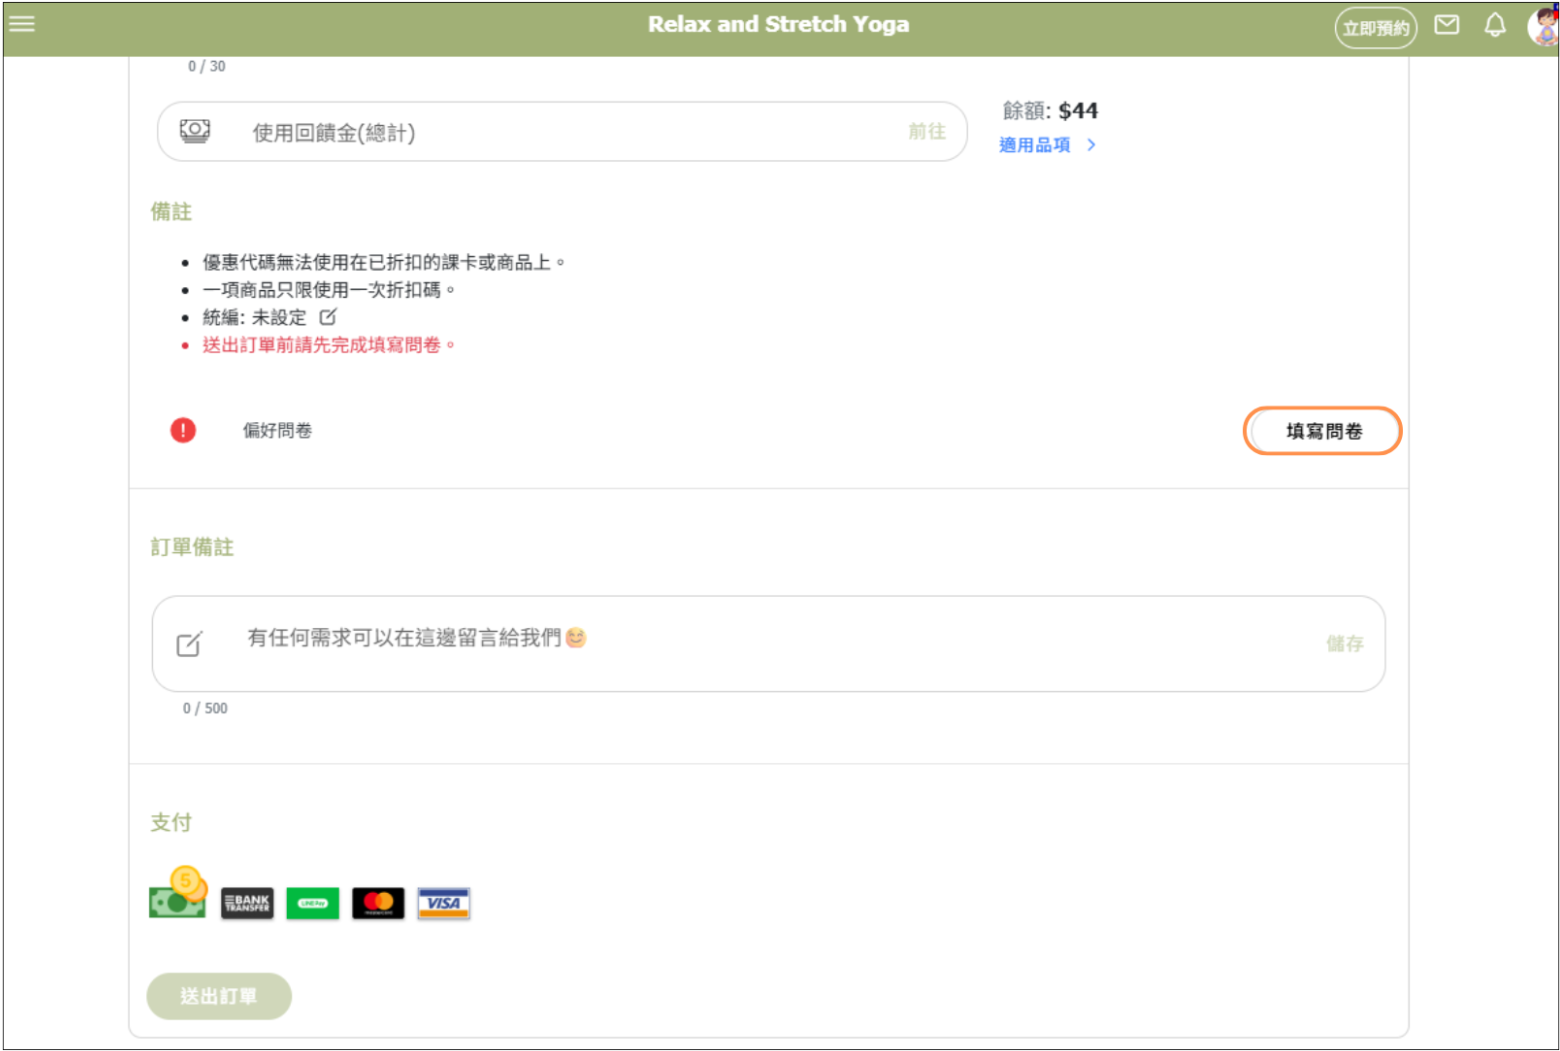
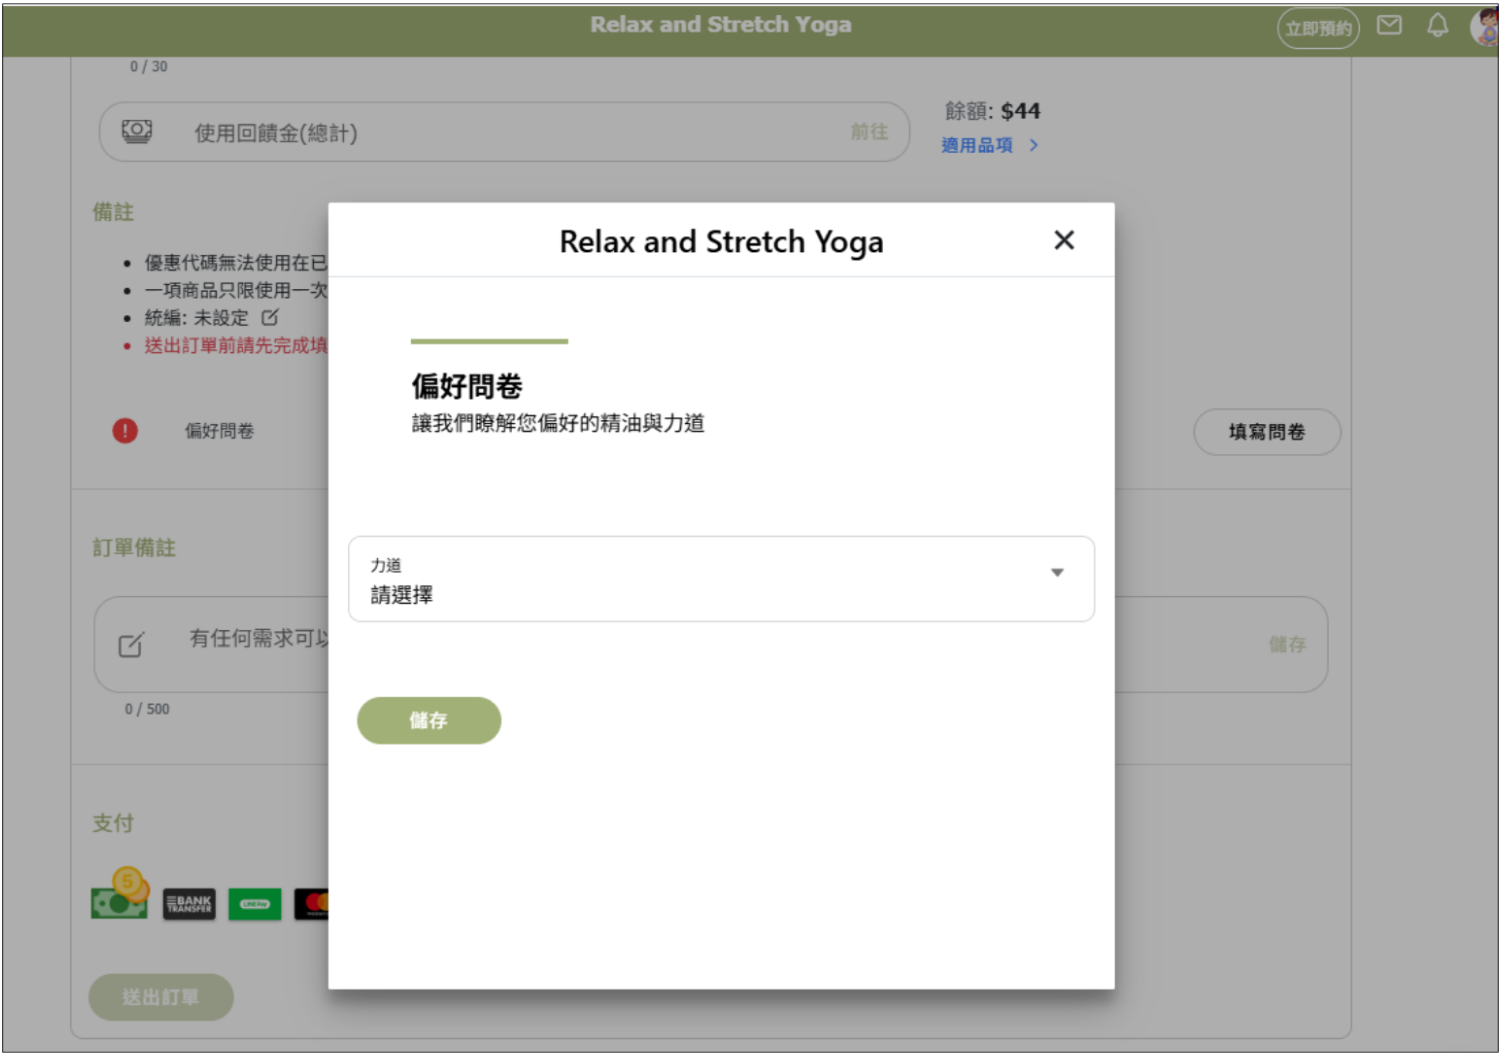
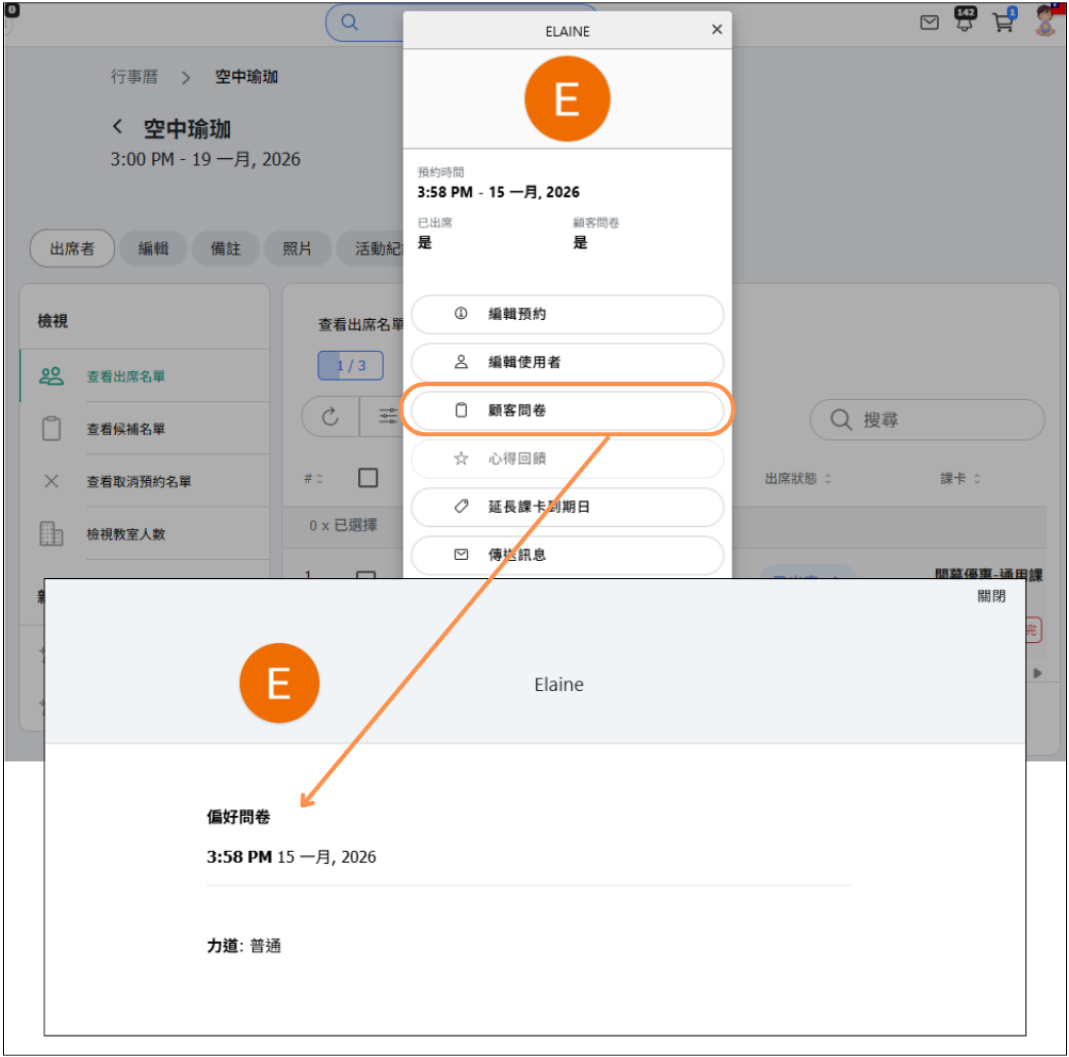
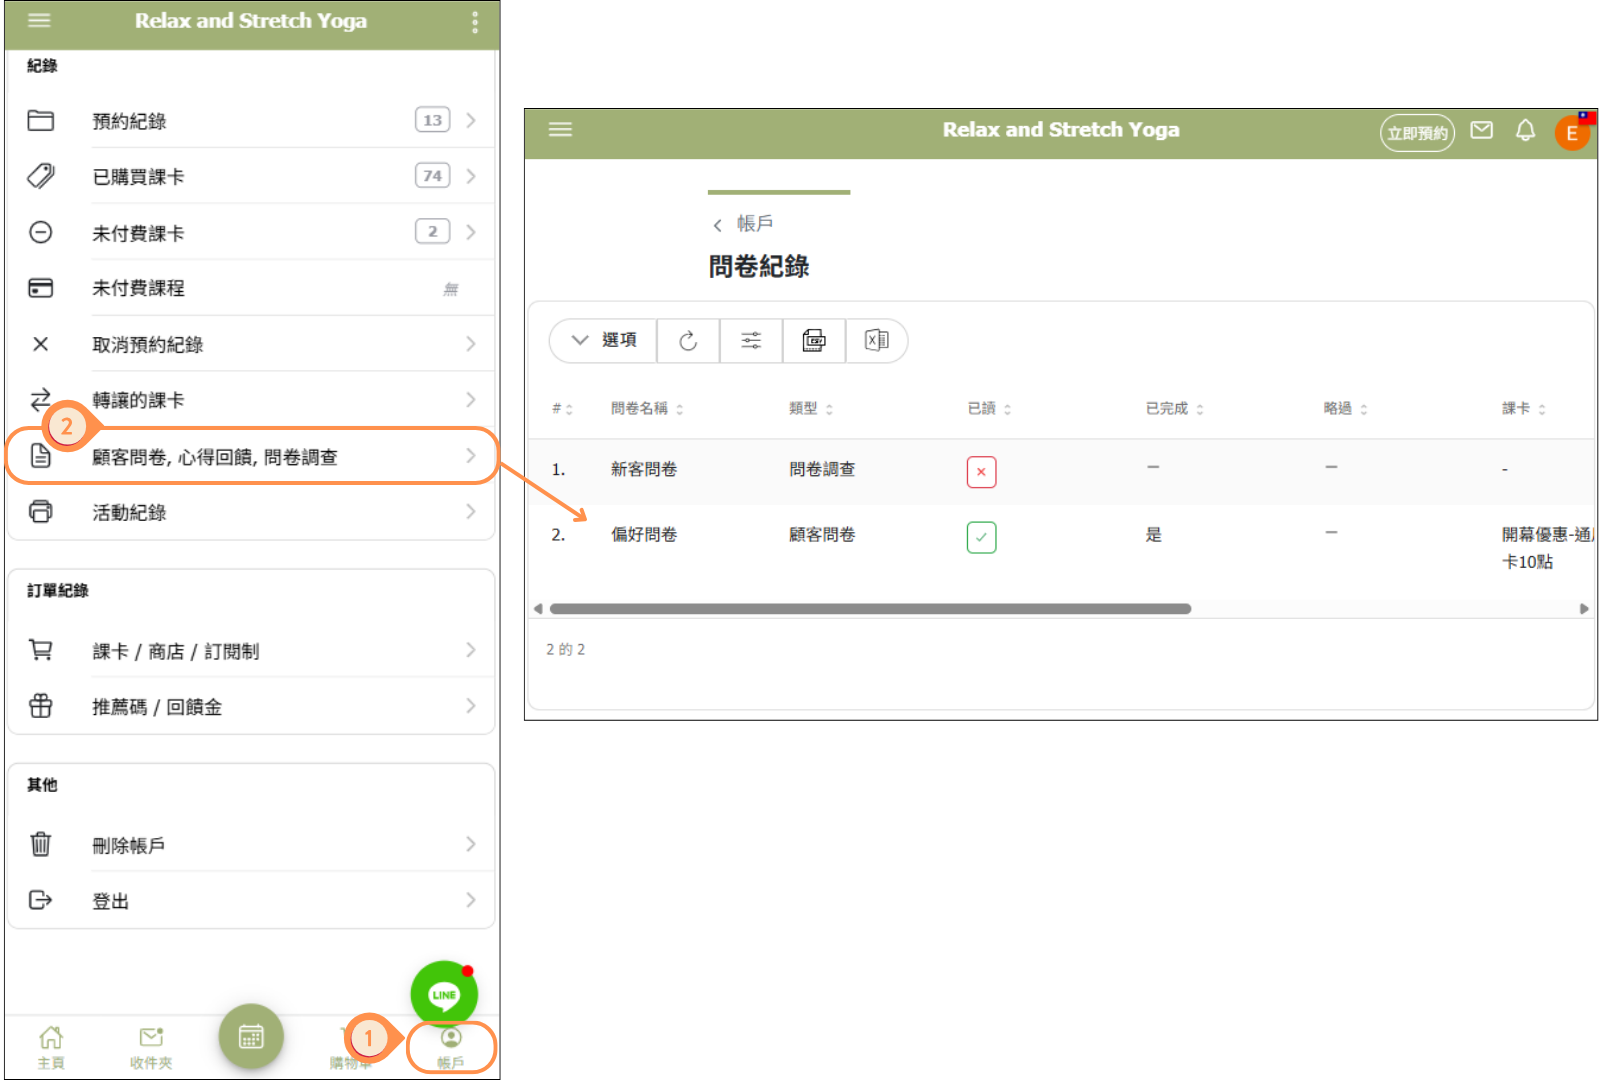
- When a customer makes a reservation using a pass that has a survey attached, or books a course that is linked to a survey, the customer's survey responses can be viewed in the reservation records.
Form Type: Feedback
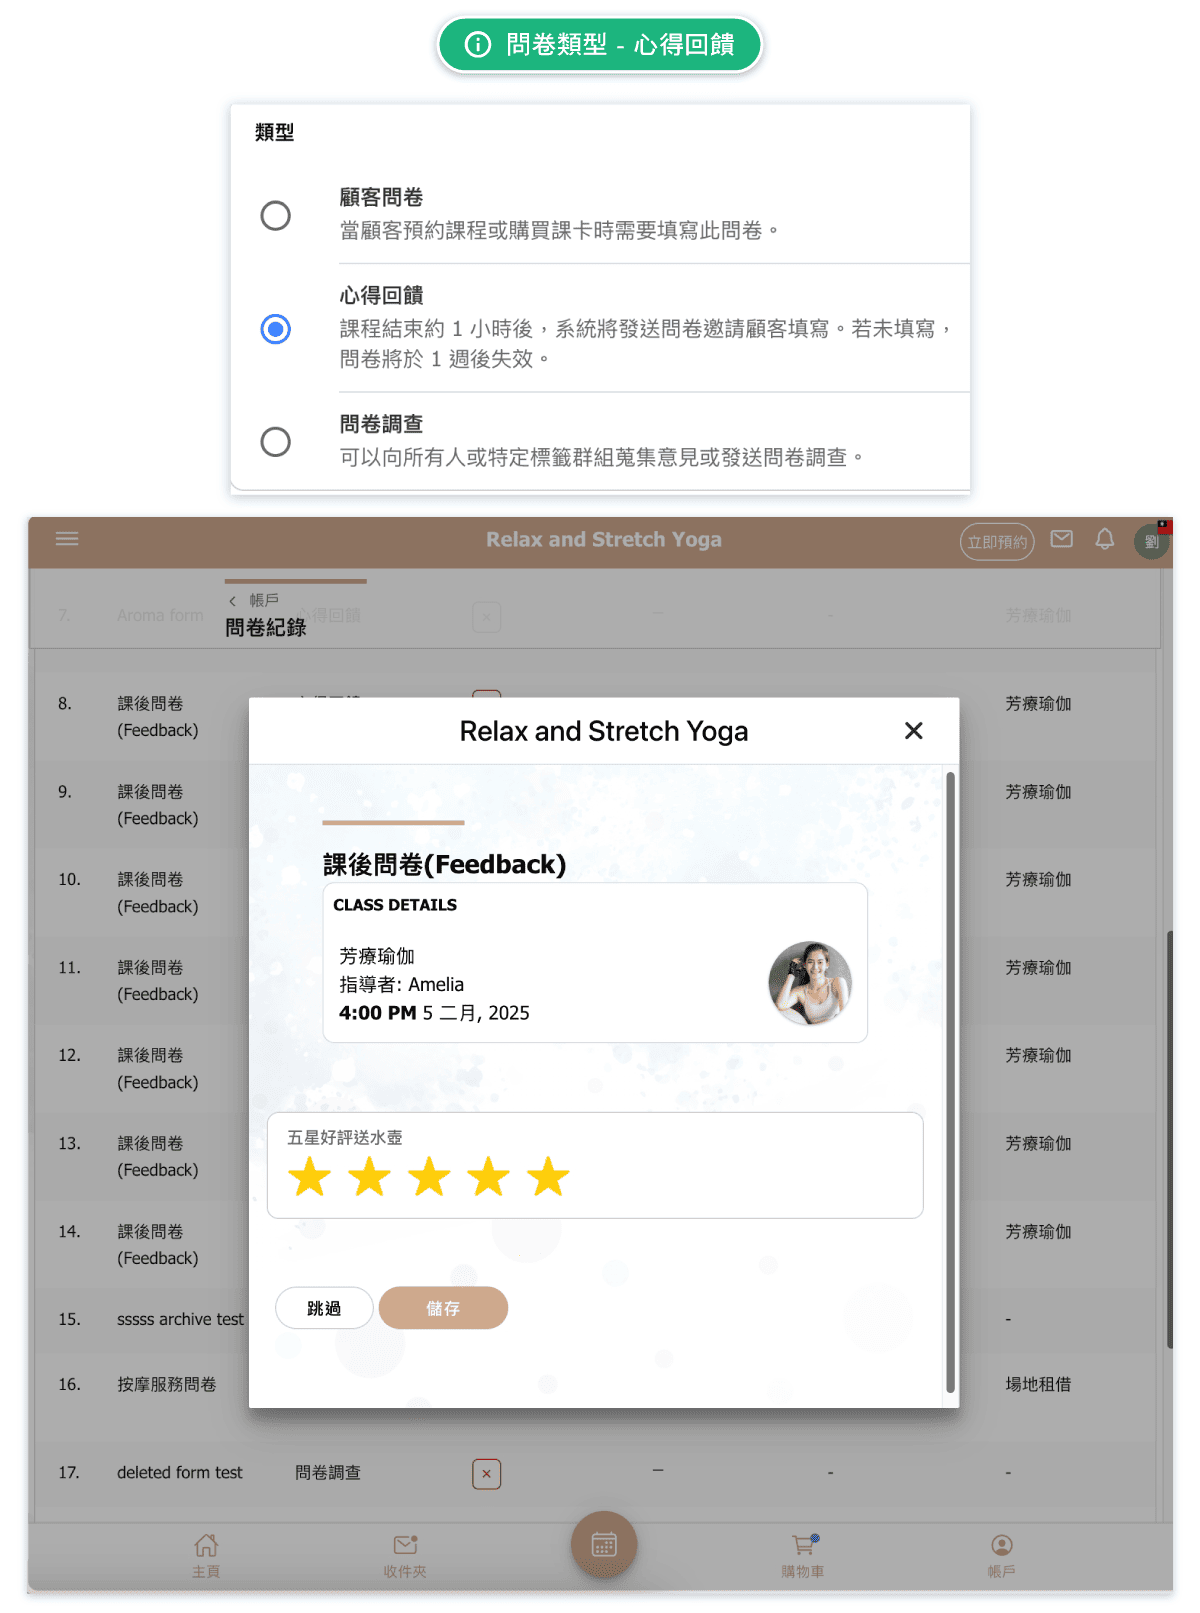
Feedback forms are automatically sent to customers after they attend a class. This helps you collect valuable reviews and improve your services.
How Feedback Forms Work:
- The system automatically sends the feedback form to each attendee 31 minutes past the hour after their class ends
- For example: If a class ends at 13:45, students will receive the feedback form after 14:31
- Only customers who actually attended (marked present) receive the form
- Customers can complete the form at their convenience
Common Feedback Questions:
- How would you rate this class? (1-5 stars)
- What did you enjoy most about the class?
- How can we improve?
- Would you recommend this class to others?
- Any additional comments?
Benefits:
- Automated collection - no manual work required
- Timely feedback while the experience is fresh
- Helps identify popular instructors and classes
- Provides insights for improvement
Form Type: Cancellation
Cancellation forms collect information immediately before a customer cancels a class reservation.
How Cancellation Forms Work:
- The form appears after the customer confirms they want to cancel, but before the reservation is removed
- A required form must be submitted before cancellation can continue; closing it leaves the reservation active
- An optional form can be skipped and the cancellation will continue without answers
- Select specific classes to limit the form, or leave Classes empty to apply it to every class cancellation
- Cancellation forms do not attach to passes and do not create a separate pending survey or notification
- Completed answers are linked to the cancelled attendance record and can be reviewed in History
Useful Questions:
- Why are you cancelling?
- Was the class time inconvenient?
- Would a different time or instructor work better?
- Is there anything we could change to help you attend next time?
Form Type: Survey
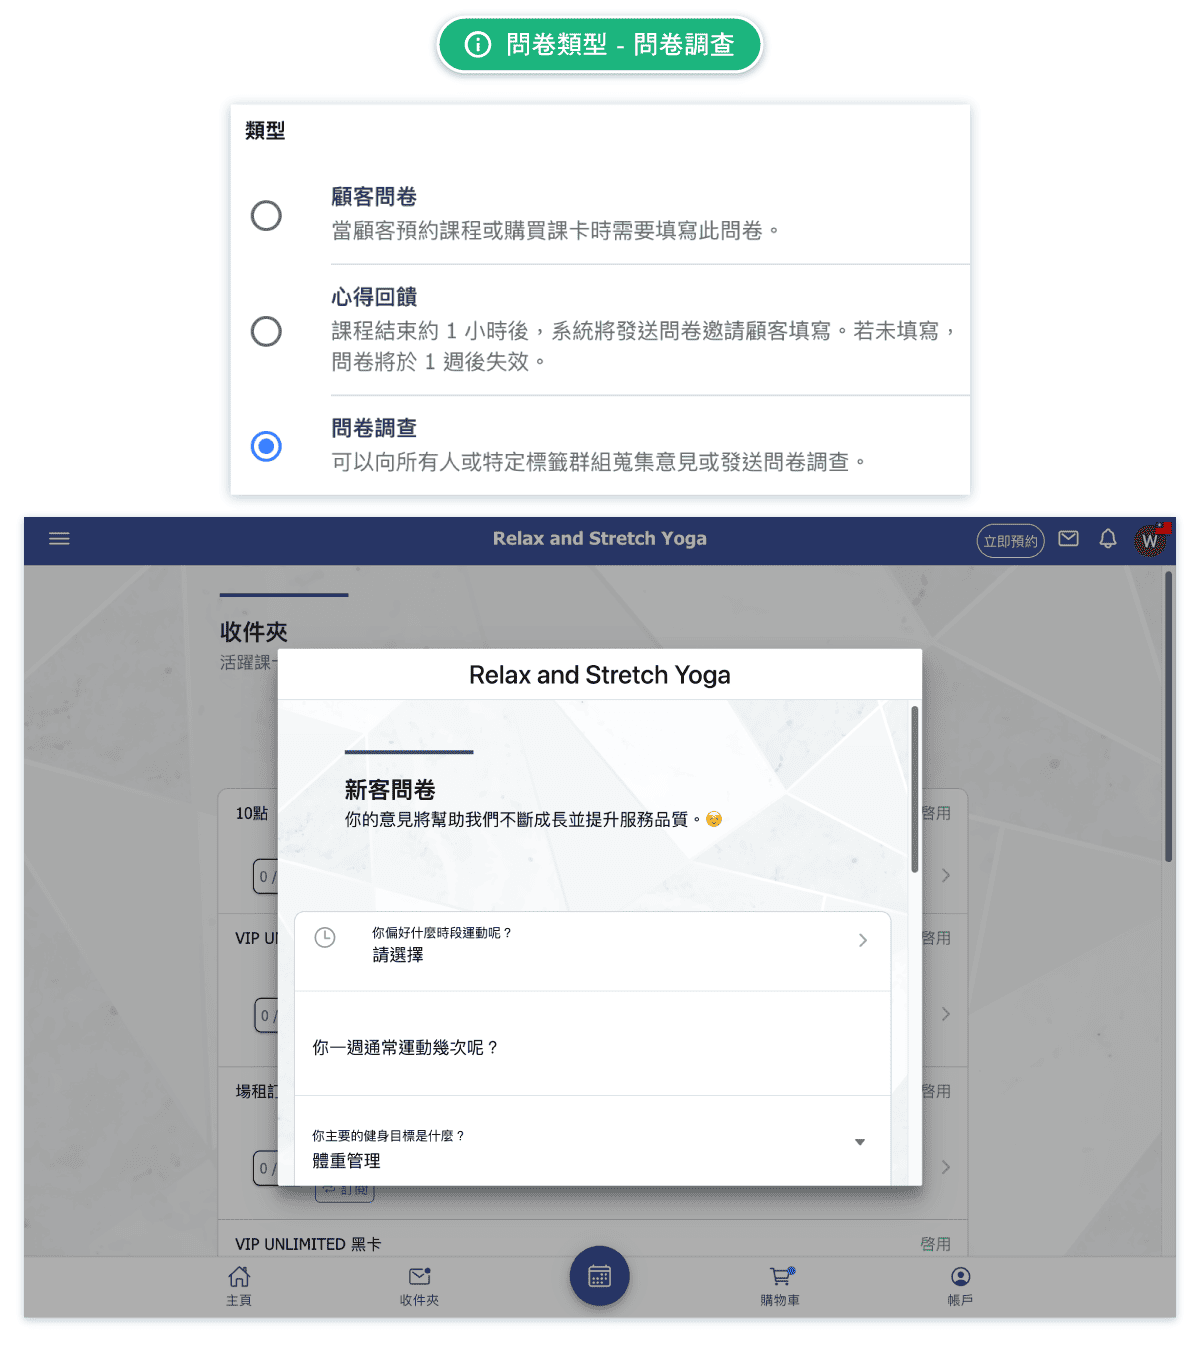
Surveys are general-purpose questionnaires that can be sent to customers at any time. Unlike Intake Forms and Feedback, surveys are not tied to specific classes or attendance.
Survey-Specific Features:
- Ready to Go toggle - Keep it off to save as a draft; turn on when ready to publish
- End Date - Set a deadline for responses; customers will see when the survey expires
- Status tracking - The forms list shows Draft before publishing, Live once published, and Ended after the end date has passed
- Locked questions - Once the survey is live, its questions can no longer be edited or replaced with a template. The form shows the note "Once this form is live, the form items cannot be edited", so answers already collected stay comparable
Common Survey Uses:
- Customer satisfaction surveys
- New service interest polls
- Schedule preference surveys (best class times)
- Annual feedback collection
- Event planning questionnaires
- Marketing research
Tips for Surveys:
- Keep surveys short - 5-10 questions maximum for better completion rates
- Set reasonable end dates to create urgency
- Use the draft feature to prepare surveys in advance
- Review responses before the end date to take action
Form Type: Registration
Take the Registration forms tour: Start at Custom Features > All features. The tour highlights the Intake Form card for every business. If the feature is disabled, the tour stops there: enable it or start a trial if available, then retake the tour. If it is enabled, continue to click its cog and open the Forms list. The tour highlights New and pauses, then clicks New on the next continuation and highlights Type in the editor. Choose Registration. The tour does not enable a feature, save a form or publish it.
A Registration form is the one-time joining form. It is given automatically to customers who register with your business, including people who complete registration while paying as a guest. Registration forms are not attached to specific passes or classes.
Settings for a Registration form:
- Required - When on, the customer must complete the form. When off, they can dismiss it without filling it out.
- Ready to go - Keep it off while you are still writing the form; it stays a draft and nobody receives it. Turn it on when the form is ready and confirm, and every customer who registers after the start date will be asked to complete it.
- Start date (required) - Only customers who register after this date receive the form. Leave it as today and your existing customers are untouched; set it earlier to also reach everyone who has joined since that date.
- End date (optional) - Stops the form being given out after that day. Leave it empty to keep asking new customers indefinitely, or clear it later to remove the deadline.
Status in the forms list:
- Draft - Ready to go is off; nobody receives the form
- Live - Ready to go is on; new customers are asked to complete it
- Ended - The end date has passed
Registration forms follow the same lifecycle as surveys, so once the form is live its questions can no longer be edited or replaced with a template. The form shows the note "Once this form is live, the form items cannot be edited", which keeps the answers you have already collected comparable. Prepare the questions as a draft first, and create a new form when you want to ask something different.
The New member registration template:
Instead of writing the questions yourself, choose the New member registration template on the Templates step. It is supplied in English and Chinese and includes:
- Emergency contact name (required)
- Emergency contact phone number (required)
- Do you have any injuries or medical conditions we should know about?
- How did you hear about us? (a dropdown offering Friend or family, Social media, Search engine, Walked past)
- What are you hoping to get out of your visits?
- An opt-in switch for news and offers
You can add, remove, or reword any of these before saving, and before the form goes live.
Viewing Form Responses (Admin)
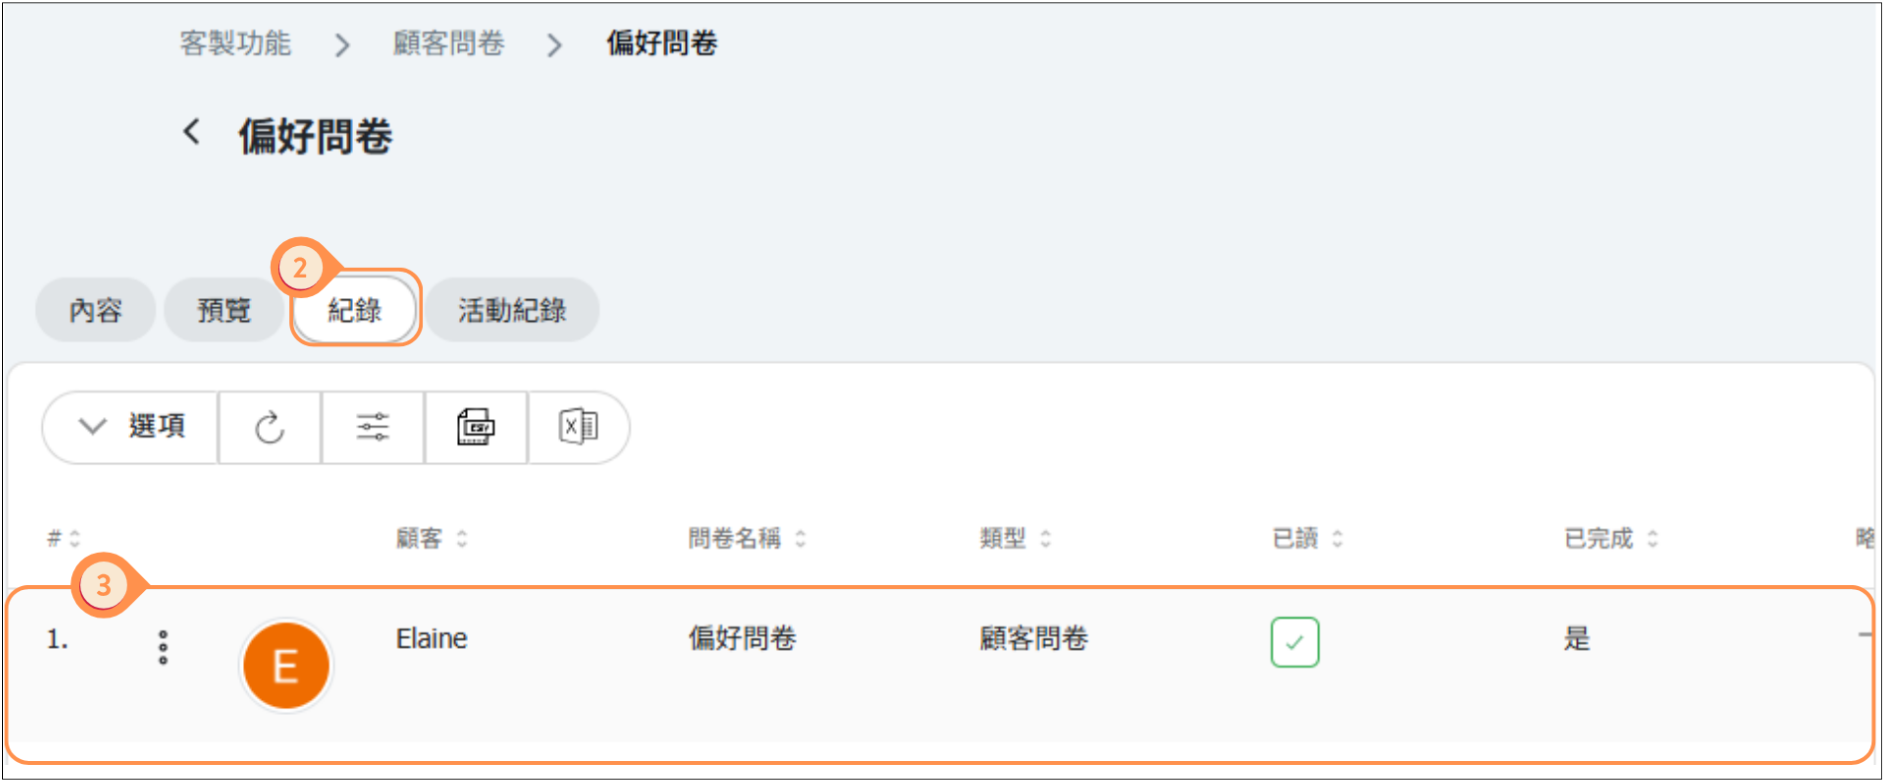
Completed answers from all five form types are collected in the History tab.
How to View Responses:
- Go to Custom Features > Intake Form
- Click the History tab
- Filter by customer, form, class, status, or date when available
- Click an entry to view the full response
Information Displayed:
- Customer - Who completed or skipped the form
- Form Name and Type - Intake Form, Registration, Cancellation, Feedback, or Survey
- Class or Pass Context - The related booking, cancellation, or purchase when applicable
- Status - Whether the form is pending, completed, or skipped
In a response, a signature appears as an image of what the customer drew. A blank signature appears as a dash (—).
Cancellation forms are completed inline, so they do not have a pending to-do. A required form produces a completed response before cancellation; an optional form may be skipped without storing answers.
Customer Experience
Customers encounter each form type at a different point:
- Intake Forms - During class booking or pass purchase
- Registration Forms - Once, when they register, if they joined after the form's start date
- Cancellation Forms - After confirming a class cancellation, before the reservation is removed
- Feedback Forms - After attending a class
- Surveys - From their pending forms when a survey is published to them
For a required cancellation form, closing the form cancels the cancellation action, not the reservation. For an optional cancellation form, the customer may skip it and continue.
If a form has a Signature item, customers draw their signature in a bar at the bottom of the screen, next to the form's buttons. They can tap Clear to sign again. A required signature must be drawn before the form can be submitted; an optional one shows (Optional).
Submitted responses can be referenced later from form history where the form type supports it.
Activity Log
The Log tab provides a complete audit trail of all changes made to forms and form items.
What's Tracked:
- New form items created
- New forms created
- Edits to existing forms or items
- Who made each change
- When the change was made
How to Use the Log:
- Go to Custom Features > Intake Form
- Click on the Log tab
- Use the date range filter to find specific changes
- Review the activity timeline
Benefits:
- Track who made changes to forms
- Audit form modifications
- Troubleshoot issues by seeing recent changes
- Maintain accountability across team members
Best Practices
Follow these tips to get the most out of the Intake Form feature:
Creating Effective Forms:
- Keep it short - Ask only for information you will use
- Use clear language - Explain why the question is being asked
- Use required carefully - A required cancellation form stops the customer from cancelling until it is submitted
- Reuse questions - Keep wording and reporting consistent across forms
Choose the Right Lifecycle:
- Use Intake Forms for information needed during booking or pass purchase
- Use Registration for the joining details you only need to ask once, such as emergency contacts and medical conditions
- Use Cancellation for short, actionable questions about why class reservations are cancelled
- Use Feedback for post-class reviews and instructor ratings
- Use Surveys for broader research sent to a customer audience
For cancellation forms, start with one or two questions. Leave Classes empty only when the same questions make sense for every class; otherwise target the relevant classes.