
How to Enable a Custom Feature
Follow these steps to enable a custom feature:
- Go to Custom Features in the left sidebar (under "Advanced")
- Click All Features to browse available features
- Find the feature you want to enable
- Click the Enable button on the feature card
The feature will be activated immediately and the button will change to show ENABLED.
Note: Make sure you have available custom feature slots in your plan. Check the counter at the top of the page (e.g., "Your custom features: 5 / 10").
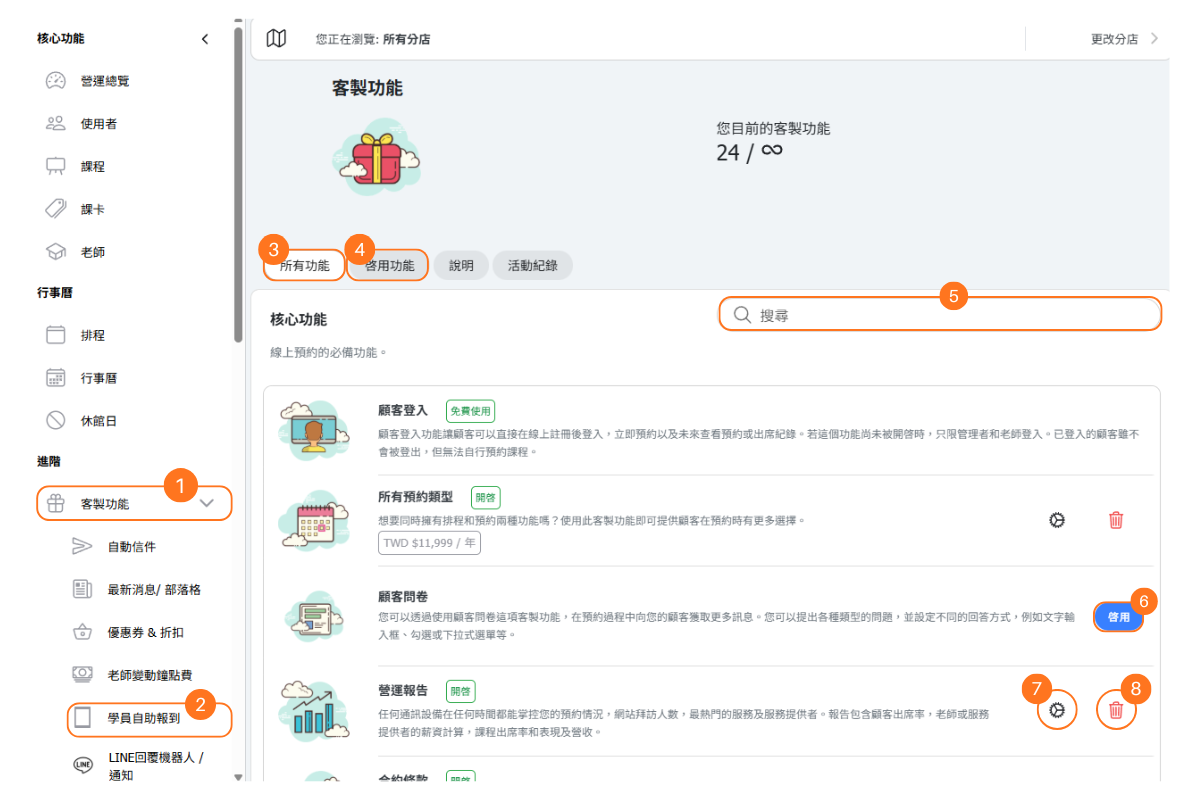
[Operating Instructions]
-
Click to enter the “Custom Feature Menu”.
-
Click to open a configured feature page.
-
Review all custom features.
-
Review the enabled custom features.
-
Enter keywords to search for a specific feature.
-
When the feature selection is not full, click “Enable” to start using the feature.
-
Enter the feature settings page.
-
Disable the feature.
Where to Find Enabled Features
After enabling a custom feature, you can access it in two ways:
1. Sidebar Menu
Most enabled features will automatically appear in the left sidebar menu under Custom Features. Simply click on the feature name to access its settings and functionality.
2. Settings Icon (Cog)
On the Custom Features page, each enabled feature shows a settings icon (gear/cog). Click this icon to go directly to the feature's configuration page.
Quick Access Tips:
- The sidebar provides the fastest navigation to frequently used features
- Use the settings icon when you're already on the Custom Features page
- Some features may have sub-pages accessible from the sidebar dropdown
What If I've Reached My Feature Limit?
If you've reached your plan's custom feature limit, you have several options:
Option 1: Try a Feature for Free
You can trial any feature once for 7 days at no cost. This doesn't count against your feature limit. Look for the "Try Free" or "Start Trial" button.
Option 2: Disable Another Feature
Free up a slot by disabling a feature you no longer need. Click the trash icon on any enabled feature to disable it.
Option 3: Upgrade Your Plan
Get more feature slots by upgrading to a higher plan in the Shop. Plans offer 1, 4, 10, or unlimited custom features.
Important Note:
Once you reach your limit, a 24-hour countdown begins. Complete any feature changes within this window. After the timer expires, further changes may incur additional fees.
How to Disable a Feature
To disable a custom feature you no longer need:
- Go to Custom Features > All Features or Activated
- Find the feature you want to disable
- Click the trash icon (delete) on the feature card
- Confirm the deactivation
What happens when you disable:
- The feature is immediately deactivated
- It disappears from your sidebar menu
- Your feature count decreases, freeing up a slot
- Your settings and data are preserved for future re-activation