
Why Connect Multiple Zoom Accounts?
Connecting multiple Zoom accounts to your booking system offers several key advantages for businesses running online classes:
1. Avoid Scheduling Conflicts
A single Zoom account can only host one meeting at a time. If you have multiple classes scheduled at the same time (e.g., different instructors teaching simultaneously), you'll need separate Zoom accounts for each concurrent class.
2. Distribute Meeting Load
Each Zoom account has participant limits based on your subscription plan. By using multiple accounts, you can distribute your classes across accounts and avoid hitting capacity limits.
3. Instructor-Specific Accounts
Some businesses prefer each instructor to have their own Zoom account for branding consistency and easier management of their individual classes.
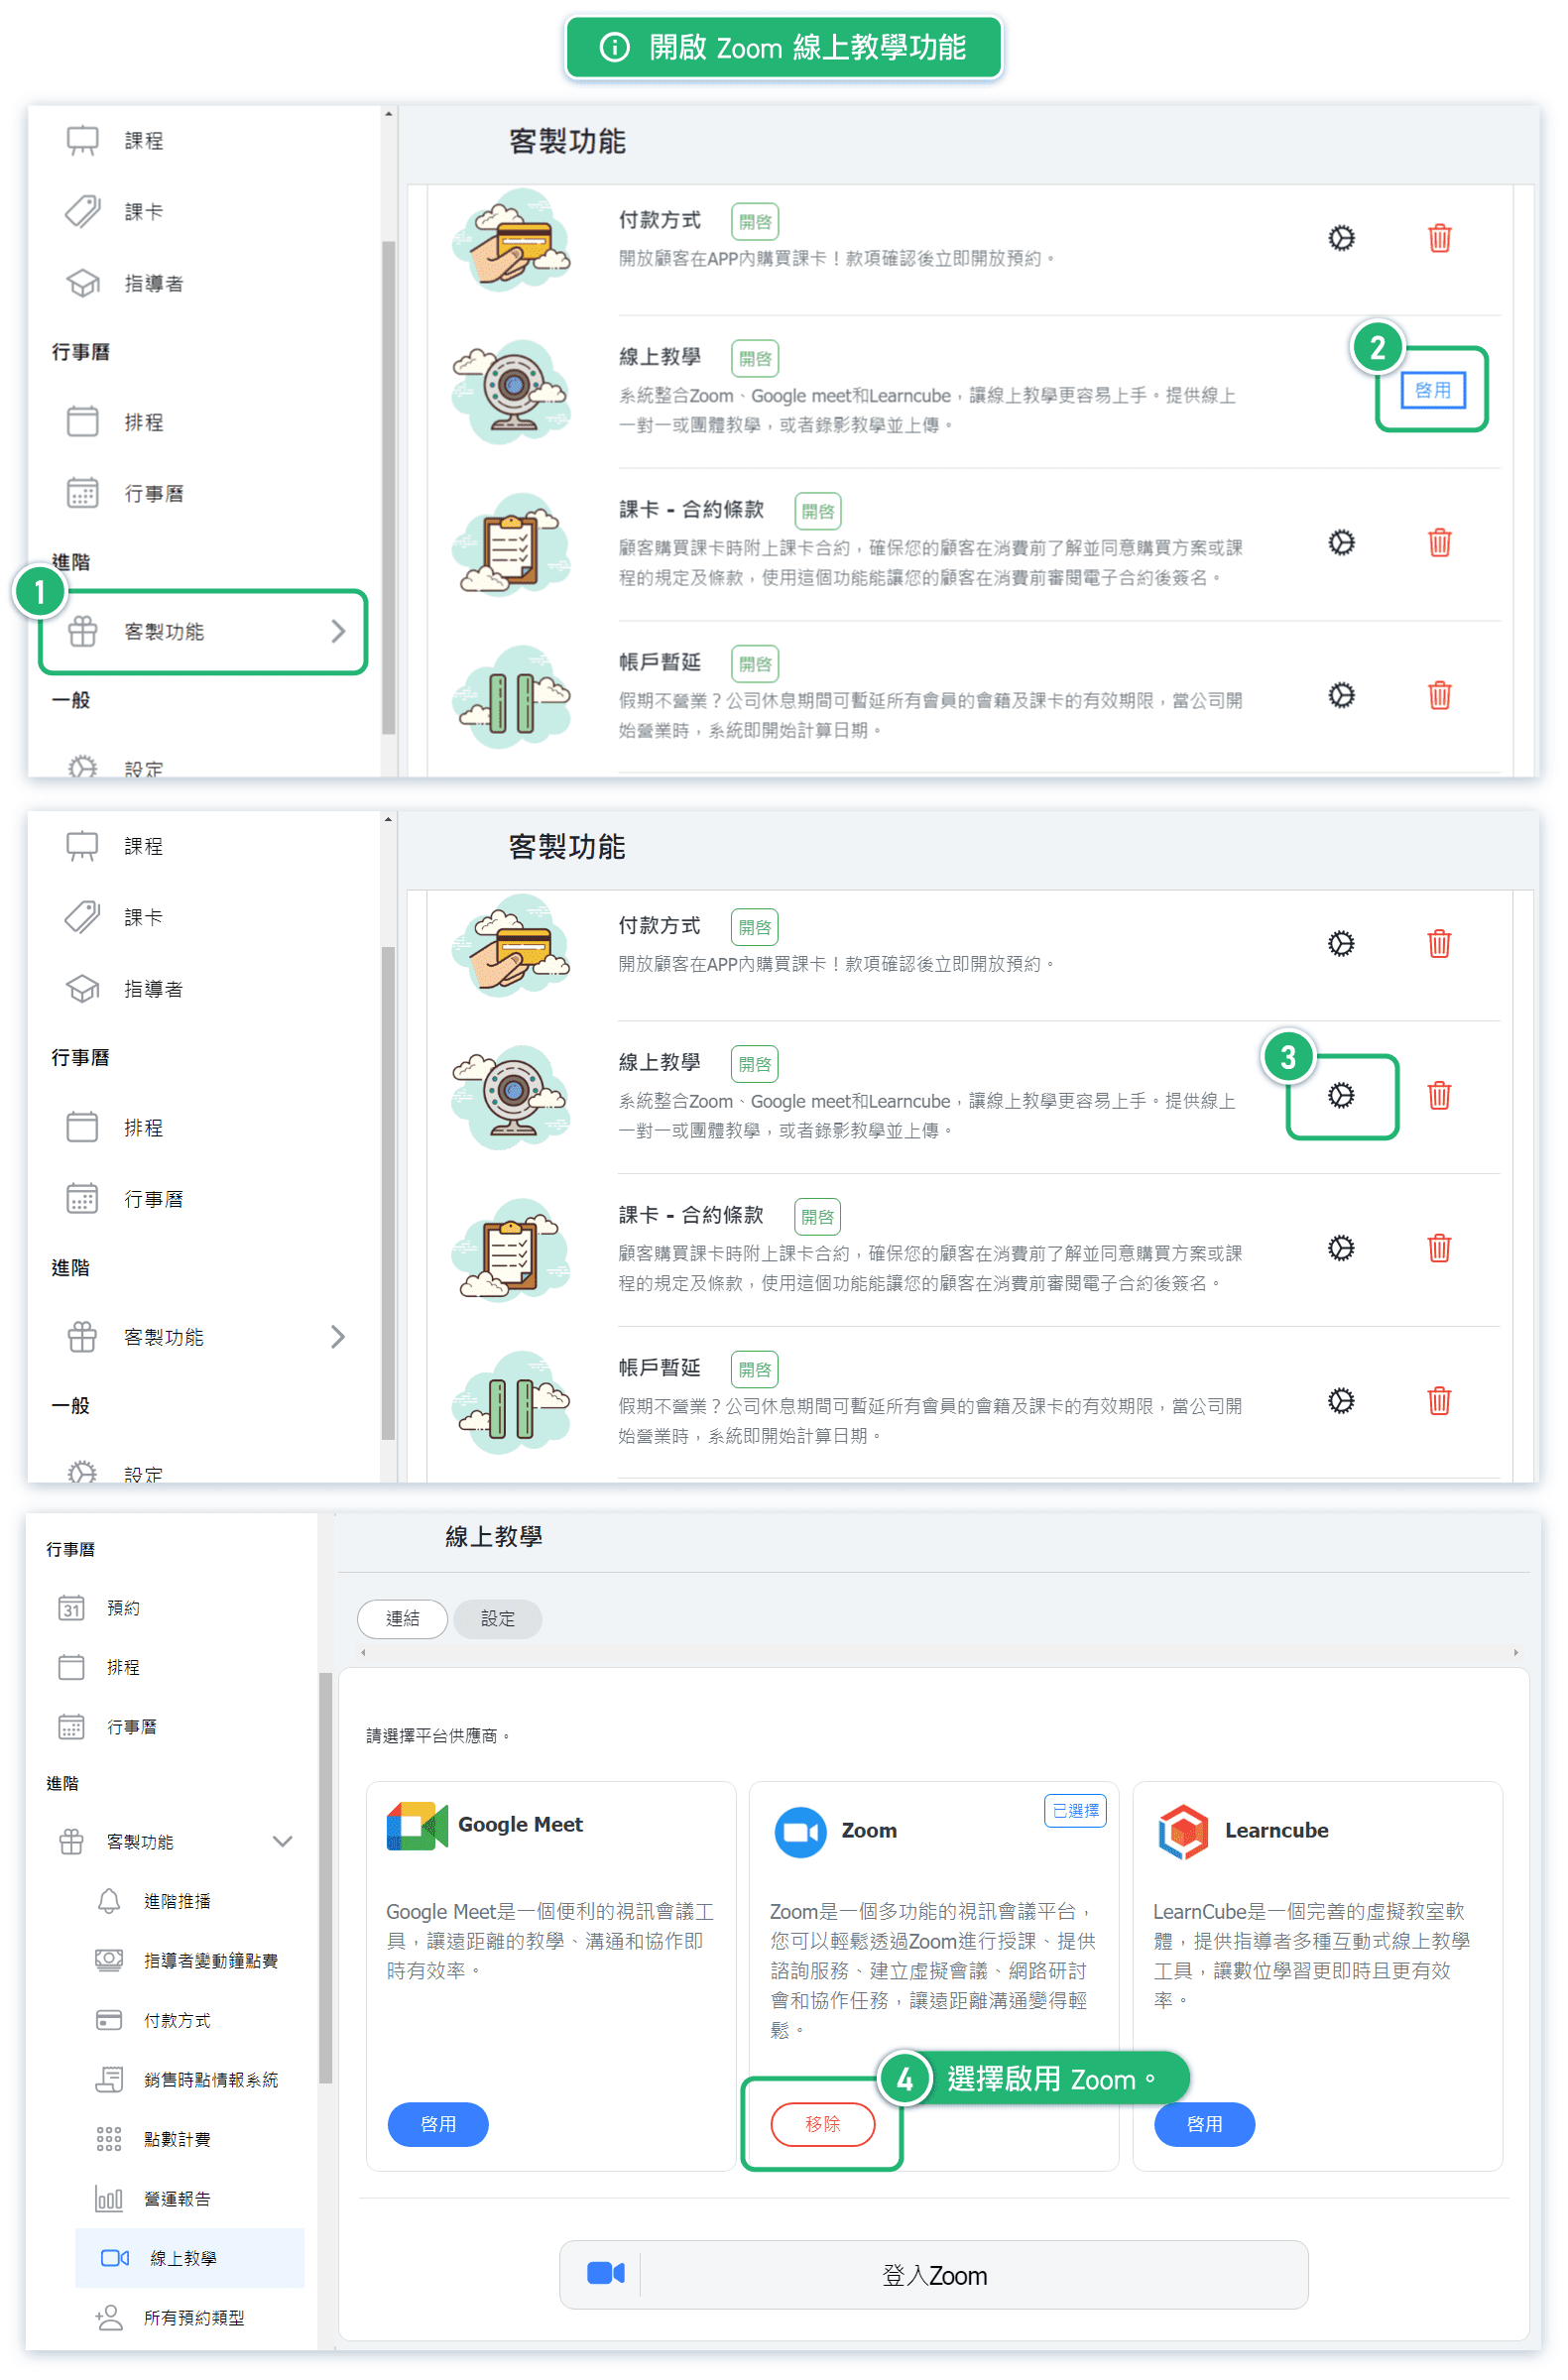
How to Enable the Zoom Online Teaching Feature
Before connecting Zoom accounts, you need to enable the Online Teaching feature in your system:
- Navigate to Custom Features in the left sidebar menu
- Find Online Teaching in the feature list
- Click the Enable button on the Zoom card
Once enabled, you'll see the Zoom option marked as "Selected" and a "Remove" button will appear, indicating the feature is active.
Available Video Conferencing Options:
- Google Meet - Seamless integration with Google Workspace
- Zoom - Popular choice for webinars and virtual meetings
- LearnCube - Specialized virtual classroom software for interactive teaching
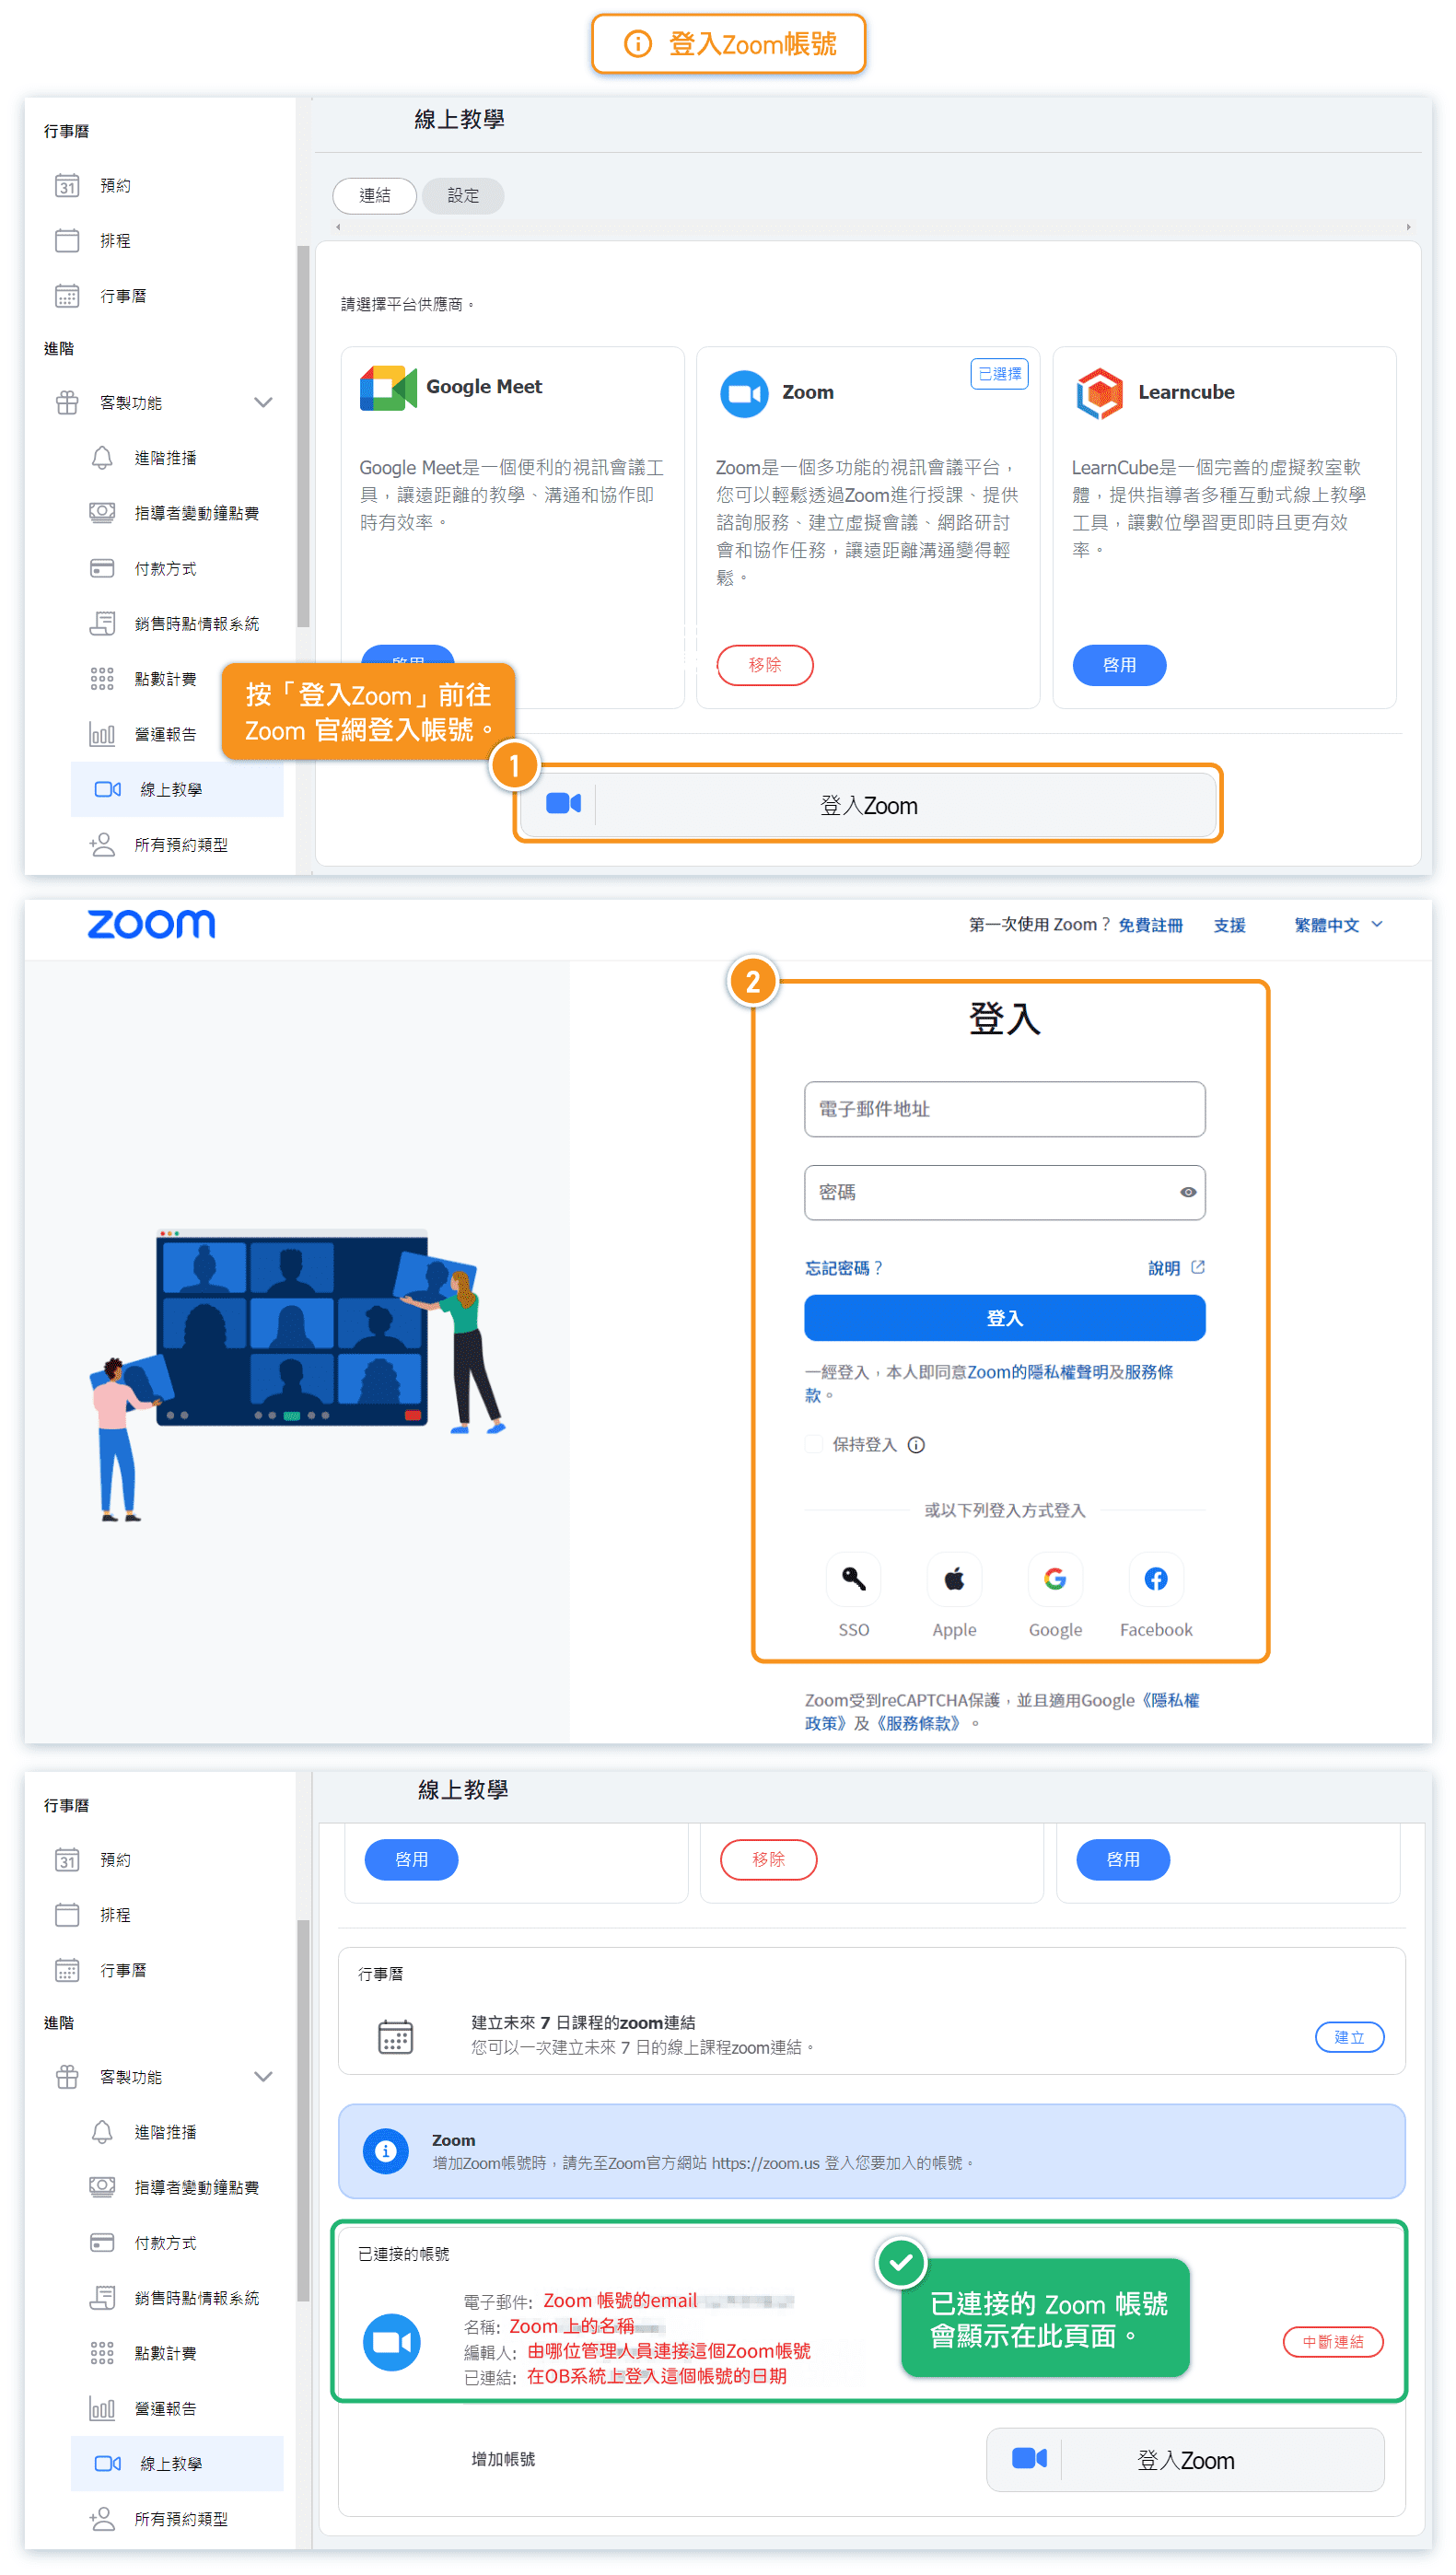
How to Connect Your First Zoom Account
Follow these steps to connect your first Zoom account:
- On the Online Teaching page, scroll down to the Connected Accounts section
- Click the Sign in with Zoom button
- You'll be redirected to Zoom's login page
- Enter your Zoom credentials and authorize the connection
- Once connected, you'll see your account appear in the Connected Accounts list with details including:
- Email address
- Account name
- Who connected it
- Connection date and time
Important: Make sure you're logged into the correct Zoom account in your browser before clicking "Sign in with Zoom", as Zoom will automatically use your current session.
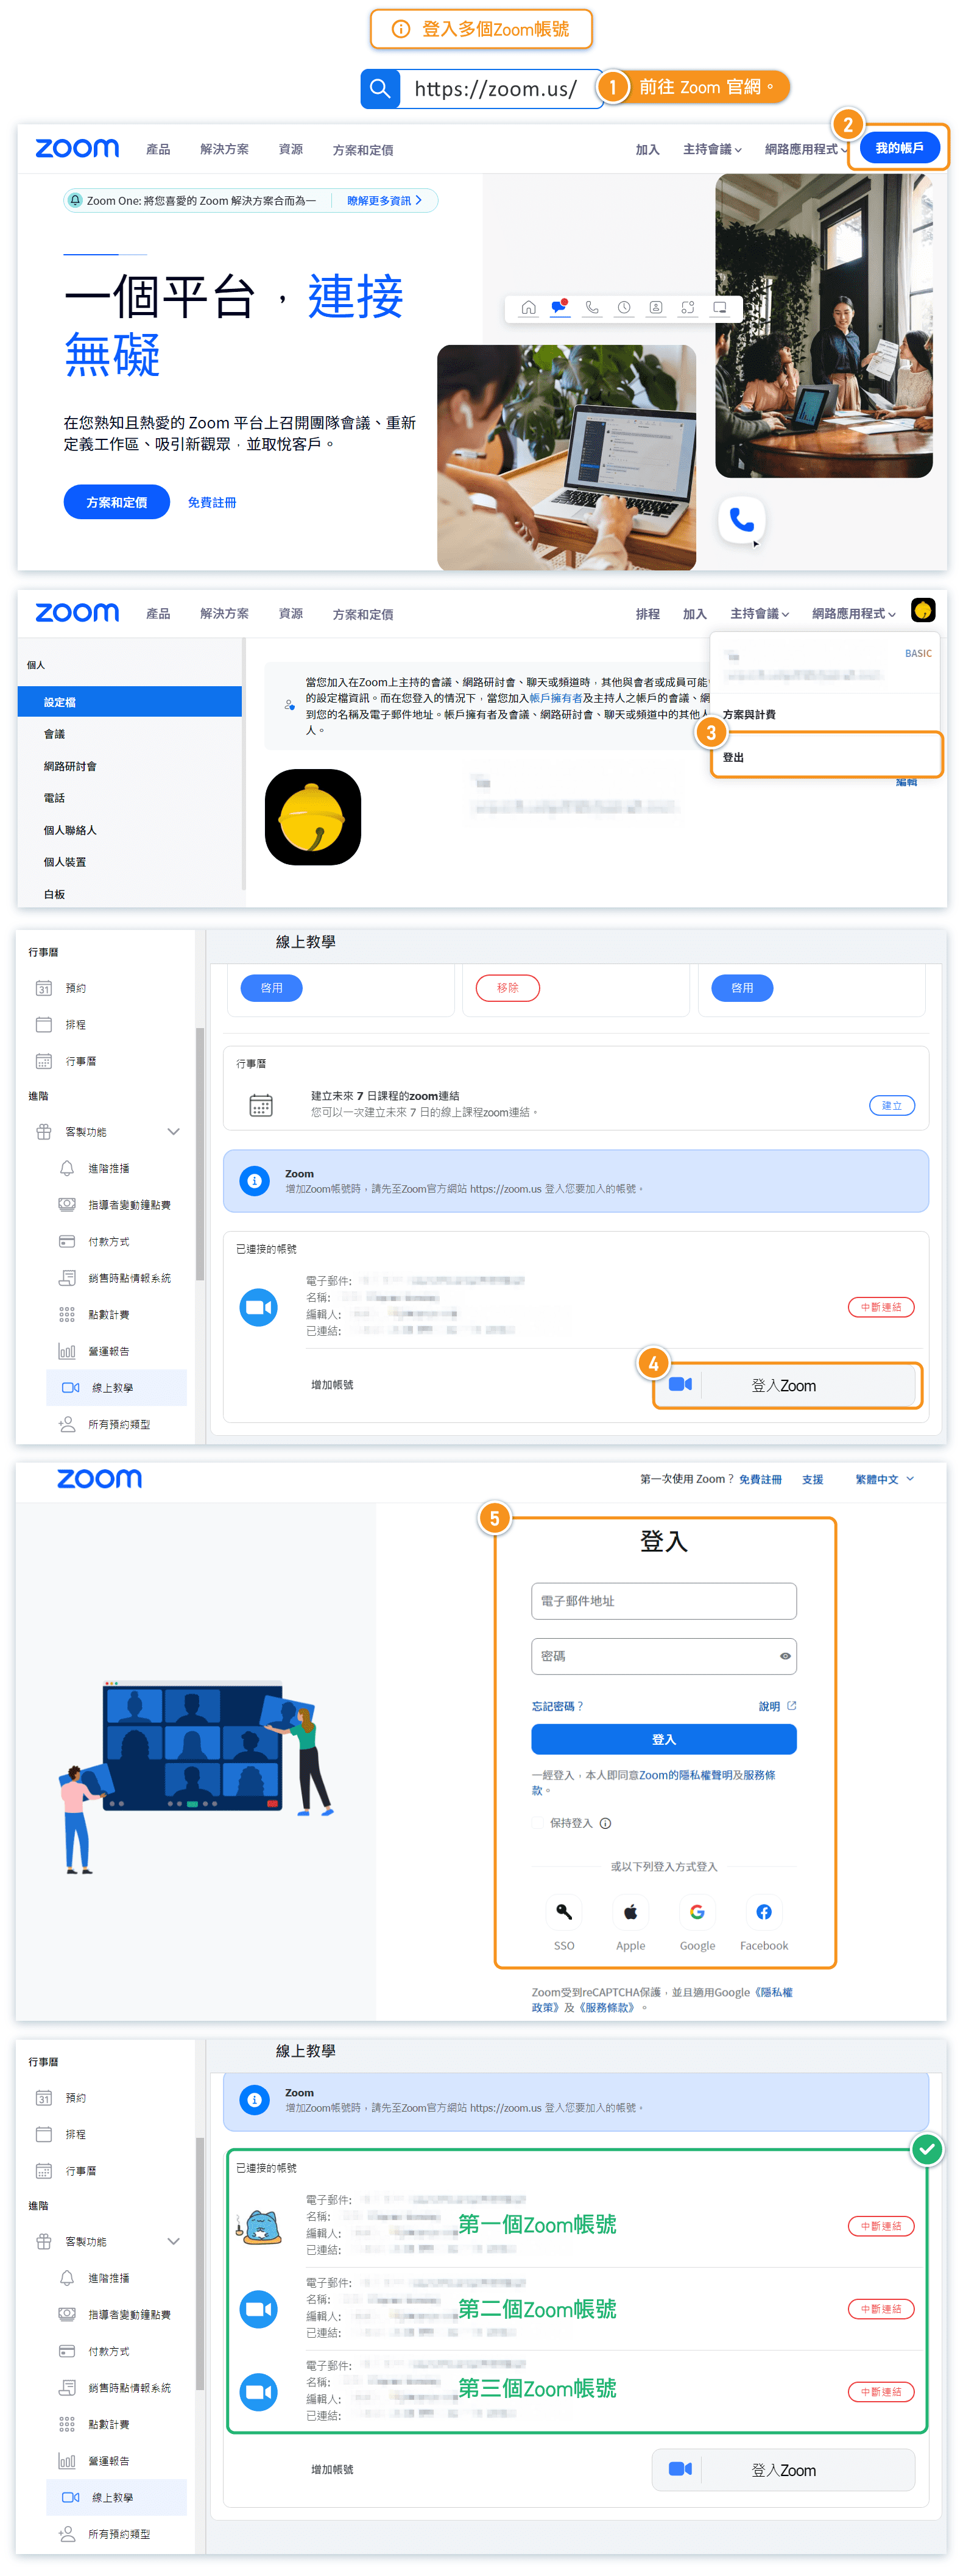
How to Add Additional Zoom Accounts
To connect additional Zoom accounts, you need to first log out of your current Zoom session. Here's the step-by-step process:
- Log out of Zoom: Go to https://zoom.us and sign out of your current Zoom account
- Log into the new account: Sign in to the Zoom account you want to add
- Return to the booking system: Go back to the Online Teaching settings page
- Click "Add account": In the Connected Accounts section, click the "Sign in with Zoom" button under "Add account"
- Authorize the connection: Complete the authorization process for the new account
Why is this necessary?
Zoom's OAuth system automatically uses your current browser session. Without logging out first, clicking "Sign in with Zoom" would simply reconnect the same account rather than adding a new one.
Tip: You can also use an incognito/private browser window to add accounts without logging out of your primary Zoom account.
How to Batch Generate Zoom Meeting Links
The system allows you to generate Zoom meeting links for all scheduled classes in the next 7 days with a single click.
Before generating links, ensure:
- You have completed scheduling for the next 7 days
- All required Zoom accounts are connected to the system
To generate links:
- Go to the Online Teaching settings page
- In the Calendar section, click the Generate button next to "Generate zoom links next 7 days"
- The system will create meeting links for all scheduled online classes
How account assignment works:
When you click "Generate", the system assigns Zoom accounts to classes in rotation, starting with the first connected account. For example, if you have three accounts (A, B, C), classes will be assigned in order: A → B → C → A → B → C...
Important notes:
- Classes that already have meeting links will be skipped (no duplicates created)
- Links are assigned based on the chronological order of classes in the calendar
- Disconnecting a Zoom account will also remove all meeting links created with that account
How to Manually Select a Zoom Account for a Specific Class
In addition to batch generation, you can manually create meeting links for individual classes and choose which Zoom account to use:
- Go to Calendar in the left menu
- Click on the class you want to set up
- Select the Online Class tab
- Under Zoom account, click to select from your connected accounts
- Click Create Class Now to generate the meeting link
What you'll see after creation:
- ID: The Zoom meeting ID
- Customer: Class Link: The link students will use to join
- Start Class: Button for instructors/admins to launch the Zoom meeting
Important timing note:
Create the meeting link within an hour of the class start time. Zoom meeting links can expire if created too far in advance. If you encounter issues, simply click "Create Class Now" again to generate a fresh link.
Who can start the class?
Only the Zoom account holder (the account used to create the meeting) can start the class. Make sure the correct instructor has access to start the meeting.
FAQ: What happens if I disconnect a Zoom account?
Disconnecting a Zoom account has the following effects:
- All meeting links created by that account will be removed from your scheduled classes
- Classes that were using that account will no longer have a valid Zoom link
- You'll need to reconnect the account or use a different account and regenerate links for affected classes
Before disconnecting, consider:
- Are there any upcoming classes using this account?
- Do you have alternative accounts connected to reassign those classes?
- Have you communicated with students if meeting links will change?
To disconnect an account, click the Disconnect button next to the account in the Connected Accounts list.
FAQ: Why might the same Zoom account be used for classes at the same time?
This can happen when you generate meeting links in multiple batches instead of all at once. Here's how to avoid this issue:
The Problem:
If you schedule 8 classes, generate links, then schedule 8 more classes and generate links again, both batches will start assigning from Account A. This means you could have two classes at the same time both assigned to Account A.
Example:
- You have 3 Zoom accounts: A, B, C
- First batch of 8 classes: assigned A, B, C, A, B, C, A, B
- Second batch of 8 classes: also starts with A, B, C, A, B, C, A, B
- If any classes from batch 1 and batch 2 overlap in time, they'll have conflicting Zoom accounts
The Solution:
- Complete all scheduling first - Schedule all classes for the next 7 days before generating any links
- Generate links once - Click "Generate" only after all scheduling is complete
- Use manual assignment for exceptions - If you need to add classes later, manually select the Zoom account to avoid conflicts
FAQ: How many Zoom accounts do I need?
The number of Zoom accounts you need depends on your maximum concurrent classes:
Simple Rule: You need at least as many Zoom accounts as the maximum number of classes running at the same time.
Examples:
- 1 class at a time: 1 Zoom account is sufficient
- 3 instructors teaching simultaneously: You need at least 3 Zoom accounts
- Peak hours with 5 concurrent classes: You need at least 5 Zoom accounts
Tips for planning:
- Review your weekly schedule to find your peak concurrent class times
- Add 1-2 extra accounts as backup for flexibility
- Consider if instructors prefer their own dedicated accounts
Note: If you try to schedule more concurrent classes than you have Zoom accounts, some classes won't be able to have meeting links generated, or you'll need to stagger class times.
Troubleshooting: Common Issues and Solutions
Issue 1: "Sign in with Zoom" connects the same account
Solution: Log out of Zoom at zoom.us first, then log into the account you want to add before clicking "Sign in with Zoom".
Issue 2: Meeting link expired or not working
Solution: Go to the class's "Online Class" tab and click "Create Class Now" to generate a fresh link. Remember to create links within an hour of class start time.
Issue 3: Students can't join the meeting
Solution: Ensure the instructor has started the class first. Students cannot join until the host (Zoom account owner) has launched the meeting.
Issue 4: Wrong Zoom account assigned to a class
Solution: Go to the class's "Online Class" tab, select the correct Zoom account from the dropdown, and click "Create Class Now" to update the link.
Issue 5: Can't find the "Online Class" tab
Solution: Ensure the Online Teaching feature is enabled in Custom Features. The tab only appears for classes marked as online classes.