
How do I add a new user from the admin backend?
Administrators can manually create user accounts for customers, staff, or instructors:
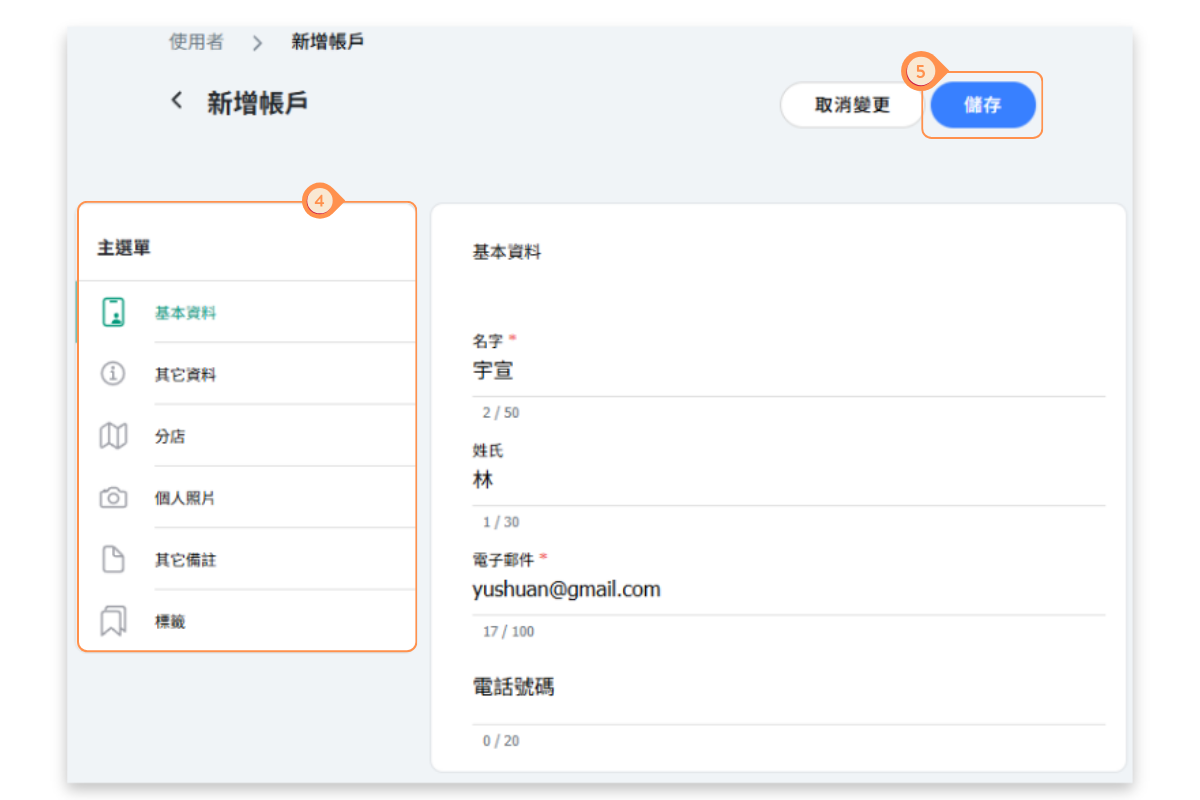
- Go to Users in the admin menu
- Click the + NEW button
- Fill in the required information:
- First Name (required)
- Last Name
- Email Address (required)
- Phone Number
- Click Save to create the account
Important notes about admin-created accounts:
- Accounts created by admins do not have a password set initially
- The user must use the "Forgot Password" feature to set their password
- Alternatively, they can log in using Google or Line if they registered those services with the same email

What additional information can I add to a user profile?
When creating or editing a user, you can add various types of information through the menu tabs:
| Basic Information | Name, email, and phone number |
| Extra Information | Additional custom fields you've configured (birthday, address, emergency contact, etc.) |
| Location | Assign the user to specific branch locations |
| Profile Picture | Upload a photo for the user |
| Additional Notes | Internal notes about the customer (only visible to staff) |
| Tags | Add tags to categorize and filter users |
Tip: Use tags to organize customers into groups like "VIP", "New Member", or "Corporate" for easier management and targeted communications.
How do I set up roles and permissions for staff accounts?
After creating an account for a staff member or instructor, you need to assign them appropriate roles:
- Go to Settings → Role Permissions Management
- Find the user and assign them a role:
- Account Admin: Full access to all features
- Manager: Access to most features except sensitive settings
- Instructor: Access to their own classes and schedules
- Custom roles: Create roles with specific permissions
- Save the changes
What each role can do:
- Admins can manage all users, settings, and financial data
- Managers can handle day-to-day operations
- Instructors can view and manage their assigned classes and attendance
For detailed information on configuring roles, see the Role and Permission Management help article.
How do customers register themselves?
Customers can create their own accounts through your booking page:
- Customer visits your booking page
- They tap on Account in the navigation
- They choose a registration method (see below)
- They complete the registration form
- Their account is created and they can start booking
Available registration methods:
- Email and password: Traditional registration with email verification
- Google login: One-click registration using their Google account
- Line login: Registration using their Line account (popular in Asia)
The available login methods depend on what you've enabled in your settings. Customers will only see the options you've configured.
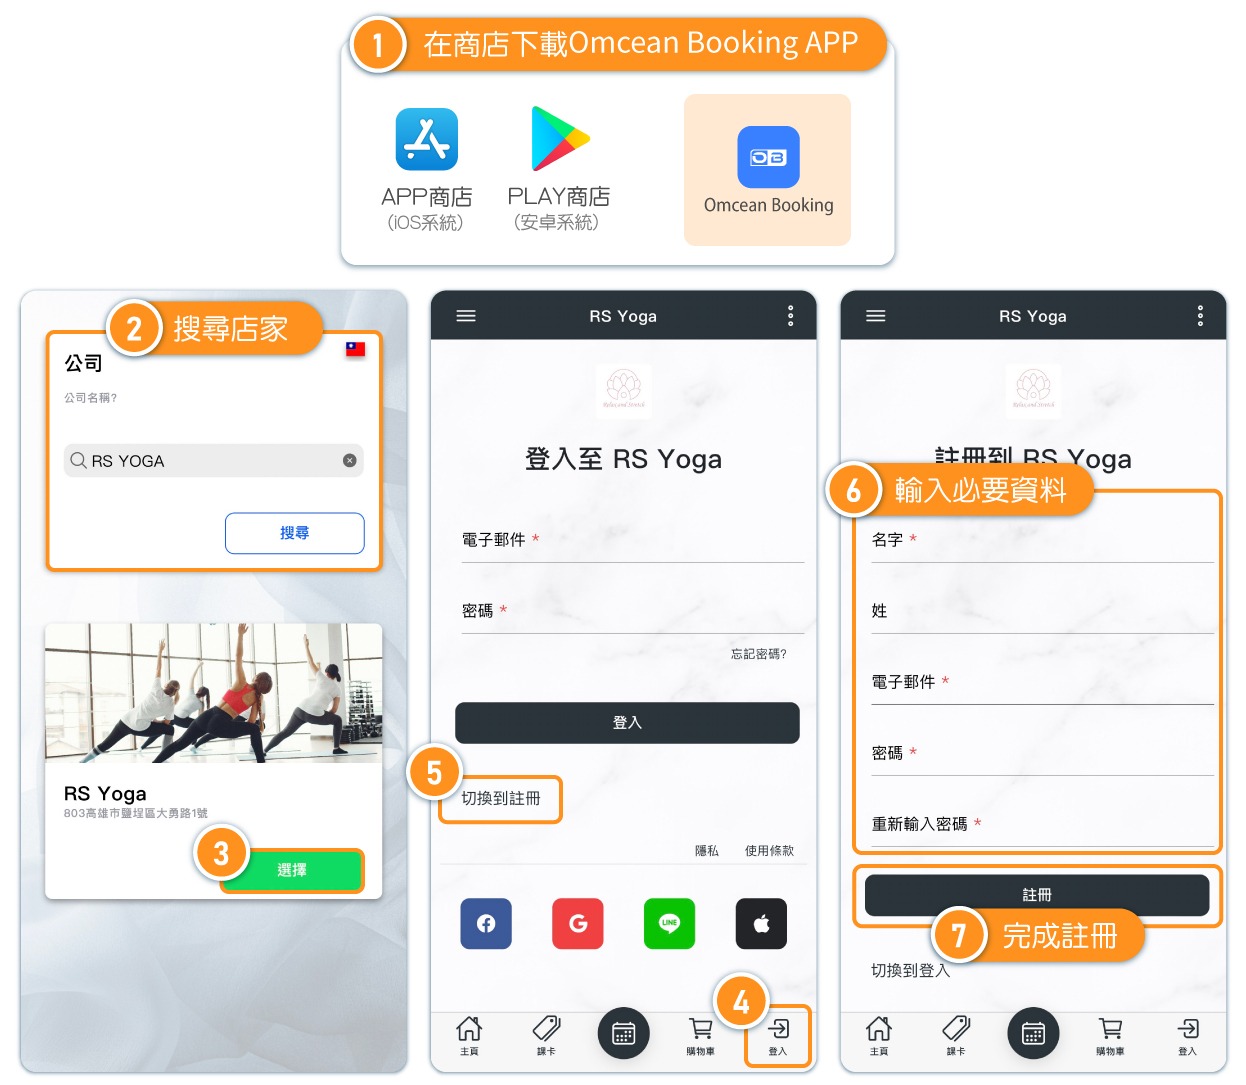
[Instructions]
- Download the Omcean Booking APP from the app store.
- Search for the store name.
- Click “Select.”
- Tap “Login” at the bottom right.
- Choose “Switch to Register.”
- Enter the required information.
- Complete the registration.
What login methods can I enable for customers?
You can configure which login methods are available to your customers:
Email and Password
- Traditional registration requiring email and password
- Customers receive a verification email
- They can use "Forgot Password" to reset if needed
Google Login
- Customers click "Sign in with Google"
- They authorize using their Google account
- No password to remember - uses Google's secure authentication
- Quick and convenient for customers who use Google
Line Login
- Popular option for businesses in Taiwan, Japan, and Thailand
- Customers authorize using their Line account
- Great for businesses whose customers primarily use Line for communication
Tip: Enabling multiple login options gives customers flexibility and can increase registration rates.
How do I view and manage user accounts?
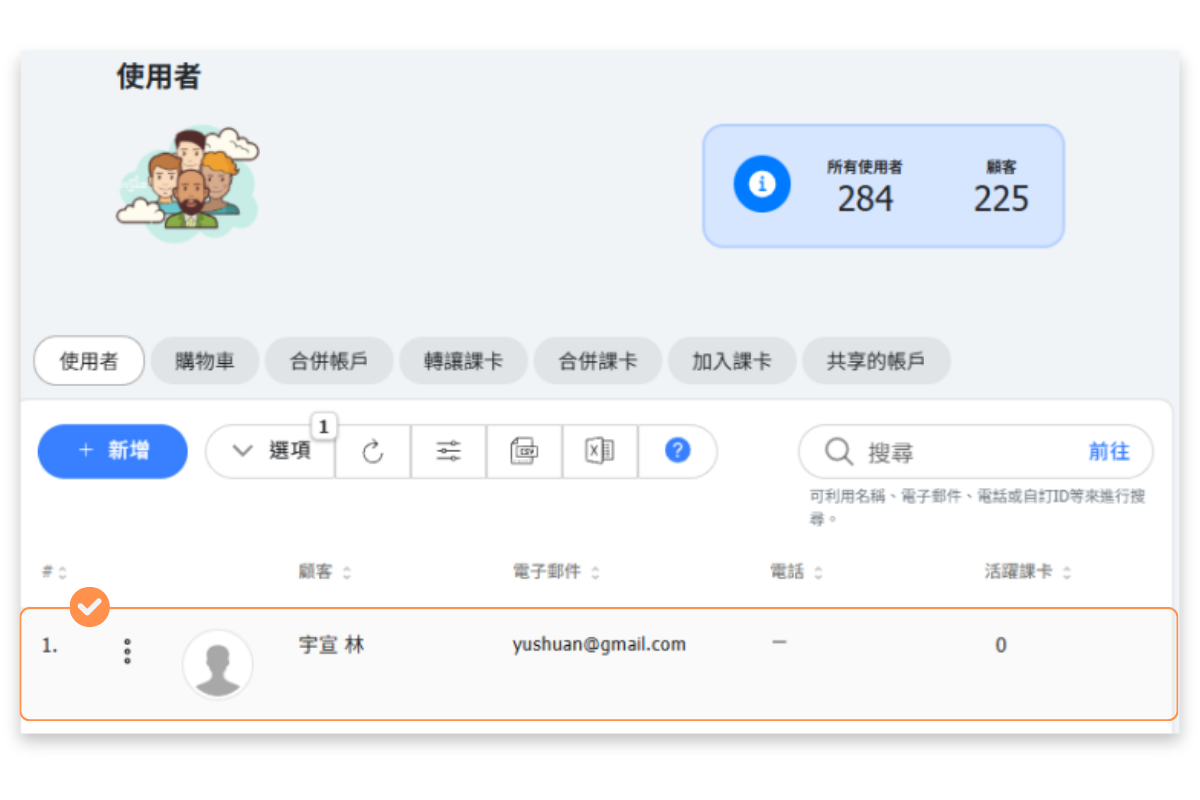
The Users page provides a comprehensive view of all accounts:
Viewing users:
- Go to Users in the admin menu
- See the summary showing total users and customers
- Browse the list showing name, email, phone, active passes, and upcoming classes
Finding specific users:
- Use the Search box to find by name, email, phone, or custom ID
- Use OPTIONS to filter and sort the list
- Click on any user to view their full profile
User list columns:
| Customer | Name and profile picture |
| Email address | Contact email |
| Phone | Phone number |
| Active passes | Number of current valid passes |
| Upcoming classes | Scheduled reservations |
Additional tabs: Shopping cart, Merge Users, Transfer Pass, Rollover Pass, Add Pass, Shared Accounts
What's the difference between admin-created and self-registered accounts?
Both methods create valid user accounts, but there are some differences:
| Admin-Created | Self-Registered | |
|---|---|---|
| Password | Not set - user must reset | Set during registration |
| Email verification | Not required | Required (for email method) |
| Profile info | Admin enters what they know | Customer enters their own |
| Immediate access | User needs password reset first | Can log in immediately |
| Best for | Existing customers, staff, bulk imports | New customers finding you online |
When to use admin creation:
- Adding existing customers from another system
- Creating staff and instructor accounts
- Registering customers who call or visit in person
When to use self-registration:
- New customers discovering your business online
- Reducing admin workload for high-volume signups
- 24/7 registration availability
Is an account required for booking?
Yes. By creating an account, you will not only be able to complete your booking but also view your reservation history and modify your appointment time.