
What Are Custom Features?
Custom features are optional add-ons that extend your booking system beyond its core functionality. They allow you to tailor the system to your specific business needs.
Feature Categories:
- Essentials - Must-have features for your business
- Enhanced Operations - Tools to streamline your daily operations
- Membership Management - Features for managing customer memberships and passes
- Booking Management - Advanced booking controls and options
- Marketing - Tools for promotions, referrals, and customer engagement
Key Points:
- Some features are Always Free (like Client Login)
- Some features can be purchased individually with annual pricing
- The number of custom features(points) you can enable depends on your subscription plan
- You can view your current usage at the top of the Custom Features page (e.g., "49 / ∞")
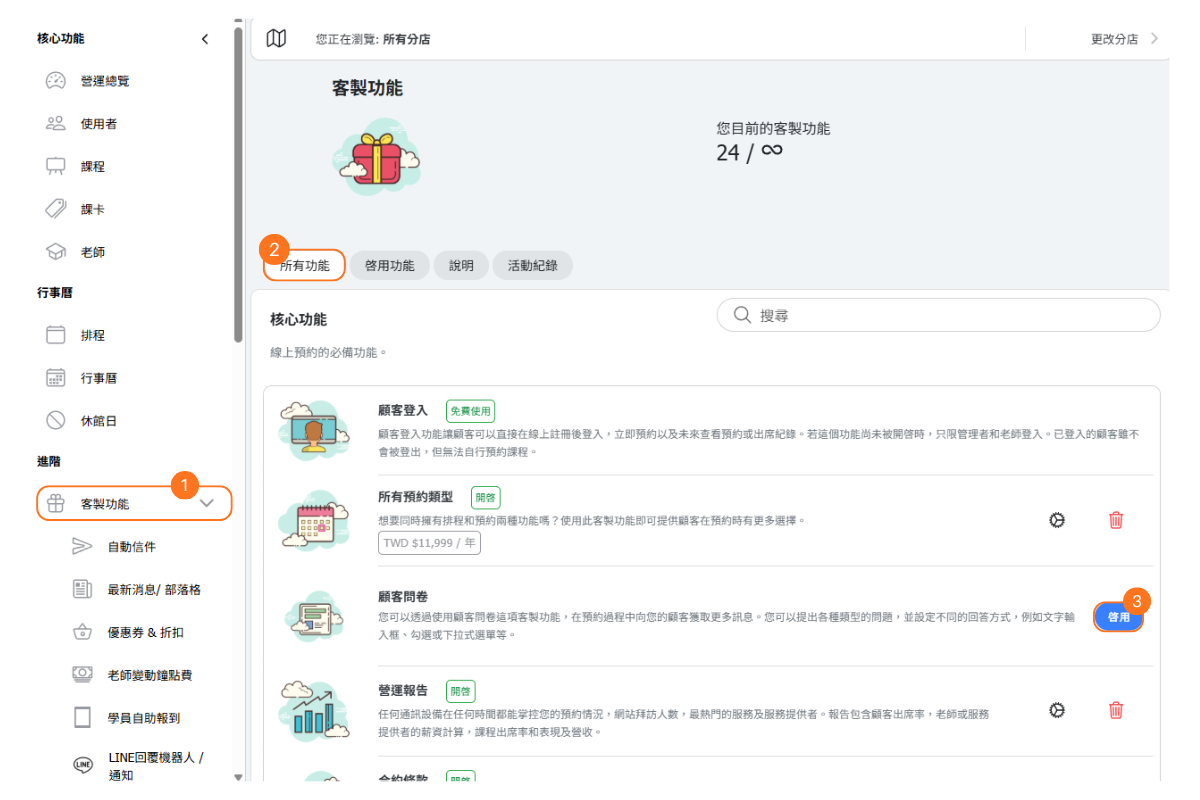
How to Find and Browse Custom Features
To access your custom features:
- Click Custom Features in the left sidebar menu under "Advanced"
- Select All Features to see the complete list
Page Navigation Tabs:
- All Features - Browse all available custom features organized by category
- Activated - View only the features you currently have enabled
- How It Works - Learn about how custom features and plans work
- Log - See a history of feature activations and deactivations
Feature Status Labels:
- ALWAYS FREE - Available at no cost on all plans
- ENABLED - Currently active on your account
- TRIAL - Currently in trial period
Tip: Use the Search box to quickly find specific features by name or keyword.
[nstructions]
- Click “Custom Features”.
- Select the “All Features” tab.
- Click “Enable”.
- Click to enter the feature settings page.
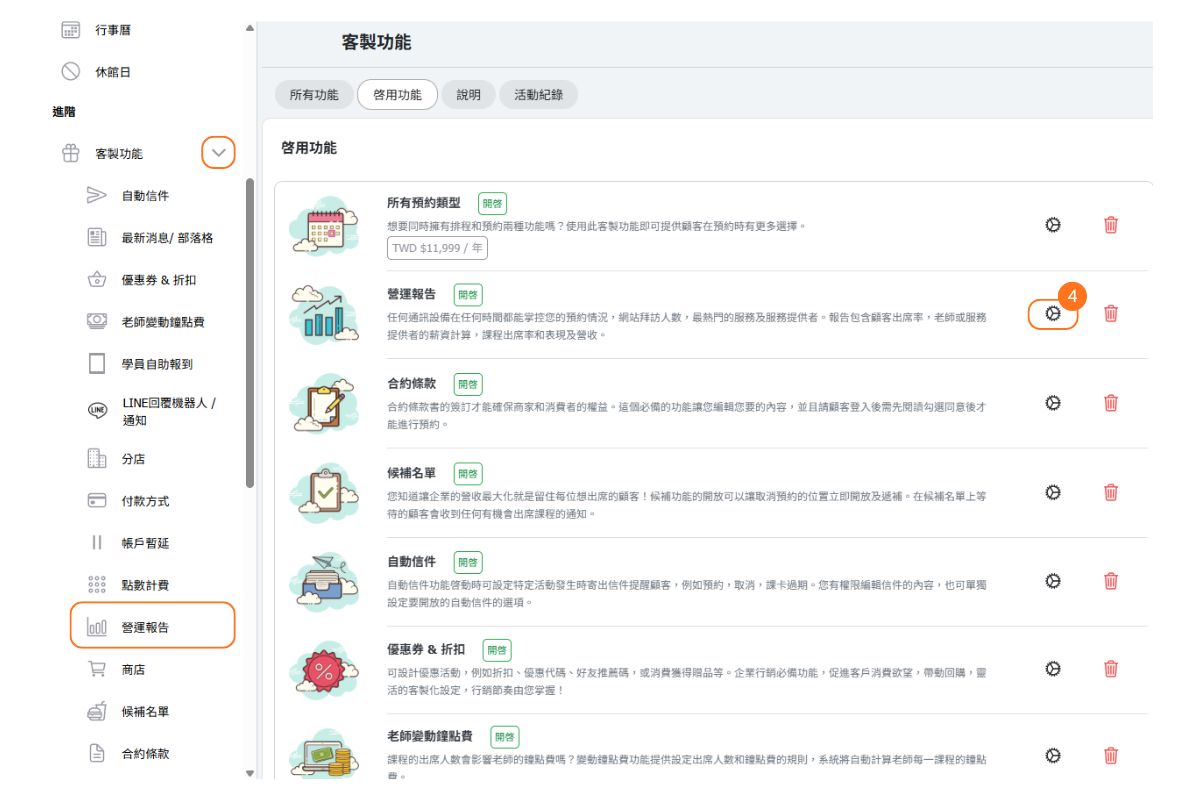
How to Enable a Custom Feature
Enabling a custom feature is straightforward:
- Navigate to Custom Features > All Features
- Browse or search for the feature you want
- Click the Enable button on the feature card
- The feature will be activated immediately
After Enabling:
- The feature status will change to ENABLED
- A settings icon (gear) will appear, allowing you to configure the feature
- A delete icon (trash) will appear if you want to disable it later
- Your custom feature count will increase (shown at the top of the page)
Important: Make sure you have available custom feature slots in your plan before enabling. If you've reached your limit, you'll need to either disable another feature or upgrade your plan.
How to Try a Feature with a Free 7-Day Trial
Not sure if a feature is right for your business? You can try most custom features for free before committing!
How the Trial Works:
- Each feature can be trialed once per account
- The trial lasts for 7 days
- You get full access to all feature functionality during the trial
- The trial does not count against your plan's custom feature limit
- No payment information required to start a trial
To Start a Trial:
- Find the feature you want to try
- Look for the Try Free for 7 Days or Start Trial button
- Click to activate the trial
- The feature will show a TRIAL badge with remaining days
After the Trial Ends:
- The feature will be automatically disabled
- Any settings or data created during the trial will be preserved
- You can enable the feature permanently if you have an available slot or upgrade your plan
Note: Trial availability may vary by feature. Some features marked "Always Free" don't need a trial.
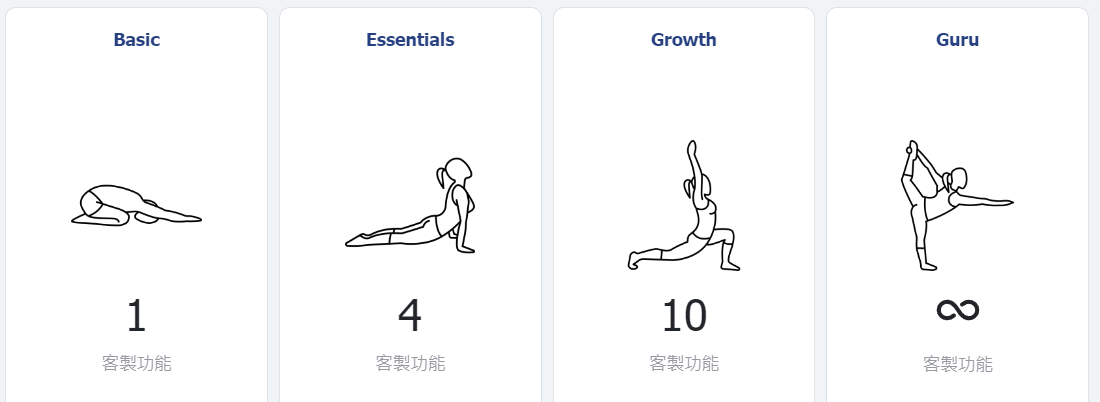
Understanding Plan Limits: How Many Features Can I Enable?
The number of custom features you can enable depends on your subscription plan:
| Plan | Custom Features | Bookings/Month |
|---|---|---|
| Basic | 1 | +400 |
| Essentials | 4 | +600 |
| Growth | 10 | +1000 |
| Guru | Unlimited (∞) | +1500 |
Check Your Current Usage:
At the top of the Custom Features page, you'll see "Your custom features: X / Y" where:
- X = Number of features currently enabled
- Y = Maximum features allowed by your plan (or ∞ for unlimited)
Note: "Always Free" features do not count against your limit.
How to Upgrade Your Plan for More Features
If you need more custom features than your current plan allows, you can upgrade to a higher plan:
- Go to the Shop page (in the left sidebar under "General" or via Settings)
- Compare the available plans and their custom feature limits
- Choose your preferred billing period (1 month, 6 months with 5% off, or 12 months with 10% off)
- Click the shopping cart icon to add to cart
- Complete the checkout process
Plan Upgrade Benefits:
- Immediate access to additional feature slots
- Increased monthly booking capacity
- Better value with longer billing periods
Alternative: Purchase Individual Features
Some features can be purchased individually with annual pricing, separate from your plan limits. Look for pricing displayed on feature cards (e.g., "TWD $11,999 / year"). This is useful if you only need one specific premium feature.
How to Disable a Custom Feature
If you no longer need a feature or want to free up a slot for another feature:
- Go to Custom Features > All Features or Activated
- Find the feature you want to disable
- Click the trash icon (delete) on the feature card
- Confirm the deactivation
What Happens When You Disable:
- The feature will be immediately deactivated
- Your custom feature count will decrease, freeing up a slot
- Settings and data associated with the feature are typically preserved
- You can re-enable the feature later if needed
Important Considerations:
- Disabling a feature may affect active workflows (e.g., disabling Automated Emails stops scheduled emails)
- Check if any other features depend on the one you're disabling
- Consider the impact on your customers' experience before disabling customer-facing features
FAQ: What happens to my data if I disable a feature?
When you disable a custom feature, your data is typically preserved:
- Settings - Your configuration settings are saved and will be restored if you re-enable
- Historical Data - Reports, logs, and records created by the feature remain accessible
- Customer Data - Any customer information collected (e.g., intake form responses) is retained
However, active processes will stop:
- Automated emails will stop sending
- Active integrations will disconnect
- Scheduled tasks will pause
If you're unsure about a specific feature, we recommend testing with a trial first or contacting support before disabling critical features.
FAQ: Can I use the same feature trial again?
No, each feature can only be trialed once per account.
The 7-day free trial is a one-time opportunity to test a feature before committing. This policy ensures fair usage of the trial system.
If your trial has ended and you want the feature:
- Check if you have available custom feature slots in your plan
- If yes, simply enable the feature permanently
- If no, consider upgrading your plan or disabling another feature to free up a slot
- Some features can also be purchased individually with annual pricing
Tip: Make the most of your trial period! Use all 7 days to thoroughly test the feature and ensure it meets your business needs.
FAQ: Which features should I enable first?
The best features to start with depend on your business type, but here are common recommendations:
Essential for Most Businesses:
- Client Login (Always Free) - Allows customers to register, book, and view their history
- Reports - Track attendance, revenue, instructor performance, and more
- Intake Form - Collect important information from customers during registration
For Studios with Classes:
- All Bookings - Enable both appointments and scheduled classes
- Waiting List - Manage full classes and fill cancellations automatically
- Automated Emails - Send booking confirmations and reminders
For Growing Businesses:
- Online Payment - Accept payments through the booking system
- Coupons & Discounts - Run promotions and referral programs
- Multiple Locations - Manage all your branches from one dashboard
Tip: Start with the essentials, then add features as your business needs evolve. You can always try features for 7 days before committing!